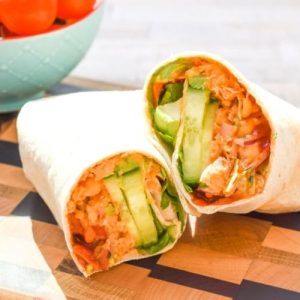
Spicy, creamy, and satisfyingly fresh, these Sriracha Chickpea & Avocado Wraps are a perfect plant-based meal for busy days.
Packed with protein-rich chickpeas, heart-healthy avocado, and fiber-filled veggies, they deliver lasting energy and bold flavor in every bite.
With no cooking required, this easy wrap is ideal for meal prep, quick lunches, or wholesome on-the-go eating — nutritious, vibrant, and effortlessly delicious.
Sriracha Chickpea & Avocado Wrap
Equipment
- 1 large mixing bowl
- 1 fork or potato masher
- 1 cutting board
- 1 sharp knife
- 1 spoon (for mixing and spreading)
Ingredients
- 2 large flour tortillas
- 240 g cooked chickpeas drained and rinsed (from a 400 g can)
- 1 handful fresh herbs basil, parsley, chives, or dill, chopped
- ½ small red onion finely chopped
- 2 tablespoons vegan mayonnaise
- 2 tablespoons sriracha plus 2 teaspoons for drizzling
- 2 teaspoons lemon juice
- 1 teaspoon dried dill
- 1 teaspoon garlic powder
- 1 pinch salt and black pepper
- 8 slices cucumber
- ½ medium avocado sliced
- 1 handful mixed salad leaves
Instructions
- Prepare the Chickpeas for Mashing: Start by draining and rinsing the chickpeas thoroughly under cold running water to remove any brine or excess starch. Transfer the chickpeas to a large mixing bowl. Using a fork or a potato masher, begin to mash them gently. Press down until most chickpeas are crushed but not completely smooth — a few whole or partially mashed pieces will add a nice texture and bite to your wrap. The goal is to achieve a chunky, spreadable consistency rather than a puree.
- Build the Creamy Sriracha Mixture: Once the chickpeas are mashed to your liking, add the finely chopped red onion to the bowl. Follow with vegan mayonnaise, sriracha, lemon juice, garlic powder, dried dill, and a pinch of salt and black pepper. If using fresh herbs like basil, parsley, or chives, chop them finely and add them in at this stage as well. Using a spoon or spatula, mix everything together thoroughly until all ingredients are well combined and coated. The mixture should look creamy, slightly spicy, and aromatic, with bits of herbs and onions visible throughout.
- Taste and Adjust the Seasoning: Before assembling your wraps, take a small taste of the chickpea filling. Adjust the flavor as needed — add more sriracha for extra heat, a touch more lemon juice for brightness, or an extra pinch of salt and pepper to enhance the overall taste. The balance should be creamy, tangy, and spicy all at once.
- Prepare the Fresh Fillings: On a cutting board, slice the cucumber into thin, even rounds and set them aside. Halve and peel the avocado, then cut it into smooth, even slices. Rinse and pat dry your salad leaves so they remain crisp and fresh. Arrange all your fillings within easy reach to make the assembly process quick and tidy.
- Assemble the Wrap Base: Lay one flour tortilla flat on a clean work surface or plate. Spoon about half of the chickpea mixture onto the center of the tortilla, positioning it about three-quarters of the way up the wrap and leaving a clean border around the edges. Shape the filling into a horizontal “sausage-like” line to make wrapping easier and prevent spillage. Repeat with the second tortilla.
- Add Crunch and Creaminess: Top the chickpea filling with several slices of cucumber for a refreshing crunch. Next, layer the avocado slices evenly over the cucumber. The avocado’s creamy texture perfectly balances the chickpea mixture’s spice and tang. Finally, add a generous handful of mixed salad leaves for freshness, color, and added nutrition.
- Drizzle and Enhance the Flavor: For an extra kick, drizzle about a teaspoon of sriracha sauce over the top of the fillings on each wrap. If you prefer a milder flavor, you can use sweet chili sauce instead, which adds a gentle sweetness without overpowering the other ingredients.
- Roll the Wrap Securely: To roll, fold the sides of the tortilla slightly inward over the filling, then bring the bottom edge up and roll tightly toward the top, keeping everything snug inside. Apply light pressure as you roll to help the wrap hold its shape. If the tortilla feels dry or stiff, you can warm it briefly in a dry skillet for a few seconds to make it more pliable before wrapping.
- Slice and Serve Fresh: Once the wraps are rolled, use a sharp knife to slice each one in half diagonally. This not only makes them easier to eat but also gives them an appealing, café-style presentation. Serve immediately for the freshest texture and flavor. The wraps can be enjoyed as they are, or paired with a small side salad, chips, or a light soup for a complete meal.
- Make Ahead or Store for Later: If you plan to make these wraps ahead of time, you can prepare the chickpea filling up to three days in advance and keep it refrigerated in an airtight container. Assemble the wraps just before serving to keep the tortillas from becoming soggy. For meal prep, store the filling and veggies separately and assemble fresh each day — it’s the perfect grab-and-go lunch solution.
Notes
- The chickpea and sriracha filling can be prepared up to 3–4 days ahead and stored in an airtight container in the refrigerator.
- For meal prep, keep the wraps unassembled until serving time to prevent sogginess.
- You can adjust the spice level easily — add extra sriracha for more heat or swap it for sweet chili sauce for a milder, tangier flavor.
- Use fresh herbs for a bright, fragrant taste. Dill, parsley, and chives work beautifully with chickpeas and avocado.
- To make the wrap gluten-free, use gluten-free tortillas or large lettuce leaves for a lighter, low-carb alternative.
- If you prefer extra creaminess, mix in a spoonful of mashed avocado directly into the chickpea filling.
Chef’s Secrets for Perfect Texture and Flavor
The secret to a truly satisfying chickpea wrap lies in balance — both in flavor and texture.
When mashing the chickpeas, aim for a mix of creamy and chunky pieces to create contrast in every bite.
Using a fork or masher gives you more control than a food processor, ensuring you don’t end up with a paste.
Fresh herbs are also key; they bring out the natural nuttiness of the chickpeas while enhancing the heat from the sriracha.
Always season generously with salt, pepper, and lemon juice — these simple touches elevate the flavor and make it taste professionally crafted.
For the best wraps, assemble them just before serving so the tortillas stay soft and fresh, and the vegetables maintain their crispness.
Serving Suggestions for Every Occasion
These wraps are wonderfully versatile and can fit into almost any mealtime.
Serve them as a light lunch, a quick post-workout meal, or even a picnic favorite.
They pair beautifully with simple sides such as sweet potato fries, roasted veggie chips, or a refreshing cucumber salad.
For an extra burst of flavor, drizzle a little vegan ranch or tahini dressing on top before rolling.
If serving guests, slice the wraps into bite-sized pieces and secure them with toothpicks for an easy party appetizer.
For a heartier dinner option, pair them with a warm bowl of tomato soup or lentil stew — the spicy, creamy filling complements both cold and hot accompaniments effortlessly.
Storage Tips to Keep Wraps Fresh
For the best quality, store the chickpea filling separately from the tortillas and fresh vegetables.
Place the prepared filling in an airtight container and refrigerate it for up to 3 to 4 days.
When ready to eat, simply spread the filling on fresh tortillas and add the toppings.
If you must store assembled wraps, wrap them tightly in parchment paper or foil, and refrigerate for up to 24 hours — this keeps them firm and prevents the tortilla from drying out.
Avoid freezing the wraps, as the avocado and salad leaves lose their texture once thawed.
To refresh a slightly chilled wrap, warm it briefly in a skillet or sandwich press for 30 seconds to bring back its softness.
Frequently Asked Questions
1. Can I make the filling without sriracha?
Absolutely! If you’re sensitive to spice or prefer a milder taste, you can replace sriracha with sweet chili sauce, smoky paprika, or even a touch of hot sauce mixed with ketchup.
The goal is to maintain that tangy-sweet-spicy balance, even without the heat.
2. What other vegetables can I add?
Feel free to customize your wrap with any crisp vegetables you enjoy. Shredded carrots, sliced bell peppers, baby spinach, or arugula all add color and crunch.
For extra protein and flavor, you can even toss in roasted tofu or tempeh strips.
3. How can I make the wraps more filling?
To boost the meal’s heartiness, add quinoa, brown rice, or lentils to the chickpea mixture. This not only increases the protein and fiber content but also helps make the wraps more satisfying for a main course meal.
4. Can I use a different sauce instead of mayo?
Yes, vegan mayo gives creaminess, but you can easily substitute it with plain vegan yogurt, tahini, or mashed avocado. Each option adds a unique flavor and keeps the filling rich without being heavy.
5. Are these wraps suitable for meal prep?
Definitely. The chickpea mixture is perfect for meal prepping. You can make it in bulk, refrigerate it for several days, and assemble fresh wraps as needed.
Just store the filling, avocado, and greens separately to keep everything crisp and flavorful.