Indulge in a rich, chocolatey treat that’s both wholesome and satisfying!
This almond flour chocolate bread is naturally gluten-free, packed with plant-based protein, fiber, and healthy fats, making it a smart everyday choice.
Quick to prepare, low in saturated fat, and perfect for breakfast, snacks, or meal prep, it delivers decadent flavor without compromising nutrition.
Healthy Almond Flour Chocolate Bread
Equipment
- 1 x 9” x 5” loaf pan
- 1 x Digital thermometer
- Mixing bowls (2 large)
- Whisk or spatula
Ingredients
- 3 large eggs
- ⅔ cup pure maple syrup
- 2 Tbsp avocado oil
- 2 tsp vanilla extract
- 2 cups finely ground almond flour
- ½ cup tapioca flour
- ½ cup unsweetened cocoa powder or raw cacao powder
- ½ tsp sea salt
- 1 tsp ground cinnamon
- 2 tsp baking powder
- ⅔ cup chocolate chips optional
Instructions
- Preheat and Prepare Your Pan: Begin by setting your oven to 350°F (175°C) so it reaches the perfect baking temperature while you prepare the batter. Line a 9” x 5” loaf pan with parchment paper, making sure the edges extend over the sides. This makes removing the bread effortless once baked and ensures nothing sticks. If you prefer, lightly grease the pan first with a small amount of avocado oil to prevent sticking further.
- Combine the Wet Ingredients: In a large mixing bowl, crack the 3 large eggs and whisk them lightly until the yolks and whites are fully blended. Add ⅔ cup of pure maple syrup for natural sweetness, 2 tablespoons of avocado oil for moisture and healthy fats, and 2 teaspoons of vanilla extract for a fragrant, rich aroma. Stir thoroughly until the mixture becomes smooth, slightly glossy, and uniform in consistency. This is your wet base, which will help bind the bread and create a tender texture.
- Prepare the Dry Ingredients: In a separate large bowl, gather the dry components. Add 2 cups of finely ground almond flour for structure and protein, ½ cup of tapioca flour to give the bread lightness and chewiness, and ½ cup of unsweetened cocoa or raw cacao powder for intense chocolate flavor. Then, sprinkle in ½ teaspoon of sea salt to enhance all flavors, 1 teaspoon of ground cinnamon for subtle warmth, and 2 teaspoons of baking powder to help the bread rise. Use a whisk or spatula to thoroughly combine until no lumps remain, and the mixture appears uniform and velvety.
- Integrate Wet and Dry Mixtures: Gradually pour the dry ingredients into the wet mixture, folding gently with a spatula. Mix carefully until the batter is smooth, thick, and evenly combined, making sure not to overmix. Overmixing can create a dense texture, so aim for just enough stirring to incorporate everything evenly. At this stage, fold in ⅔ cup of chocolate chips if desired, adding bursts of melty chocolate throughout the bread.
- Transfer to the Pan: Spoon the batter into the prepared loaf pan, spreading it evenly with a spatula. If you like, sprinkle a few extra chocolate chips on top for a visually appealing finish and an extra chocolate punch. Smooth the top gently to create an even surface that will bake uniformly.
- Initial Covered Baking: Cover the loaf pan loosely with aluminum foil to prevent the top from browning too quickly while the interior cooks. Place it in the center of your preheated oven. Bake covered for 30 minutes. This initial step allows the bread to rise and set evenly, ensuring the interior becomes fully cooked without burning the top.
- Uncover and Continue Baking: After 30 minutes, carefully remove the aluminum foil. Continue baking for another 15–20 minutes. Keep an eye on the loaf—the top should appear firm, slightly domed, and set, without being dry or cracked. The combination of covered and uncovered baking ensures a tender crumb inside while achieving a slightly firmer, appealing crust.
- Check for Doneness: Insert a digital thermometer into the center of the bread to check for doneness. Quick breads are ideally baked to an internal temperature of 190°F (88°C). If the thermometer reads lower, continue baking for a few more minutes, checking frequently to prevent overbaking. This ensures the bread is moist yet fully cooked.
- Cooling for Perfect Slices: Remove the loaf from the oven and let it cool in the pan for 10–15 minutes. Then transfer it to a wire rack to reach room temperature completely. Cooling is crucial; slicing while warm can cause the bread to crumble and lose its shape. Allowing it to cool ensures each slice is clean, neat, and holds together beautifully.
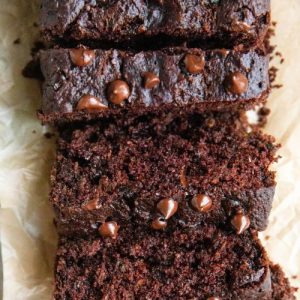
- Serving and Enjoying: Once cooled, slice the bread into your desired thickness, typically about 1 inch per slice. Enjoy it plain or with a smear of nut butter for extra richness. This bread makes a perfect breakfast, snack, or even a healthy dessert. Store leftovers in an airtight container for up to 5 days, or freeze slices individually for convenient grab-and-go portions.
Notes
- For best results, use finely ground almond flour. Coarser almond meal may result in a denser texture.
- Tapioca flour is essential for structure and chewiness; avoid substituting with regular flour if you want the same light texture.
- Always allow the bread to cool completely before slicing to prevent crumbling.
- Chocolate chips are optional but highly recommended for extra indulgence and texture.
- This recipe is naturally gluten-free and low in saturated fat, making it suitable for a variety of dietary preferences.
- A digital thermometer ensures perfect doneness; avoid relying solely on baking times as ovens vary.
Chef’s Secrets For Perfect Bread
To achieve a tender, moist chocolate bread, balance is key.
Make sure your wet ingredients are well-combined before adding the dry ingredients to avoid clumps.
Gently fold the chocolate chips in last to prevent sinking.
Covering the bread during the first part of baking locks in moisture, while uncovering ensures a light crust.
Using a digital thermometer eliminates guesswork, guaranteeing every loaf is perfectly cooked without drying out.
For extra richness, try swapping half of the avocado oil with unsweetened applesauce for a slightly fruity undertone.
Serving Suggestions To Impress Guests
This chocolate bread is versatile and can be enjoyed in multiple ways.
Serve slices warm with a spread of almond butter or peanut butter for breakfast.
For a decadent snack, add a dollop of Greek yogurt or a drizzle of honey.
Pair with coffee, chai, or a hot chocolate for a cozy treat.
For entertaining, cut into smaller squares and top with fresh berries or a sprinkle of powdered sugar to elevate presentation while keeping the flavors intact.
Storage Tips For Maximum Freshness
To maintain moisture and flavor, store the cooled bread in an airtight container at room temperature for up to 3 days.
For longer storage, wrap individual slices in parchment paper and place them in a freezer-safe bag; they will last up to 2 months in the freezer.
To serve frozen slices, thaw at room temperature or warm briefly in a toaster oven.
Avoid refrigerating for extended periods, as this can dry out the bread and affect texture.
Frequently Asked Questions
1. Can I make this bread nut-free?
Yes! Substitute almond flour with sunflower seed flour or pumpkin seed flour in equal measure. Keep in mind that the flavor will change slightly, and the texture may be a little denser.
2. Can I replace maple syrup with another sweetener?
Absolutely. Honey or agave syrup works well, though the taste may be slightly different. Avoid granulated sugar as it can alter moisture content and texture.
3. Why did my bread sink in the middle?
Overmixing the batter or opening the oven too early can cause the bread to collapse. Always fold gently and follow baking times carefully. Checking doneness with a thermometer ensures the bread is fully set.
4. Can I add extra flavors or mix-ins?
Yes! Chopped nuts, dried fruit, or even a swirl of peanut butter can be added to enhance texture and taste. Just avoid adding too much liquid, as it can affect the baking consistency.
5. How do I get cleaner slices?
Allow the bread to cool completely before slicing. Use a serrated knife and make slow, gentle sawing motions to prevent crumbling. For extra neat slices, chill the loaf slightly in the freezer for 10–15 minutes before cutting.