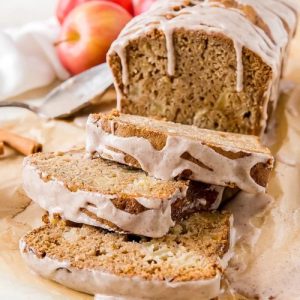
This apple cider bread brings cozy fall flavors to your kitchen with every slice.
Fresh apples, reduced cider, and warm spices create a loaf that’s moist, tender, and naturally satisfying.
With fiber from apples, moderate protein from eggs, and less saturated fat than many sweet breads, it’s a wholesome choice for everyday baking.
Easy to prepare, it makes a wonderful snack, breakfast, or dessert—and tastes even better the next day.
Apple Cider Bread
Equipment
- 1 kitchen scale
- 1 medium saucepan
- 1 mixing whisk
- 1 hand mixer
- 2 medium mixing bowls
- 1 rubber spatula or large spoon
- 1 9×5 inch Loaf Pan
- 1 Wire Cooling Rack
Ingredients
For the Apple Cider Bread:
- 1 cup 240 ml fresh apple cider, reduced to ½ cup
- 2 cups 250 g all-purpose flour
- 1 teaspoon baking powder
- 1 teaspoon baking soda
- 1 teaspoon salt
- 1 teaspoon ground cinnamon
- ½ teaspoon ground cloves
- 6 tablespoons 100 g unsalted butter, room temperature
- ½ cup 112 g granulated sugar
- ½ cup 100 g light brown sugar, packed
- 2 large eggs room temperature
- 2 ¼ cups about 3 small apples, peeled, cored, and chopped
- 1 tablespoon 15 ml fresh lemon juice
For the Cinnamon Glaze:
- ½ cup 60 g powdered sugar
- ½ teaspoon ground cinnamon
- 2 –4 teaspoons whole milk
Instructions
- Prepare the oven and pan: Set your oven to 350°F (175°C) so it has time to heat fully before the batter is ready. Lightly grease a 9×5-inch loaf pan with butter or nonstick spray, then sprinkle in a small amount of flour, tapping out the excess. This coating prevents sticking and helps the bread release smoothly after baking. Place the prepared pan aside until needed.
- Reduce the apple cider: Pour 1 cup (240 ml) of fresh apple cider into a medium saucepan and set it over medium heat. Allow the cider to simmer gently, stirring once or twice, until it reduces by half to about ½ cup (120 ml). This will take 10–15 minutes and will create a thicker, more concentrated liquid. Transfer the reduction to a bowl and let it cool completely before using it in the batter.
- Mix the dry ingredients: In a medium mixing bowl, whisk together the all-purpose flour, baking powder, baking soda, salt, ground cinnamon, and ground cloves. Whisking blends everything evenly and prevents clumps of baking powder or spices from appearing in the batter later. Set this bowl aside while you prepare the wet mixture.
- Cream the butter and sugars: In a large mixing bowl, combine the softened butter, granulated sugar, and brown sugar. Beat with a hand mixer on medium speed until the mixture becomes light, fluffy, and creamy—about 2–3 minutes. This step is key because it traps air in the mixture, giving the bread a tender, cake-like texture once baked.
- Add the eggs: Crack the two large eggs into a small bowl first to avoid shells, then add them one at a time to the butter mixture. Beat well after each addition until the eggs are fully blended in. The batter should look smooth and slightly glossy. Eggs provide structure, moisture, and richness to the bread.
- Combine the batter with cider and flour: Alternate adding the flour mixture and the cooled cider reduction into the butter mixture, beginning and ending with the flour. Mix gently on low speed until just combined. Stop mixing as soon as no streaks of flour remain, since overmixing at this stage can make the bread tough instead of soft.
- Prepare and add the apples: In a small bowl, toss the peeled, chopped apples with lemon juice. This prevents discoloration and balances the sweetness with a hint of brightness. Using a spatula or large spoon, carefully fold the apple pieces into the batter until they are evenly distributed. Be gentle to avoid deflating the batter.
- Transfer and bake the bread: Spoon the batter into the prepared loaf pan and spread it out evenly with a spatula. Lightly tap the pan on the counter to release any trapped air bubbles. Bake on the middle rack for 55–60 minutes, or until a toothpick inserted in the center comes out clean. If the bread browns too quickly, loosely cover it with foil during the last 10 minutes of baking.
- Cool the loaf properly: Remove the pan from the oven and let the bread rest for 15 minutes in the pan. This short cooling time helps the loaf firm up and makes it easier to remove. Carefully run a butter knife around the edges, then transfer the loaf to a wire cooling rack. Allow it to cool completely—about 1½ to 2 hours—before slicing or glazing.
- Make the cinnamon glaze: In a small bowl, whisk together the powdered sugar and ground cinnamon. Add milk a teaspoon at a time until the glaze reaches a smooth, pourable consistency that isn’t too runny. Typically, 3 teaspoons of milk works perfectly. If it’s too thin, add more sugar; if too thick, add a touch more milk.
- Glaze and serve the bread: When the loaf is fully cooled, drizzle the glaze over the top with a spoon, letting it drip naturally down the sides. Allow the glaze to set for a few minutes, then slice and serve. The bread can be enjoyed plain, with a pat of butter, or alongside a warm beverage for the ultimate fall-inspired treat.
Notes
- Use Granny Smith, Honeycrisp, or Braeburn apples for the best texture and balance of sweet-tart flavor.
- Reducing the cider is essential—it concentrates the flavor and prevents excess liquid in the batter.
- Avoid overmixing the batter once the flour is added; it can make the bread dense instead of tender.
- Always let the bread cool fully before glazing, or the icing will melt into the loaf.
- This bread tastes even better the next day as the flavors meld and the texture becomes moister.
Chef’s Secrets for Perfect Results
One of the biggest secrets to achieving bakery-quality apple cider bread is in the cider reduction.
Taking the time to simmer the apple cider down to half its original volume intensifies the flavor, ensuring every bite has that deep autumn apple taste.
Another trick is to cream the butter and sugars properly until light and fluffy—this step incorporates air into the batter, which leads to a soft, tender crumb.
Finally, when folding in the apples, handle the batter gently.
This keeps the bread light while ensuring the fruit is evenly distributed and doesn’t sink to the bottom.
Serving Suggestions and Pairing Ideas
This bread is wonderfully versatile and can be enjoyed at any time of the day.
Serve it warm with a pat of butter for breakfast, or pair it with cream cheese or nut butter for extra richness.
For an afternoon treat, slice and serve alongside a hot mug of apple cider, chai tea, or black coffee—the flavors complement one another beautifully.
If you’re serving guests, add a scoop of vanilla ice cream on the side and drizzle the loaf with extra glaze for a dessert-style presentation.
It also makes a thoughtful homemade gift wrapped in parchment and twine during the holiday season.
Storage and Freezing Best Practices
To keep your apple cider bread fresh, store it in an airtight container at room temperature for up to 3–4 days.
If your kitchen is very warm, you may refrigerate it, but always bring it back to room temperature before serving for the best flavor and texture.
For longer storage, this bread freezes exceptionally well.
Wrap the cooled loaf tightly in plastic wrap and then place it in a freezer-safe bag or container.
It will keep for up to 3 months.
To enjoy, thaw overnight in the refrigerator, then slice and warm slightly in the oven or microwave for that just-baked feel.
Frequently Asked Questions
1. Can I use store-bought apple cider?
Yes! Fresh, unfiltered cider works best for rich flavor, but bottled cider will also work. Just avoid sweetened apple juice, as it doesn’t provide the same depth of flavor when reduced.
2. Do I have to peel the apples?
Peeling is recommended for the best texture, as the skin can become chewy in the bread. However, if you prefer more fiber and a rustic look, you can leave the skin on.
3. Can I make this recipe without the glaze?
Absolutely. The glaze adds sweetness and a pretty finish, but the bread itself is flavorful enough to serve on its own. You could also dust the cooled loaf with powdered sugar as a lighter alternative.
4. What if I don’t have a hand mixer?
You can use a sturdy whisk and some elbow grease to cream the butter and sugars. While a mixer makes the process faster, a whisk will still achieve good results if the butter is properly softened.
5. How can I tell if my bread is done baking?
The best way is the toothpick test—insert one into the center of the loaf, and if it comes out clean or with just a few crumbs, it’s ready.
The top should be golden brown, and the loaf should pull slightly away from the sides of the pan.