These Baked Apple Slices are a simple, wholesome dessert that combines tender, naturally sweet apples with a hint of buttery cinnamon.
Rich in fiber and naturally low in saturated fat, this dish supports digestion and heart health while satisfying your sweet tooth.
Quick to prepare and bake, it’s perfect for everyday meals or easy meal prep.
Healthy Baked Apple Slices
Equipment
- 1 large mixing bowl
- 1 Sharp Chef’s Knife
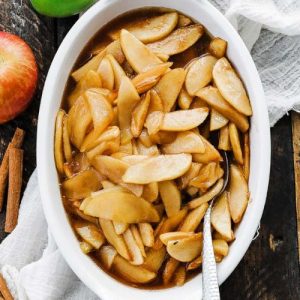
- 1 9–10″ oval casserole dish
- Measuring Cups and Spoons
- Oven
Ingredients
- 5 each Fuji apples peeled, cored, and thinly sliced
- 1 each Granny Smith apple peeled, cored, and thinly sliced
- 4 tablespoons unsalted butter melted
- ¼ cup granulated sugar
- ¼ cup light brown sugar packed
- 1 teaspoon ground cinnamon
- ¼ teaspoon sea salt
- 1 tablespoon cornstarch
Instructions
- Preheat the Oven for Even Baking: Start by preheating your oven to 350°F (175°C). Preheating ensures that the apples cook evenly from the very first minute and helps achieve that tender, caramelized texture we want. Place the oven rack in the center position for balanced heat distribution.
- Prepare the Apples for Baking: Take five Fuji apples and one Granny Smith apple. Peel each apple carefully using a vegetable peeler to remove the skins, which ensures a smooth, jammy texture in the final dish. Next, core each apple to remove the seeds and slice them thinly and uniformly—about 1/8-inch thick—so they cook at the same rate. Use a sharp chef’s knife to avoid uneven slices and keep your fingers safe.
- Mix the Apples with Sweeteners and Spices: Place the apple slices in a large mixing bowl. Pour 4 tablespoons of melted unsalted butter over the apples, making sure each slice is lightly coated. Add 1/4 cup granulated sugar, 1/4 cup packed light brown sugar, 1 teaspoon cinnamon, 1/4 teaspoon sea salt, and 1 tablespoon cornstarch. Using a large spoon or your hands, gently toss everything together until the apples are evenly coated with the buttery, cinnamon-sugar mixture. The cornstarch helps thicken the juices released during baking, creating a rich, syrupy sauce.
- Transfer Apples to Baking Dish: Select a 9–10″ oval casserole dish and lightly grease it with butter or nonstick spray. Carefully transfer the apple mixture from the bowl into the dish, spreading the slices out evenly in a single layer. This arrangement allows each slice to bake evenly and caramelize beautifully without overcrowding the dish.
- Bake Until Tender and Caramelized: Place the casserole dish in the preheated oven. Bake for 45 minutes, stirring gently every 15 minutes to ensure even cooking and caramelization. As the apples bake, they will soften and release their natural juices, which will mix with the cinnamon-butter mixture to form a delicious glaze. Use a spatula to lift and turn the slices during each stir, making sure none stick to the bottom.
- Check for Doneness: After 45 minutes, check the apples for tenderness. They should be soft, slightly golden at the edges, and coated in a glossy, lightly caramelized sauce. If you prefer your apples a little more caramelized, you can bake for an additional 5–10 minutes, watching carefully so they don’t burn.
- Serve Hot for Maximum Flavor: Remove the dish from the oven and let it cool for 2–3 minutes. Serve the baked apple slices warm, either on their own or as a topping for oatmeal, pancakes, yogurt, or ice cream. The tender, buttery slices paired with the sweet cinnamon glaze make each bite irresistibly comforting.
- Optional Flavor Enhancements: For a unique twist, consider adding a splash of bourbon, rum, or a pinch of nutmeg, allspice, or cardamom before baking. These warm flavors elevate the dessert without overpowering the natural apple sweetness.
- Storing and Reheating Leftovers: Allow any leftovers to cool completely, then transfer to an airtight container. Refrigerate for up to 4 days, or freeze for up to 2 months. To reheat, place the apples in a baking dish, cover with foil, and warm in a 350°F oven for 8–10 minutes until heated through.
- Enjoy as a Versatile Treat: These baked apple slices aren’t just for dessert—they can be served alongside roasted chicken, pork, or fish for a sweet-savory flavor twist, making them a versatile and crowd-pleasing addition to any meal.
Notes
- Choose Your Apples Wisely: A combination of Fuji and Granny Smith apples gives the perfect balance of sweetness and tartness. Fuji adds natural sweetness, while Granny Smith provides structure and a slight tang.
- Slice Uniformly: Thin, even slices ensure that all apples bake at the same rate. A sharp chef’s knife or mandoline makes this step easier and safer.
- Coating Matters: Mix the apples thoroughly with melted butter, sugars, and spices so every slice absorbs the flavors evenly. Cornstarch is essential to create a lightly thickened glaze.
- Stir During Baking: Gently turning the apples every 15 minutes helps achieve uniform caramelization and prevents sticking.
- Optional Flavor Boosts: Add warm spices like nutmeg or cardamom, or a splash of bourbon or rum to elevate the taste.
Chef’s Secrets: Insider Baking Tips Revealed
For perfectly tender baked apple slices, peeling the apples is essential—skins can become chewy and uneven during baking.
Use a 9–10” oval casserole dish for even cooking and to allow the slices to spread out without overcrowding.
If you want a slightly lighter dessert, you can reduce butter and sugar by half; the natural sweetness of the apples will still shine.
Additionally, pre-soaking the slices in a little pineapple or lemon juice prevents browning if you’re prepping ahead.
Finally, stirring the apples during baking isn’t just about caramelization—it also ensures the buttery cinnamon sauce coats every slice evenly, creating a glossy, irresistible finish.
Serving Suggestions: Creative Ways to Enjoy
Baked apple slices are incredibly versatile.
Serve them warm as a standalone dessert or pair with vanilla ice cream, Greek yogurt, or oatmeal for a wholesome breakfast treat.
For savory pairings, they complement roasted pork, chicken, or even baked fish for a sweet-savory twist.
They also work beautifully as a topping for pancakes, waffles, or crepes.
A sprinkle of chopped nuts or a drizzle of honey adds texture and visual appeal for an elegant presentation.
Storage Tips: Keep Apples Fresh Longer
To store baked apple slices, allow them to cool completely before transferring to an airtight container.
They keep in the refrigerator for up to 4 days.
For longer storage, freeze in a freezer-safe container for up to 2 months.
Thaw overnight in the fridge before reheating.
Reheat gently in a 350°F oven for 8–10 minutes, covered with foil, to preserve their soft, caramelized texture.
If you’re prepping the apples in advance, submerge raw slices in pineapple juice to prevent browning.
Frequently Asked Questions
1. Can I use other apple varieties?
Absolutely! Honeycrisp, Gala, or Braeburn apples work well. Just combine a sweeter variety with a tart one to maintain flavor balance and texture.
2. Do I have to peel the apples?
Peeling is recommended for a smoother, jammy texture, but leaving the skins on is fine if you prefer a rustic, fiber-rich version.
3. Can I make this ahead of time?
Yes! Slice the apples up to a day in advance and submerge them in pineapple or lemon juice to prevent browning. Then bake just before serving.
4. Can I reduce sugar or butter?
You can reduce both by half for a lighter dessert. The apples’ natural sweetness still shines through, but the caramelized glaze will be slightly thinner.
5. How can I serve leftovers creatively?
Use leftover baked apples as a topping for pancakes, yogurt bowls, oatmeal, or even roasted meats. They also make a delightful filling for hand pies or crêpes.