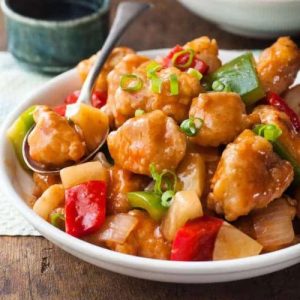
This oven-baked sweet and sour chicken delivers all the flavor of your favorite Chinese restaurant without the extra oil or deep-frying.
High in protein and paired with colorful bell peppers and pineapple, it’s a nutrient-rich, fiber-friendly meal.
Quick to prepare and perfectly balanced, this recipe is ideal for weeknight dinners, meal prep, or a satisfying low-carb twist on a classic favorite.
Baked Sweet and Sour Chicken
Equipment
- 1 large mixing bowl
- 1 ziplock bag (for coating chicken)
- 1-Large skillet
- 1-Baking tray
- Oil spray bottle
- Measuring Cups and Spoons
- Cutting Board and Knife
Ingredients
Chicken:
- 500 g 1 lb chicken breast, cut into bite-sized cubes
- ½ tsp salt
- 1 large egg or 2 small eggs, lightly beaten
- 1 cup cornstarch
- 3 –5 tbsp vegetable or canola oil
- Oil spray as needed
Stir-Fry:
- ½ tbsp oil
- 1 garlic clove minced
- 1 small onion diced
- ½ red bell pepper diced
- ½ green bell pepper diced
- 250 g 1 can, 8 oz pineapple chunks in natural juice
Sauce:
- ½ cup sugar white or brown
- ⅓ cup apple cider vinegar
- 2 –3 tbsp pineapple juice from the can
- 3 tbsp ketchup
- 1 tsp Worcestershire sauce
- 1 tsp soy sauce
- 1 tsp oyster sauce
- ¼ tsp salt
Thickener:
- 1 tbsp cornstarch + 4 tbsp water mixed to form slurry
Instructions
- Preheat Oven: Begin by preheating your oven to 200°C (390°F). This ensures that when the chicken goes in, it immediately starts baking evenly, helping achieve that golden, crispy exterior while keeping the inside tender. Line a baking tray with parchment paper or lightly spray it with oil for easier cleanup.
- Prepare the Chicken: Take the chicken breast and cut it into bite-sized cubes, roughly 2–3 cm pieces. Sprinkle the salt evenly over the chicken to enhance the flavor. In a separate bowl, lightly beat your egg(s) until smooth. Add the chicken to the bowl and gently toss to coat each piece thoroughly in the egg. Allow any excess egg to drip off before moving to the next step to avoid clumping.
- Coat Chicken with Cornstarch: Place 1 cup of cornstarch in a large ziplock bag. Working in small batches, add a handful of egg-coated chicken into the bag. Seal the bag, trapping a little air to create a balloon effect, and shake vigorously until every piece is coated evenly with cornstarch. Repeat with remaining chicken. Discard any excess cornstarch that sticks to the bag. This coating will form a delicate, crispy crust in the oven.
- Lightly Pan-Fry Chicken (Optional Browning): Heat 3–5 tablespoons of oil in a large skillet over high heat. Carefully add the chicken in a single layer, cooking in two batches if necessary. Sear each batch for about 2 minutes, turning gently so all sides get lightly golden. Remember, the chicken does not need to cook fully at this stage—just form a slightly crisp exterior. Remove the chicken and transfer it to your prepared baking tray.
- Bake the Chicken: Spray the top of the chicken lightly with oil to enhance crispiness. Place the tray in your preheated oven and bake for 15–20 minutes. During baking, the chicken will cook through and develop a crunchy, golden-brown surface without drying out. Halfway through, you can gently turn the chicken for even browning.
- Prepare Stir-Fry Vegetables: While the chicken bakes, prepare your vegetables. Heat ½ tablespoon of oil in a clean skillet over medium-high heat. Add the minced garlic and sauté for about 20 seconds until fragrant. Add the diced onion and cook for 2 minutes, stirring occasionally, until the onions become slightly translucent.
- Add Bell Peppers: Add the diced red and green bell peppers to the skillet and cook for another 1 minute, stirring frequently. The goal is to soften the vegetables slightly while retaining their bright color and crunch, which will add freshness and texture to the dish.
- Combine Sauce Ingredients: In the same skillet with the vegetables, pour in the sugar, apple cider vinegar, pineapple juice, ketchup, Worcestershire sauce, soy sauce, oyster sauce, and salt. Stir constantly to dissolve the sugar and blend the flavors. Allow the mixture to heat until it begins to bubble gently. This is the base of your sweet and sour sauce.
- Thicken the Sauce: Prepare the thickener by mixing 1 tablespoon of cornstarch with 4 tablespoons of water in a small bowl until smooth. Slowly pour this slurry into the bubbling sauce while stirring continuously. Allow the sauce to simmer for 2–3 minutes until it reaches a glossy, syrupy consistency. This step ensures the sauce coats the chicken perfectly without being runny.
- Add Pineapple Chunks: Once the sauce has thickened, add the drained pineapple pieces and stir just enough to warm them through. The pineapple adds a natural sweetness and tang, balancing the tangy and savory notes of the sauce. Avoid overcooking to preserve their juiciness.
- Toss Chicken in Sauce: Remove the baked chicken from the oven and immediately add it to the skillet with the sauce and vegetables. Gently toss to coat every piece of chicken thoroughly in the sweet and sour glaze. Ensure that each bite has a perfect balance of crispy chicken, tangy sauce, and tender vegetables.
- Serve and Garnish: Transfer the sweet and sour chicken to a serving platter. Serve hot over steamed rice or, for a low-carb option, cauliflower rice. Garnish with sliced scallions or sesame seeds for added freshness and visual appeal. This dish is best enjoyed immediately while the chicken remains crisp and the sauce is luscious.
Notes
- Use fresh chicken breast for the best texture. Thicker pieces can be cut smaller for even baking.
- Lightly shaking off excess egg before coating in cornstarch prevents clumping and ensures a crispy crust.
- If you prefer extra crunch, allow the chicken to rest 5 minutes after coating before searing.
- Pineapple juice in the sauce adds natural sweetness and tang—adjust the quantity for your preferred flavor balance.
- This recipe can easily be doubled for meal prep, and the baked chicken holds its texture well even after reheating.
Chef’s Secrets: Enhancing Flavor And Texture
The magic of this dish lies in three simple but essential ingredients Worcestershire sauce, oyster sauce, and soy sauce.
Together, they replicate the complex umami and tanginess of classic restaurant sweet and sour sauce.
Lightly pan-frying the chicken before baking is another trick—it sets the crust and locks in juices while still keeping the inside tender.
For extra depth, allow the sauce to simmer gently until it reaches a thick, glossy consistency.
Adding the pineapple chunks at the end prevents them from becoming mushy, keeping each bite perfectly balanced between tangy, sweet, and savory.
Serving Suggestions: Make Meals More Enjoyable
Serve this baked sweet and sour chicken over steamed jasmine or brown rice for a traditional meal.
For a low-carb alternative, cauliflower rice works beautifully, soaking up the sauce while keeping the dish light.
Pair with simple stir-fried greens or a side of steamed broccoli for added fiber and color.
Garnish with sliced scallions or sesame seeds for a professional finish.
Leftovers can be enjoyed cold in salads or reheated in a skillet for a quick, satisfying lunch.
Storage Tips: Keep It Fresh Longer
Store leftover chicken and sauce separately in airtight containers in the refrigerator for up to 3 days.
This helps maintain the chicken’s crispiness.
The sauce can be gently reheated on low heat, and the chicken can be briefly warmed in a skillet or oven to restore texture.
For longer storage, freeze the chicken and sauce separately in freezer-safe containers for up to 2 months.
Thaw overnight in the refrigerator and reheat slowly to preserve flavor and consistency.
Frequently Asked Questions
1. Can I use dark meat chicken instead?
Yes, thigh meat can be substituted for breast. It will be more flavorful and slightly juicier but may require a few extra minutes of baking to ensure it cooks through.
2. How do I make the chicken extra crispy?
Double-coating the chicken in cornstarch or lightly pan-frying before baking helps create a crunchier exterior. Avoid overcrowding the skillet or baking tray to prevent steaming.
3. Can I adjust the sweetness or tanginess?
Absolutely. Reduce sugar for a less sweet sauce or increase vinegar for more tang. Taste the sauce before combining with the chicken to achieve your desired balance.
4. Is this recipe suitable for meal prep?
Yes! Cooked chicken can be stored with the sauce separately for up to 3 days in the refrigerator. Pair with rice or vegetables for ready-to-go lunches or dinners.
5. Can I make this gluten-free?
Yes, substitute soy sauce with tamari and ensure oyster sauce is gluten-free. Cornstarch is naturally gluten-free, making this recipe easily adaptable without sacrificing flavor or texture.