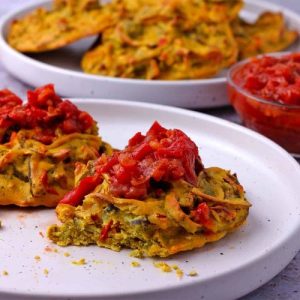
Discover a lighter, healthier twist on a classic Indian favorite with this baked vegetable pakora recipe.
Packed with plant-based protein from chickpea flour and fiber-rich vegetables, these golden bites are naturally low in saturated fat and oil-free.
Quick to prepare and oven-baked to perfection, they’re perfect for a wholesome snack, appetizer, or side dish, making them ideal for busy weekdays or effortless meal prep.
Crispy Baked Vegetable Pakoras
Equipment
- 1 large mixing bowl
- 1 whisk
- 1 Baking sheet
- Parchment paper (enough to line the tray)
- Measuring Cups and Spoons
- Knife and cutting board
Ingredients
- 1 ½ cups chickpea flour besan
- ½ teaspoon salt
- 1 teaspoon ground cumin
- 1 teaspoon turmeric powder
- 1 small red onion halved and thinly sliced
- 1 medium red chili pepper diced (optional: remove seeds for less heat)
- ½ small broccoli head about 1 cup, chopped into small florets
- ¾ – 1 cup water
Instructions
- Preheat the Oven for Perfect Crispiness: Begin by preheating your oven to 425°F (220°C). Preheating ensures that your pakoras start cooking immediately and develop a golden, crispy exterior rather than steaming in the pan. While the oven warms, line a baking sheet with parchment paper to prevent sticking and make cleanup a breeze. Make sure the parchment lies flat with no folds or wrinkles.
- Prepare the Dry Spice Mix: In a large mixing bowl, combine 1 ½ cups of chickpea flour, ½ teaspoon of salt, 1 teaspoon of ground cumin, and 1 teaspoon of turmeric powder. Stir these ingredients thoroughly to create an even spice blend. The chickpea flour provides protein and structure, while the cumin and turmeric add warmth, color, and subtle earthy flavor.
- Make a Smooth Batter: Gradually pour in ½ cup of water and begin whisking to form a smooth batter. Slowly add 1 tablespoon of water at a time until the mixture reaches a consistency slightly thicker than pancake batter. The batter should be thick enough to hold the vegetables together but still pourable. Avoid lumps by whisking gently but thoroughly.
- Test the Batter Consistency: Scoop a small spoonful of the batter onto a plate. If it spreads too thin and cannot hold its shape, it’s too runny. In this case, gradually fold in a little more chickpea flour until the batter thickens. Proper consistency is key to ensuring your pakoras remain intact during baking.
- Prepare the Vegetables: While the batter rests for a few minutes, chop and prepare the vegetables. Slice 1 small red onion in half and thinly slice it. Dice 1 medium red chili pepper, removing seeds if you prefer milder pakoras. Chop ½ a small broccoli head into small florets, about 1 cup. Ensuring all pieces are roughly uniform helps the pakoras cook evenly.
- Combine Vegetables with Batter: Gently fold the sliced onion, chili, and broccoli florets into the chickpea batter. Use a spatula or large spoon to coat the vegetables evenly with the spiced batter. Take care not to overmix, as this can make the pakoras dense rather than light and fluffy.
- Portion the Pakoras on the Baking Sheet: Using a large spoon or a small ¼-cup measuring cup, drop 6 evenly spaced mounds of the batter onto the prepared baking sheet. Leave a small gap between each portion so that the heat circulates freely, allowing each pakora to crisp properly. Smooth the tops slightly with the back of the spoon if desired.
- Bake Until Golden Brown: Place the baking sheet in the preheated oven. Bake for 15 minutes, checking halfway to ensure even cooking. The pakoras should firm up, turn a beautiful golden brown, and develop a lightly crisp crust. Avoid opening the oven frequently, as this can lower the temperature and affect texture.
- Cool Slightly Before Serving: Once baked, remove the pakoras from the oven and allow them to cool on the tray for 2–3 minutes. Cooling slightly helps the pakoras firm up even more, making them easier to handle. Serve warm for the best texture and flavor.
- Optional Serving Tips and Enhancements: Pair your baked pakoras with fresh chutney, yogurt dip, or a squeeze of lemon to enhance flavor. They also make a delightful addition to salads, wraps, or as a side for a light lunch or dinner. These pakoras can be stored in an airtight container for 4–5 days in the refrigerator or frozen for up to 3 months for later enjoyment.
Notes
- Always check the batter consistency before adding vegetables; it should be slightly thicker than pancake batter to hold the shape while baking.
- Chickpea flour absorbs moisture over time, so be ready to adjust with a tablespoon of water or flour if needed.
- Cut vegetables into uniform small pieces to ensure even cooking and a consistent texture.
- Use parchment paper to prevent sticking and help with easy cleanup.
- These pakoras are best enjoyed warm but can be reheated for a crisp snack later.
Chef’s Secrets for Crispy Pakoras
To achieve the perfect balance of crispy exterior and tender interior, preheat the oven fully before baking.
Don’t overcrowd the baking sheet; giving each pakora enough space allows hot air to circulate evenly.
Whisking the batter gradually ensures no lumps, while gently folding in vegetables preserves their shape and crunch.
For a subtle flavor boost, you can experiment with additional spices like garam masala, smoked paprika, or a pinch of chili powder.
Serving Suggestions to Impress Guests
Baked vegetable pakoras are versatile and can be served in multiple ways.
Offer them as an appetizer with a cooling cilantro-mint or tamarind chutney.
They also pair beautifully with yogurt-based dips or a squeeze of fresh lemon juice for a tangy touch.
Serve them alongside a simple salad or a light curry for a wholesome lunch or dinner.
For parties, arrange them on a platter with dipping sauces for a colorful, crowd-pleasing presentation.
Storage Tips to Maintain Freshness
Store leftover pakoras in an airtight container in the refrigerator for up to 4–5 days.
To freeze, separate them with parchment paper to prevent sticking and freeze for up to 3 months.
Reheat in a preheated oven at 350°F (175°C) until warmed through.
Cover with foil for the first 10 minutes, then uncover for the last 5 minutes to restore crispiness.
Avoid microwaving, as it can make the pakoras soggy.
Frequently Asked Questions
1. Can I use different vegetables?
Absolutely! You can substitute or add vegetables like cauliflower, zucchini, carrots, or bell peppers. Just ensure they are cut into small, uniform pieces for even baking.
2. How can I make pakoras less spicy?
Remove the seeds from chili peppers or reduce the number of chilies. You can also balance heat by serving pakoras with yogurt-based dips or chutneys.
3. Can I prepare the batter in advance?
Yes, you can prepare the dry ingredients ahead of time. Mix with water just before baking to ensure the batter maintains the right consistency. Pre-mixed batter left too long may become too thick.
4. Are baked pakoras as crispy as fried ones?
Baked pakoras are slightly less oily but still achieve a golden, firm exterior with proper oven temperature and spacing. For extra crunch, flip halfway through baking or allow the top to crisp under the broiler for 1–2 minutes.
5. Can I make this recipe gluten-free and vegan?
Yes! This recipe is naturally gluten-free, using chickpea flour as the base, and vegan since it contains no animal products. It’s a healthy, plant-based alternative to traditional fried pakoras.