These homemade banana nut muffins are soft, moist, and naturally sweetened with ripe bananas, making them a wholesome choice for breakfast or snacking.
Packed with fiber-rich fruit, heart-healthy walnuts, and warm spices, they offer a boost of plant-based protein and good fats with minimal saturated fat.
Quick to prepare, freezer-friendly, and perfectly portioned, these muffins are a convenient everyday bake for busy mornings or meal-prep snacks.
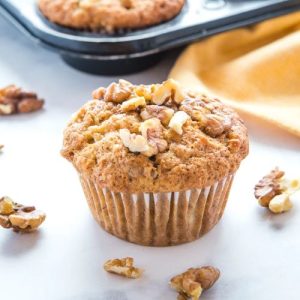
Fluffy Banana Nut Muffins
Equipment
- 1 large mixing bowl
- 1 Medium mixing bowl
- 1 wooden spoon or spatula
- 1 12-cup muffin tin
- 12 paper muffin liners (optional)
- 1 fork (for mashing bananas)
- 1 Measuring cup set
- 1 Measuring Spoon Set
- 1 cooling rack
Ingredients
For the Muffins:
- 3 large ripe bananas mashed
- ¾ cup white sugar
- 1 large egg
- ⅓ cup vegetable oil or applesauce
- 1 ½ cups all-purpose flour
- 1 teaspoon baking powder
- 1 teaspoon baking soda
- ½ teaspoon salt
- ½ teaspoon ground cinnamon
- ¼ teaspoon ground nutmeg optional
- ¾ cup walnuts chopped
For the Topping:
- ¾ cup walnuts chopped
- 2 tablespoons brown sugar
- 1 tablespoon butter melted
Instructions
- Prepare the Oven and Pan: Begin by setting your oven to 350°F (175°C) so it has enough time to fully preheat. Line a standard 12-cup muffin pan with paper liners, or if you prefer a rustic, liner-free look, generously grease each cup with butter or nonstick spray. Preparing the pan early ensures your batter can go straight in once mixed, helping the muffins rise evenly.
- Mash the Bananas Thoroughly: Place the ripe bananas in a large mixing bowl. Using a fork or potato masher, press them until smooth with only a few tiny lumps remaining. Well-mashed bananas blend better into the batter, adding natural sweetness, moisture, and flavor without leaving chunks behind. This step also activates their aroma, which will carry into your muffins as they bake.
- Blend in Sugar and Egg: To the mashed bananas, add the white sugar and the egg. Stir them together with a wooden spoon or spatula until the mixture becomes creamy and slightly glossy. The sugar dissolves into the banana puree while the egg helps bind the batter, setting the stage for a tender crumb. Make sure everything is evenly incorporated before moving on.
- Incorporate the Oil for Moisture: Pour in the vegetable oil (or applesauce if you’re using a lighter option). Mix gently until the oil disappears into the wet mixture. This ingredient ensures the muffins bake up moist and soft instead of dry. Be careful not to over-stir—mix just until the batter looks uniform and shiny.
- Combine the Dry Ingredients Separately: In a medium bowl, whisk together the flour, baking powder, baking soda, salt, cinnamon, nutmeg (if using), and ¾ cup chopped walnuts. Tossing the walnuts with the flour keeps them from sinking to the bottom during baking, while whisking the dry ingredients helps distribute the leavening agents and spices evenly. This step guarantees every bite is balanced in flavor and texture.
- Mix Wet and Dry Ingredients Together: Gradually add the dry mixture into the bowl of wet ingredients. Use a gentle folding motion—sweeping the spoon down the middle, across the bottom, and up the sides—to combine. Stop mixing as soon as no visible streaks of flour remain. Overmixing at this stage can make the muffins dense and tough, so a slightly lumpy batter is perfectly fine.
- Prepare the Crunchy Walnut Topping: In a small bowl, combine the remaining ¾ cup of walnuts, the brown sugar, and the melted butter. Stir until every nut piece is coated with the sugary glaze. This topping adds a sweet, toasty crunch to the muffins and should be mixed just before use to keep the walnuts crisp.
- Fill the Muffin Cups: Spoon the batter evenly into the 12 muffin cups, filling each one about three-quarters full. Divide the topping mixture over the muffins, sprinkling it gently across the surface. Make sure the nuts are spread out instead of piled in one spot—this helps them stay on top during baking instead of sinking into the batter.
- Bake to Perfection: Place the muffin pan in the preheated oven and bake for 20–23 minutes. The muffins are done when the tops turn a deep golden brown and a toothpick inserted into the center comes out clean or with a few moist crumbs (not wet batter). Avoid opening the oven too early, as this can cause muffins to deflate.
- Cool and Serve: Let the muffins rest in the pan for 5 minutes after baking—this allows them to firm up slightly, making removal easier. Transfer them carefully to a wire cooling rack to cool completely. Serve warm for the best flavor, or enjoy them at room temperature. These muffins pair beautifully with coffee, tea, or a glass of milk.
Notes
- Use very ripe bananas for the best flavor and natural sweetness. The riper they are, the more moist and flavorful your muffins will be.
- Mixing the walnuts with the dry ingredients prevents them from sinking to the bottom.
- Don’t overmix the batter—a few lumps are fine and will help keep the texture soft and tender.
- Swap vegetable oil for applesauce if you’d like a lighter, lower-fat option.
- These muffins freeze well, so consider making a double batch for meal prep.
Chef’s Secrets for Fluffy Muffins
The key to bakery-style muffins lies in balancing moisture and airiness.
Ripe bananas not only add natural sugar but also act as a binding ingredient that keeps the muffins soft.
When combining wet and dry ingredients, use a light hand—overmixing can lead to dense muffins instead of tender, fluffy ones.
Another tip is to start baking in a fully preheated oven, which helps the muffins rise quickly and creates a golden dome.
Finally, tossing the walnuts in flour ensures they stay suspended throughout the batter, so each bite has the perfect crunch.
Serving Suggestions for Every Occasion
These muffins are incredibly versatile and work well as breakfast, a mid-morning snack, or even dessert.
Serve them warm with a pat of butter, cream cheese, or a drizzle of honey for added indulgence.
They pair beautifully with coffee, tea, or a chilled glass of milk.
For a brunch spread, arrange them on a platter with fresh fruit and yogurt.
If you want to turn them into a more filling snack, pair a muffin with Greek yogurt or a smoothie for extra protein.
Storage Tips to Keep Them Fresh
To keep muffins soft and moist, store them in an airtight container at room temperature for up to 4 days.
If stacking, place parchment paper between layers to prevent sticking.
For longer storage, wrap each muffin individually in plastic wrap or foil and freeze them in a zip-top bag or container for up to 2 months.
When ready to enjoy, thaw at room temperature or warm in the microwave for 20–30 seconds.
Avoid refrigerating, as the cold air can dry them out quickly.
Frequently Asked Questions
1. Can I make these muffins without nuts?
Yes! You can simply leave out the walnuts or replace them with chocolate chips, sunflower seeds, or dried fruit. The muffins will still be moist and delicious.
2. What’s the best substitute for vegetable oil?
Applesauce is the most popular substitute for a lighter version, but you can also use melted coconut oil, olive oil, or even melted butter for richer flavor.
3. How do I know when muffins are done baking?
Insert a toothpick into the center of a muffin. If it comes out clean or with a few crumbs, they’re ready. If wet batter sticks to the toothpick, bake for a few minutes longer.
4. Can I double this recipe?
Absolutely. The recipe scales well—just double all ingredients and use two muffin pans. Baking time will remain the same, but make sure to rotate pans halfway through for even baking.
5. How can I make these muffins healthier?
You can reduce the sugar slightly, use whole wheat flour for added fiber, and replace oil with unsweetened applesauce or Greek yogurt. These swaps maintain great texture while boosting nutrition.