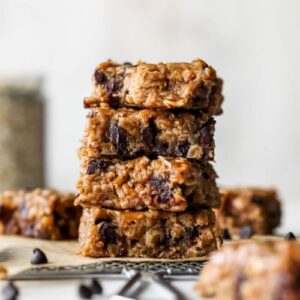
These Banana Peanut Butter Oat Bars are a wholesome, easy-to-make snack perfect for busy days.
Packed with plant-based protein, fiber-rich oats, and heart-healthy fats from peanut butter and walnuts, they keep you satisfied longer.
Naturally sweetened with bananas and maple syrup, they’re quick to prepare and ideal for meal prep, post-workout fuel, or a healthy grab-and-go treat.
Banana Peanut Butter Oat Bars
Equipment
- 1 mixing bowl
- 1 fork or potato masher
- 8×8-inch baking dish
- Parchment Paper
- Measuring Cups and Spoons
Ingredients
- 2 medium ripe bananas
- ½ cup natural creamy peanut butter
- ½ cup pure maple syrup
- 3 tbsp coconut oil melted (or avocado oil)
- ½ tsp vanilla extract
- 2 cups old-fashioned rolled oats
- 2 scoops collagen protein powder ~20g (or protein powder of choice)
- ½ cup chocolate chips or cacao nibs/dried fruit for vegan option
- ¼ cup finely chopped walnuts optional
- ¼ tsp kosher salt
Instructions
- Preheat Oven and Prepare Pan: Begin by preheating your oven to 350°F (175°C). While the oven warms, line an 8×8-inch baking dish with parchment paper. Make sure the parchment covers all sides of the pan, leaving extra overhang on the edges — this will make removing the bars easier later. Lightly press the parchment so it fits snugly into the corners of the dish.
- Mash the Bananas: Peel 2 medium ripe bananas and place them in a large mixing bowl. Using a fork or potato masher, mash them thoroughly until they form a smooth, lump-free puree. The bananas should be soft and aromatic, releasing their natural sweetness, which will serve as a foundational flavor for the bars.
- Combine Wet Ingredients: To the mashed bananas, add ½ cup of natural creamy peanut butter, ½ cup of pure maple syrup, 3 tablespoons of melted coconut oil (or avocado oil), and ½ teaspoon of vanilla extract. Using a sturdy spoon or spatula, stir gently but thoroughly until all the wet ingredients are completely combined. This mixture should be smooth, slightly glossy, and evenly blended, with no streaks of oil or peanut butter.
- Incorporate Dry Ingredients: Add 2 cups of old-fashioned rolled oats to the banana mixture. Then sprinkle in 2 scoops of collagen protein powder (approximately 20g — or any protein powder of your choice). Follow with ½ cup of chocolate chips (or cacao nibs/dried fruit if making vegan), ¼ cup finely chopped walnuts if desired, and ¼ teaspoon kosher salt. Stir gently but completely until all dry ingredients are evenly distributed and coated with the wet mixture. The result should be a thick, cohesive dough-like batter.
- Transfer to Baking Dish: Pour the prepared batter into the parchment-lined baking dish. Use a spatula or the back of a spoon to press the mixture evenly into the dish, ensuring there are no gaps or uneven areas. For extra flavor and visual appeal, sprinkle a few additional chocolate chips evenly over the top. Press them lightly into the batter so they adhere during baking.
- Bake to Perfection: Place the baking dish in the preheated oven and bake for 28 to 32 minutes. The bars should set firmly but remain soft and chewy inside. You can test for doneness by gently pressing the center — it should spring back slightly, and the edges should look lightly golden. Be careful not to overbake, as this will make the bars dry.
- Cool in Pan: Once baking is complete, carefully remove the dish from the oven. Let the bars cool in the pan for about 30 minutes. Cooling allows the bars to firm up, making them easier to slice. This step also enhances the flavor as the ingredients meld together.
- Lift and Slice Bars: Using the parchment paper overhang, gently lift the bars from the pan and place them on a cutting board. With a sharp knife, slice them into 12 even-sized bars. For a professional touch, wipe the knife clean between cuts to ensure smooth edges.
- Optional Final Touch: For a gourmet twist, sprinkle a tiny pinch of flaky sea salt over each bar before serving. This enhances the peanut butter and banana flavors while adding a delightful contrast to the sweetness.
- Store and Enjoy: Transfer the bars into an airtight container. Store at room temperature for up to 3 days, or refrigerate for up to another 3 days to extend freshness. For longer storage, wrap each bar individually in plastic wrap and freeze for up to 3 months. To enjoy frozen bars, unwrap and warm for 30–60 seconds in the microwave for a soft, fresh-baked experience.
Notes
- Use ripe bananas for natural sweetness and a moist texture — the riper, the better.
- Old-fashioned rolled oats give the best chewy texture; instant oats may make the bars softer.
- For a vegan version, substitute chocolate chips with cacao nibs or dried fruit.
- Adjust sweetness by adding a little more maple syrup if desired.
- Finely chopped walnuts add crunch and healthy fats but are optional.
- Ensure all ingredients are well-mixed but avoid overmixing to prevent dense bars.
- Lining the pan with parchment paper makes removing the bars easier and cleaner.
- Cooling bars completely before slicing gives cleaner cuts and better texture.
Chef’s Secrets: Tips For Perfect Bars
One secret to these bars’ chewy texture is not overmixing the batter — stir until the oats and wet ingredients are just combined.
Overmixing can make the bars denser.
Another tip is letting the bars cool completely before slicing; this ensures clean edges and prevents crumbling.
For an added nutritional boost, experiment with mixing seeds like chia or flaxseed into the batter, which enhances fiber and omega-3 content.
Toasting the oats briefly before mixing can also add a deeper, nutty flavor that elevates the bars.
Serving Suggestions: Delicious Ways To Enjoy
These bars are versatile and perfect for multiple occasions.
Enjoy them as a quick breakfast paired with a cup of Greek yogurt and fresh berries, or as a post-workout snack to refuel.
They also work well as an on-the-go option for busy mornings or as a healthy dessert with a drizzle of dark chocolate.
For kids’ lunchboxes, wrap individually for easy grab-and-go treats.
Pairing them with a hot herbal tea or coffee makes for a satisfying afternoon pick-me-up.
Storage Tips: Keep Bars Fresh Longer
These bars store best in an airtight container at room temperature for up to three days.
If you want to extend their shelf life, refrigerate them for up to a week — they maintain a pleasant chewy texture and develop deeper flavors.
For long-term storage, freeze them individually wrapped for up to three months.
When ready to eat, thaw at room temperature or microwave for 30–60 seconds.
This preserves both texture and flavor, giving you a convenient snack anytime.
Frequently Asked Questions
1. Can I make these bars gluten-free?
Yes! Simply ensure your oats are certified gluten-free. The rest of the recipe is naturally gluten-free.
This makes the bars a great option for gluten-sensitive individuals while still maintaining the same chewy texture and flavor.
2. Can I substitute peanut butter with another nut butter?
Absolutely. Almond, cashew, or sunflower seed butter work beautifully and provide a slightly different flavor profile. Choose a natural, creamy variety for best results to ensure smooth mixing and consistent texture.
3. How can I make these bars vegan?
To make a fully vegan version, use plant-based protein powder and replace chocolate chips with vegan chocolate or cacao nibs. Coconut oil or avocado oil already make this recipe dairy-free.
4. Can I add extra protein without changing texture?
Yes — you can add an additional half scoop of protein powder, but balance by adding a tablespoon or two more maple syrup or mashed banana to maintain moisture. This keeps the bars chewy rather than dry.
5. What’s the best way to make these bars ahead of time?
These bars are perfect for meal prep. Bake as directed, let cool completely, and store in an airtight container.
For longer freshness, freeze them individually. This makes it easy to grab a bar whenever you need a quick snack or boost of energy.