Indulge in the creamy richness of homemade Caramel Swirl Ice Cream, where velvety vanilla meets luscious ribbons of caramel.
This treat is high in protein from whole milk and eggs, offers healthy fats from cream and butter, and provides a satisfying, nutrient-rich dessert.
Quick to prepare and perfect for everyday enjoyment, it’s ideal for family-friendly dessert nights or meal-prep indulgence.
Irresistible Homemade Caramel Swirl Ice Cream
Equipment
- 1 small saucepan
- 1 medium saucepan
- 1 mixing bowl
- 1 whisk
- 1 Measuring cup (8-cup size)
- 1 Ice cream maker (2-quart capacity)
- 1 Airtight container for freezing
- Plastic wrap
Ingredients
For the Ice Cream Base:
- 1 ½ cups whole milk
- 4 large egg yolks
- ½ cup granulated sugar
- 2 ¼ cups heavy cream
- 2 tablespoons vanilla extract
For the Caramel Sauce:
- ¼ cup water room temperature
- 1 cup granulated sugar
- ½ cup heavy cream room temperature
- ¼ cup unsalted butter room temperature
- 1 teaspoon sea salt
Instructions
- Prepare Ingredients at Room Temperature: Before starting, ensure all ingredients, especially for the caramel sauce—heavy cream, butter, and water—are at room temperature. This prevents the caramel from seizing when hot sugar is added. For the ice cream base, have your milk, egg yolks, and cream ready. Gather all equipment, including saucepans, a whisk, mixing bowls, measuring cups, and your ice cream maker.
- Make the Caramel Sauce: a. Dissolve the Sugar: In a small, heavy-bottomed saucepan, combine ¼ cup water and 1 cup granulated sugar. Place the pan over medium heat, stirring constantly until the sugar fully dissolves into the water. This ensures a smooth caramel without grainy clumps.b. Boil Without Stirring: Increase the heat slightly and bring the mixture to a boil. Stop stirring at this stage—allow the sugar to caramelize naturally. Watch carefully as it changes from clear to light amber, then deep amber. This transformation usually takes several minutes.c. Add Cream Carefully: Once the sugar reaches the perfect amber color, remove the pan from heat. Slowly pour in ½ cup of room-temperature heavy cream while whisking continuously. This prevents the sugar from hardening and creates a silky, smooth caramel texture.d. Incorporate Butter and Salt: Add ¼ cup room-temperature butter, stirring gently until fully melted and combined. Finally, sprinkle in 1 teaspoon of sea salt to balance the sweetness and enhance the caramel flavor. Set aside to cool slightly while preparing the ice cream base.
- Temper the Egg Yolks:a. Whisk Eggs and Sugar: In a medium mixing bowl, combine 4 large egg yolks with ½ cup granulated sugar. Whisk vigorously until the mixture is pale, smooth, and slightly thickened.b. Heat the Milk: In a medium saucepan, warm 1 ½ cups whole milk over medium heat. Heat it carefully to about 165°F (74°C)—hot but not boiling.c. Temper the Eggs: Slowly pour about ¼ cup of the hot milk into the egg-sugar mixture, whisking constantly. Repeat until all the milk is incorporated. This gradual process prevents the eggs from scrambling.d. Return to Heat: Pour the tempered egg mixture back into the saucepan with the remaining milk. Heat again to 165°F (74°C), stirring gently until slightly thickened. Remove from heat.
- Add Cream and Vanilla: Pour the hot egg-milk mixture into an 8-cup measuring cup or large bowl. Allow it to cool slightly at room temperature, then stir in 2 ¼ cups heavy cream and 2 tablespoons vanilla extract. Whisk gently until fully combined. This creates a rich, creamy ice cream base ready for chilling.
- Chill the Ice Cream Base: Cover the mixture tightly with plastic wrap, ensuring the wrap touches the surface of the liquid to prevent a skin from forming. Refrigerate for at least 4 hours—or overnight if possible—until the mixture is very cold. Proper chilling ensures a smooth, creamy texture when churned.
- Churn the Ice Cream: a. Prepare the Ice Cream Maker: Start your 2-quart ice cream maker according to the manufacturer’s instructions.b. Pour and Churn: Slowly pour the chilled ice cream mixture into the running ice cream maker. Let it churn for 25–30 minutes until it thickens and resembles soft-serve ice cream. You’ll notice the mixture rising and the machine slowing slightly as it sets.
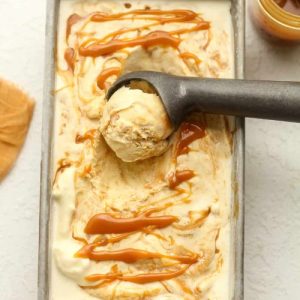
- Layer with Caramel: a. First Layer: Transfer half of the churned ice cream into a shallow, airtight container. Drizzle a few tablespoons of the caramel sauce evenly over the surface.b. Second Layer: Add the remaining ice cream on top of the caramel layer. Drizzle with additional caramel, reserving a small amount for serving. Use a spatula or the back of a spoon to gently swirl the caramel through the ice cream, creating marbled ribbons without fully blending them in.
- Freeze to Firm: Cover the container with a lid or plastic wrap and place it in the freezer. Initially, the ice cream will have a soft-serve consistency. Freeze for at least 2–3 hours, or until it reaches a firm, scoopable texture.
- Serve and Enjoy: Scoop the ice cream into bowls or cones. Drizzle the reserved caramel on top for extra indulgence. The result is a perfectly balanced dessert with creamy vanilla and sweet, buttery caramel swirls, rich in protein and healthy fats, satisfying without being overly heavy.
Notes
- Use room-temperature ingredients for smooth, lump-free caramel and creamy ice cream.
- Heavy-bottomed saucepans help prevent sugar from burning while making caramel.
- Tempering the egg yolks is essential to avoid scrambled eggs in your custard base.
- Chilling the ice cream base thoroughly ensures a rich, smooth texture after churning.
- Swirl caramel gently to maintain marbled patterns rather than fully mixing it in.
- Store extra caramel separately for drizzling when serving.
- Soft-serve consistency occurs immediately after churning; freezing firm ensures perfect scoops.
Chef’s Secrets: Tips For Perfect Ice Cream
Achieving creamy, restaurant-quality ice cream at home is all about temperature control and careful mixing.
Always use cold ingredients when churning the base, and make sure your ice cream maker’s bowl is fully frozen if required.
When creating caramel, don’t rush the cooking process—patience ensures a deep, rich flavor.
Gently folding in caramel preserves the elegant swirls instead of blending it entirely, giving a visually stunning and texturally delightful result.
For a professional touch, consider slightly warming your serving bowls before scooping; this prevents ice crystals from forming and keeps the ice cream smooth.
Serving Suggestions: How To Enjoy
Caramel Swirl Ice Cream is versatile and can be served in multiple ways.
Scoop it into bowls and drizzle extra caramel for an indulgent treat, or pair it with warm apple pie, brownies, or chocolate sauce for a decadent dessert experience.
For a lighter option, serve small portions with fresh berries or sliced bananas, which add natural sweetness and color.
This ice cream also works beautifully in milkshakes, ice cream sandwiches, or as a topping for pancakes and waffles.
Its creamy texture and sweet caramel notes make it perfect for celebrations or simple everyday indulgence.
Storage Tips: Keep Ice Cream Perfect
To maintain optimal texture and flavor, store the ice cream in an airtight container in the coldest part of your freezer.
Cover the surface with a layer of plastic wrap before sealing to minimize ice crystal formation.
Homemade ice cream is best enjoyed within 1–2 weeks, though it can be kept for up to a month.
Keep extra caramel sauce in a small airtight jar in the refrigerator for up to 2 weeks and gently rewarm before drizzling.
Avoid frequent thawing and refreezing, which can make the ice cream grainy.
Frequently Asked Questions
1. Can I use a different sweetener for the caramel?
Yes! You can substitute coconut sugar or brown sugar for a deeper, slightly richer flavor. Keep in mind that it may slightly alter the color and taste of the caramel.
2. Do I have to use an ice cream maker?
While a machine produces the smoothest results, you can manually freeze the mixture in a shallow pan, stirring every 30 minutes to break up ice crystals. This method is less creamy but still delicious.
3. Can I make this dairy-free or vegan?
Absolutely. Replace whole milk and cream with plant-based alternatives such as coconut or oat milk, and use a vegan butter substitute for the caramel. The flavor remains rich, though texture may vary slightly.
4. How can I prevent the caramel from hardening too quickly?
Always add room-temperature cream and butter slowly while whisking constantly. Heating the caramel gently and avoiding stirring during initial caramelization helps create a smooth, pourable sauce.
5. Can I prepare this in advance for parties?
Yes! The ice cream base can be made a day or two in advance and stored in the refrigerator before churning. Caramel can also be made ahead and stored separately for easy last-minute assembly.