These Carrot Cake Bliss Balls are a wholesome, naturally sweet snack packed with fiber, plant-based protein, and healthy fats.
Made with simple ingredients like oats, dates, cashews, and carrots, they’re low in saturated fat yet full of flavor.
Quick to prepare and easy to store, they’re perfect for everyday snacking, lunchboxes, or on-the-go energy bites.
20-Minute Carrot Cake Bliss Balls
Equipment
- 1 Food Processor (medium to large)
- 1 Measuring Cups & Spoons Set
- 1 Mixing Bowl (optional for rolling)
- 1 spatula
Ingredients
- 1 large carrot ~116 g, roughly chopped
- ½ cup 70 g raw cashews
- ½ cup 88 g soft pitted dates (soak 10–15 minutes if firm)
- 1½ cup 135 g old-fashioned oats
- ½ cup 45 g unsweetened shredded coconut
- ¼ cup 40 g raisins
- 1 teaspoon ground cinnamon
- ⅛ teaspoon ground ginger
- ⅓ cup 30 g unsweetened shredded coconut (optional, for rolling)
Instructions
- Prepare the Dates and Carrots: If your dates are firm or slightly dry, place them in a small bowl with warm water and let them soak for 10–15 minutes. This ensures they become soft and sticky, which helps the mixture bind together. While the dates are soaking, wash and peel your carrot. Chop the carrot into roughly 1-inch pieces so that your food processor can blend them evenly.
- Blend the Carrots: Add the chopped carrot to the food processor. Pulse or blend until the carrot is finely diced. You want a texture that’s small enough to combine well with the other ingredients but still has a bit of body so the balls don’t become mushy. Scrape down the sides of the processor to make sure all pieces are evenly chopped.
- Combine Dates and Cashews: Drain the soaked dates and add them to the carrot in the food processor. Next, add the raw cashews. Blend everything together until the mixture is finely chopped and starts to stick together. Stop occasionally to scrape down the sides of the bowl to ensure uniform mixing. The mixture should resemble a sticky, slightly coarse dough.
- Incorporate Dry Ingredients: Add the old-fashioned oats, ½ cup of shredded coconut, raisins, ground cinnamon, and ground ginger to the carrot-date-cashew mixture. Blend again until all ingredients are evenly combined. The mixture should start to clump together naturally. If it seems too dry and crumbly, add one tablespoon of water and pulse until it comes together. Be careful not to over-hydrate, as the mixture should be moldable but not wet.
- Test the Dough: Using a spatula or your fingers, press a small amount of the mixture together. It should hold its shape without falling apart. If it crumbles, blend a little more or add a tiny splash of water. If it’s too sticky, sprinkle in a small amount of oats. This ensures that your bliss balls will roll easily and maintain their shape.
- Scoop the Dough: Using a tablespoon or small cookie scoop, measure out even portions of the mixture. This helps ensure all balls are roughly the same size, which makes for consistent cooking and a beautiful presentation. Scoop the mixture directly onto a clean plate or work surface ready for rolling.
- Shape the Bliss Balls: Gently roll each portion of dough between your palms to form a smooth, round ball. Take your time to press lightly and evenly, creating a uniform shape. Repeat this process with the remaining dough. The mixture should yield 23–26 bliss balls depending on size.
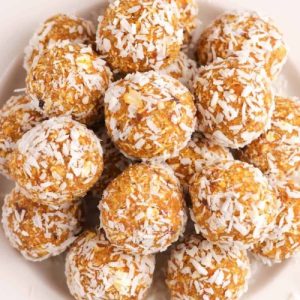
- Optional Coconut Coating: If desired, pour ⅓ cup of unsweetened shredded coconut onto a plate. Roll each ball in the coconut until fully coated. This adds extra texture, a subtle sweetness, and an attractive finish. It also helps prevent the balls from sticking together when stored.
- Chill and Set: Place the finished bliss balls on a plate or airtight container. Chill them in the refrigerator for at least 15–20 minutes to allow the flavors to meld and the texture to firm up. This step is optional but recommended, especially if you prefer a slightly firmer bite.
- Serve or Store: Serve immediately as a healthy snack or dessert. Store any leftovers in an airtight container in the refrigerator for up to 5–7 days. For longer storage, these bliss balls freeze beautifully for up to 2–3 months—just thaw for 10–15 minutes before eating.
Notes
- Always check dates for pits, even if labeled “pitted,” to avoid unpleasant surprises.
- If your dates are dry, soak them in warm water for 10–15 minutes to make them easier to blend and bind.
- Use a food processor for best results; it ensures a smooth, cohesive dough.
- Adjust the sweetness by adding more or fewer dates or raisins according to taste.
- For even rolling, lightly wet your palms to prevent sticking.
- These bliss balls can be customized—try adding chopped nuts, seeds, or a pinch of nutmeg for extra flavor.
Chef’s Secrets for Perfect Balls
To achieve the ideal texture, make sure your carrots are finely chopped and not too large—this ensures the mixture binds properly.
Using soft dates is key; if they are hard, the mixture may crumble.
Blend the ingredients until the dough just comes together—over-processing can make the balls too sticky.
For a smoother finish, roll each ball with gentle, even pressure, and optionally coat in shredded coconut for added texture.
Finally, chilling before serving helps them firm up and improves the flavor profile.
Serving Suggestions for Maximum Enjoyment
These bliss balls are incredibly versatile.
Enjoy them as a quick breakfast on the go, a mid-afternoon snack, or a guilt-free dessert.
Pair them with a cup of herbal tea, almond milk, or coffee for a satisfying treat.
They also work beautifully on a brunch board alongside fresh fruit, yogurt, or nuts.
For a festive twist, sprinkle with a little cinnamon or cocoa powder before serving, or even drizzle lightly with nut butter for an indulgent touch.
Storage Tips for Freshness
Store your bliss balls in an airtight container in the refrigerator for up to 5–7 days.
If you want to enjoy them longer, they freeze exceptionally well for 2–3 months.
Simply place them in a freezer-safe container or zip-lock bag.
To enjoy, thaw at room temperature for 10–15 minutes before eating.
Avoid leaving them out at room temperature for more than a day, as the natural ingredients may dry out or lose their shape.
Frequently Asked Questions
1. Can I make these gluten-free?
Yes! These bliss balls are naturally gluten-free if you use certified gluten-free oats. Ensure all other ingredients, like shredded coconut and raisins, are also labeled gluten-free to avoid cross-contamination.
2. Can I substitute the cashews?
Absolutely. Almonds, walnuts, or sunflower seeds can replace cashews. Keep in mind that substitutions may slightly alter the flavor and texture, but the balls will still hold together.
3. How do I make them less sweet?
Reduce the number of dates or raisins, or replace some with unsweetened dried fruit. You can also add extra oats or a few nuts to balance sweetness without compromising texture.
4. Can I make these ahead of time?
Yes, these bliss balls are perfect for meal prep. They can be made a day in advance, stored in the fridge, and still taste fresh. Freezing is an excellent option for longer storage.
5. Can I add extra flavorings?
Definitely! Consider adding vanilla extract, nutmeg, or even a pinch of cardamom. Small additions like cocoa powder, chia seeds, or a few chocolate chips can elevate the flavor while keeping the balls healthy.