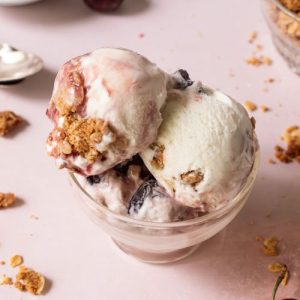
This Cherry Crisp Ice Cream is a dreamy homemade treat that blends juicy roasted cherries with golden, crunchy oat streusel for irresistible flavor and texture.
Packed with natural fruit sweetness, fiber from oats, and a good balance of protein and healthy fats from dairy, it’s a refreshing yet wholesome dessert.
Perfect for everyday enjoyment, it’s satisfying, freezer-friendly, and a fun way to elevate classic ice cream with real ingredients.
Cherry Crisp Ice Cream
Equipment
- 1 9-inch square baking dish
- 1 large mixing bowl
- 1 Medium mixing bowl
- 1 ungreased baking sheet
- 1 4-quart saucepan
- 1 gallon Ziploc freezer bag
- 1 ice cream maker
- 1 airtight storage container with lid
Ingredients
Roasted Cherries:
- 2 cups fresh or frozen cherries pitted, not thawed if frozen
- ⅔ cup granulated sugar
- 2 teaspoons cornstarch
Crisp Streusel:
- 1 cup unsalted butter 2 sticks, chilled and cut into ½-inch cubes
- 1 ½ cups all-purpose flour
- 1 ½ cups old-fashioned oats
- ¾ cup light brown sugar packed
- ½ teaspoon salt
- ⅛ teaspoon ground cinnamon
Ice Cream Base:
- 2 cups whole milk
- 1 tablespoon cornstarch
- 1 teaspoon cornstarch second addition
- 1 ½ ounces cream cheese softened
- ⅛ teaspoon fine sea salt
- 1 ¼ cups heavy cream
- ⅔ cup granulated sugar
- 2 tablespoons light corn syrup
- 1 vanilla bean split, seeds scraped, both pod and seeds reserved
Instructions
- Roast the Juicy Cherries: Preheat your oven to 400°F (200°C). Place the pitted cherries into a 9-inch square baking dish and sprinkle them with granulated sugar and cornstarch. Toss gently until the cherries are evenly coated and glossy, then spread them into an even layer. Roast in the oven for 30 to 45 minutes, stirring every 15 minutes, until the juices are bubbling, thickened, and the cherries look shiny and slightly caramelized. Remove from the oven, allow to cool completely at room temperature, and then refrigerate until you are ready to layer them into the ice cream.
- Prepare the Streusel Crumble: Reduce the oven temperature to 350°F (175°C). In a large mixing bowl, combine the chilled butter cubes, flour, brown sugar, salt, and cinnamon. Using your fingertips, rub the dry ingredients into the butter quickly until the mixture resembles coarse, sandy crumbs. Be careful not to overwork the butter—it should stay cold to ensure a crisp topping. Stir in the oats until evenly distributed. Spread the mixture onto an ungreased baking sheet, breaking up large clumps into smaller pieces about ¼–½ inch in size. Bake for 30 to 35 minutes, stirring occasionally so everything toasts evenly. Remove from the oven and cool completely before transferring to a container. Freeze until ready to use; the streusel will stay fresh for up to one month.
- Mix the Cornstarch Slurry: In a small bowl, whisk together 2 tablespoons of the milk with both portions of cornstarch until smooth and lump-free. This mixture will be added to the hot dairy later to thicken the ice cream base and give it a creamy, stable texture.
- Blend the Cream Cheese Base: Place the softened cream cheese into a medium mixing bowl and sprinkle in the fine sea salt. Whisk until the mixture is completely smooth, creamy, and free of lumps. This step ensures the cream cheese blends seamlessly with the hot milk mixture later on.
- Create an Ice Bath: Fill a large bowl with a generous amount of ice and cold water, leaving enough room to submerge a sealed freezer bag. Keep this bowl nearby, as it will be used to quickly chill the ice cream base, preventing graininess and ice crystals.
- Cook the Ice Cream Mixture: In a large 4-quart saucepan, add the remaining milk, heavy cream, granulated sugar, light corn syrup, and the vanilla bean pod along with its scraped seeds. Place the pan over medium-high heat and bring the mixture to a rolling boil. Allow it to boil vigorously for 4 minutes, stirring occasionally to keep it from scorching. Remove the pan from the heat once the time is up.
- Thicken with Cornstarch: Whisk the cornstarch slurry into the hot milk mixture in a slow, steady stream. Return the saucepan to medium-high heat and bring it back to a boil. Cook for about 1 minute, stirring constantly with a heatproof spatula, until the mixture thickens slightly and takes on a glossy finish. Remove from heat immediately.
- Combine with Cream Cheese: Gradually pour or ladle the hot mixture into the bowl with the cream cheese, whisking continuously until the mixture is smooth and uniform. This process stabilizes the base and helps create a creamy, luxurious texture in the finished ice cream.
- Rapid Chill the Custard: Pour the ice cream base into a 1-gallon resealable freezer bag, pressing out as much air as possible before sealing. Submerge the sealed bag in the prepared ice bath and let it sit for about 30 minutes, adding more ice as needed to keep the water cold. Once the mixture is thoroughly chilled, remove the vanilla bean pod.
- Churn into Ice Cream: Transfer the chilled base into your ice cream maker. Freeze according to the manufacturer’s instructions, usually about 20 to 25 minutes, until the ice cream becomes thick, creamy, and no longer increases in volume. At this stage, the consistency should resemble soft-serve ice cream.
- Assemble with Cherries and Streusel: Spoon a layer of the churned ice cream into a freezer-safe container. Add dollops of roasted cherries and a generous sprinkle of streusel, then repeat the process in layers until all the components are used. Finish with a final swirl of cherries and a light scattering of streusel on top. Gently press a sheet of parchment paper directly onto the surface before sealing the container with an airtight lid.
- Freeze Until Firm: Place the container in the coldest part of your freezer and let it firm for at least 4 hours, though overnight freezing provides the best texture. When ready to serve, remove the container from the freezer and let it sit at room temperature for 2 to 3 minutes before scooping for easier serving.
Notes
- Use fresh cherries when in season for the best flavor, but frozen cherries work beautifully too—just don’t thaw them before roasting.
- Keeping the butter cold while making the streusel is crucial for achieving the perfect crumbly texture.
- The ice bath step helps the custard base cool quickly, which prevents ice crystals and results in a smoother ice cream.
- For extra crunch, reserve some streusel to sprinkle on top when serving.
- This recipe is freezer-friendly and tastes even better after resting overnight.
Chef’s Secrets for Perfect Results
The secret to this recipe lies in balancing textures and temperatures.
Roasting the cherries concentrates their natural sweetness while adding a slightly jammy consistency that contrasts beautifully with the creamy ice cream.
When making the streusel, cold butter is key—work quickly so the butter doesn’t melt into the flour.
For the ice cream base, chilling it rapidly in an ice bath ensures fewer ice crystals, giving you a velvety-smooth scoop.
Finally, layering the cherries and streusel into the churned ice cream rather than mixing them in all at once preserves their distinct flavors and textures.
Serving Suggestions to Try at Home
Cherry Crisp Ice Cream is versatile enough to enjoy on its own, but you can also elevate it with a few simple pairings.
Serve a scoop in a waffle cone for a nostalgic treat, or alongside warm fruit pies and cobblers for an indulgent twist.
A drizzle of chocolate or caramel sauce adds extra richness, while a sprinkle of toasted nuts enhances the crunch factor.
For a lighter serving idea, spoon the ice cream into small ramekins and top with fresh berries or mint leaves for a refreshing presentation.
Storage Tips for Longer Freshness
Homemade ice cream keeps best when stored in a tightly sealed, freezer-safe container.
Pressing parchment paper directly against the surface before sealing prevents ice crystals from forming.
Always store the container in the coldest part of your freezer, away from the door where temperature fluctuations are common.
For best flavor and texture, enjoy the ice cream within two weeks.
If it becomes too hard to scoop, let it sit on the counter for a few minutes before serving—this softens the texture without melting the whole batch.
Frequently Asked Questions
1. Can I make this without an ice cream maker?
Yes! After chilling the base, pour it into a freezer-safe dish and freeze. Stir vigorously every 30 minutes for about 3–4 hours to break up ice crystals until it becomes creamy.
2. Can I use canned cherries instead of fresh or frozen?
It’s best to use fresh or frozen cherries, as canned varieties are often too soft and overly sweet. However, if canned cherries are your only option, drain them well and reduce the sugar slightly.
3. How do I keep the streusel crunchy in the ice cream?
Make sure the streusel is completely cooled and frozen before layering it into the churned ice cream. This prevents it from softening too quickly. You can also save extra streusel to sprinkle on just before serving.
4. Can I substitute the vanilla bean?
Absolutely. If you don’t have a whole vanilla bean, use 2 teaspoons of high-quality vanilla extract or vanilla paste. Add it after cooking the base so the flavor stays vibrant.
5. How long does homemade ice cream last?
While safe to eat for up to a month if stored properly, the best flavor and texture are enjoyed within the first two weeks. After that, the ice cream may develop ice crystals and lose some creaminess.