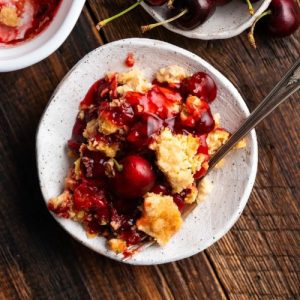
This Cherry Dump Cake is a delightfully easy dessert that comes together in under an hour with just five ingredients.
Bursting with juicy cherries and a buttery, crumbly topping, it offers a touch of healthy fats from pecans and a moderate calorie count.
Quick, satisfying, and perfect for everyday baking, it’s a stress-free way to enjoy a homemade treat.
Cherry Dump Cake
Equipment
- 9×13-inch baking dish (1)
- Mixing spoon (1)
- Measuring cups and spoons (1 set)
- Oven, 1
Ingredients
- 1 box yellow cake mix
- 2 cans 21 oz each cherry pie filling
- 1 tsp vanilla extract divided
- 10 Tbsp butter melted
- ½ cup chopped pecans optional
Instructions
- Preheat the Oven: Begin by setting your oven to 350°F (175°C) so it has enough time to reach the perfect baking temperature. Preheating ensures even cooking, allowing the cherry filling to bubble just right while the cake topping turns golden brown and crumbly. While the oven warms up, gather your baking dish and ingredients for a smooth workflow.
- Prepare the Baking Dish: Take a 9×13-inch baking dish and lightly coat it with nonstick cooking spray or a thin layer of butter. This prevents the cake from sticking and makes cleanup easier. Make sure to cover all corners and edges so your dessert will lift out effortlessly after baking.
- Enhance the Cherry Filling: Open your two cans of cherry pie filling and pour each into a medium mixing bowl. Add ½ teaspoon of vanilla extract to each can and stir thoroughly to blend the flavor evenly. This step enriches the cherry filling with a subtle, aromatic sweetness that enhances the overall taste of your cake.
- Layer the Cherry Base: Pour the entire vanilla-enhanced cherry mixture evenly into the prepared baking dish, spreading it out with a spatula or spoon so it forms a smooth, uniform layer. The cherry layer will be the juicy foundation of your dump cake, creating a luscious contrast to the crunchy topping.
- Add the Nutty Crunch (Optional): If using pecans, sprinkle the ½ cup of chopped pecans evenly over the cherry layer. The nuts add a delightful crunch and healthy fats that balance the soft, sweet filling. Take your time to distribute them evenly to ensure every slice gets a bit of nutty texture.
- Spread the Cake Mix: Next, take your box of yellow cake mix and gently sprinkle it evenly over the cherry and pecan layers. Try to cover the filling completely without pressing down—this will allow the butter to soak through naturally and create the signature crumbly top once baked.
- Drizzle the Butter: Melt 10 tablespoons of butter in a small saucepan or microwave until fully liquefied. Slowly pour the melted butter over the dry cake mix, moving from one side to the other to cover as evenly as possible. The butter will seep through the cake mix during baking, creating a golden, crisp topping while keeping the cake moist beneath.
- Bake to Perfection: Place the baking dish in your preheated oven on the middle rack. Bake for 50–60 minutes, or until the top is a rich golden brown and the cherry filling is bubbling along the edges. Keep an eye on the cake toward the end of baking; oven temperatures vary, and you want a crisp top without burning.
- Cool the Cake: Once baked, remove the dish from the oven and place it on a heat-safe surface. Allow the cake to cool for at least 15–20 minutes. Cooling slightly helps the cherry filling set, making it easier to cut neat slices while still warm and soft.
- Serve and Enjoy: Use a wide spatula to cut and serve your Cherry Dump Cake directly from the baking dish. For extra indulgence, top with a scoop of vanilla ice cream or a dollop of whipped cream. Each bite combines juicy cherries, buttery crumbs, and optional nutty crunch, delivering a dessert that’s easy, satisfying, and irresistible.
Notes
- This Cherry Dump Cake is best made in a 9×13-inch dish to ensure even baking. Using a different size may alter the cooking time.
- For best results, use full cans of cherry pie filling; draining any liquid can make the cake dry.
- If pecans are unavailable or unwanted, feel free to omit them—the cake will still be delicious and maintain its crumbly topping.
- Make sure to drizzle the melted butter slowly and evenly over the cake mix for consistent golden-brown topping.
Chef’s Secrets: Perfect Crumble Everytime
Achieving the perfect crumbly top is all about even butter distribution.
Take your time to pour the melted butter slowly over the dry cake mix; this allows it to seep naturally and creates the classic “dump cake” texture.
For extra flavor, toast the pecans lightly in a skillet before adding—they’ll release their oils and give the dessert a richer, nutty aroma.
Also, resist stirring the layers together; keeping the cake mix separate from the filling ensures a contrast of textures, with juicy cherries beneath a crisp, buttery crust.
Serving Suggestions: Creative Presentation Ideas
This dump cake is delightful on its own, but you can elevate it easily.
Serve warm with a scoop of vanilla ice cream, a drizzle of chocolate sauce, or a dollop of whipped cream for a comforting dessert.
Garnish individual slices with fresh cherries or a sprinkle of powdered sugar for a touch of elegance.
It also pairs wonderfully with hot beverages like coffee or tea, making it ideal for afternoon treats or casual family gatherings.
Storage Tips: Keep Cake Fresh Longer
Leftovers should be stored in an airtight container in the refrigerator for 4–5 days.
Cover the top with plastic wrap or aluminum foil to prevent the crust from drying out.
For quick reheating, microwave individual slices in 15–20 second intervals until warm.
This dessert also freezes well cut into portions, wrap each piece tightly in plastic wrap, then place in a freezer-safe bag for up to 2 months.
Thaw overnight in the refrigerator before serving, then warm slightly for that freshly-baked texture.
Frequently Asked Questions
1. Can I use another fruit instead of cherries?
Yes! This recipe works beautifully with blueberries, peaches, or mixed berries. Choose fruit that is slightly firm to prevent excess liquid from making the cake soggy.
2. Is it possible to make this cake gluten-free?
Absolutely. Simply substitute the yellow cake mix with a certified gluten-free variety. Ensure the pie filling does not contain gluten-based thickeners.
3. Can I make this cake ahead of time?
Yes, prep the layers the night before, cover the dish tightly, and refrigerate. Bake the next day—just add a few extra minutes to the cooking time if needed.
4. How do I get a crispier top?
For a crunchier topping, sprinkle an extra 1–2 tablespoons of melted butter over the cake mix midway through baking or broil the top for 1–2 minutes at the end, watching carefully to avoid burning.
5. Can I halve the recipe?
Definitely. Use an 8×8-inch baking dish and adjust the baking time to approximately 35–45 minutes, checking for a golden top and bubbling filling to ensure doneness.