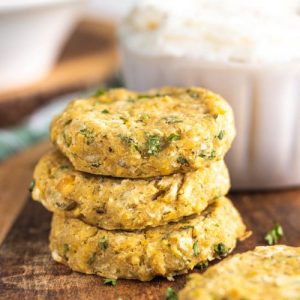
These crispy chickpea patties are a delicious and wholesome way to enjoy plant-based protein.
Packed with fiber-rich chickpeas, fresh herbs, and aromatic spices, they deliver satisfying flavor without excess fat.
Quick to prepare and bake, they’re perfect for meal prep, weekday lunches, or light dinners.
Gluten-free-friendly and nutrient-dense, they’re a versatile, healthy option for any kitchen.
Crispy Chickpea Patties
Equipment
- Food processor (1)
- Half Sheet Pan (1)
Ingredients
- 2 cups chickpeas rinsed
- ½ large onion
- 2 cloves garlic
- ¼ cup fresh parsley herbs, or spinach
- 1 teaspoon salt
- 1 teaspoon ground cumin
- 1 teaspoon ground coriander
- ¼ –½ teaspoon black pepper
- ½ cup all-purpose flour or gluten-free flour
Instructions
- Prepare Your Oven and Baking Sheet: Preheat your oven to 400°F (200°C) so it reaches the right temperature while you prepare the patties. Line a half sheet pan with parchment paper or lightly grease it with oil to prevent sticking. Having your baking sheet ready in advance ensures a smooth transition from prep to bake.
- Chop Aromatics: Onion and Garlic Prep – Peel and roughly chop half of a large onion and two garlic cloves. If using a food processor, place them in the bowl and pulse until finely chopped. If chopping by hand, mince them into tiny pieces. Properly chopped aromatics release more flavor during baking and help the patties hold together.
- Add Fresh Herbs or Greens: Herbs or Spinach Addition – Measure ¼ cup of fresh parsley, your favorite herbs, or spinach. Add them to the food processor with the onion and garlic and pulse until evenly chopped. If chopping by hand, finely mince the herbs or chop the spinach until soft.This step brightens the flavor and adds color, freshness, and nutrients.
- Season and Incorporate Chickpeas: Spice and Chickpea Mixing – Add 2 cups of rinsed chickpeas to the food processor. Sprinkle in 1 teaspoon of salt, 1 teaspoon of ground cumin, 1 teaspoon of ground coriander, and ¼–½ teaspoon of black pepper. Pulse the mixture until the chickpeas are coarsely chopped and evenly mixed with the aromatics and herbs. You want the mixture slightly chunky, not completely smooth, for texture. If mixing by hand, mash chickpeas with a fork or potato masher until coarsely combined.
- Bind the Mixture: Flour Incorporation – Add ½ cup of all-purpose flour (or gluten-free flour) to the chickpea mixture. Pulse or stir until the mixture holds together in a large, soft ball. The flour helps bind the patties so they don’t fall apart while baking. The mixture should feel moist but firm enough to shape.
- Portion the Patties: Shaping Patties – Wet your hands slightly to prevent sticking and divide the mixture into 12 equal portions. Roll each portion into a ball and then flatten gently into a patty about ½ inch thick. Arrange them evenly on the prepared baking sheet, leaving a little space between each patty for even baking.
- Bake the Patties: Oven Baking – Place the sheet pan in the preheated oven and bake for 20–25 minutes. Halfway through baking, carefully flip each patty using a spatula to ensure both sides turn golden brown and crisp. Baking develops a crunchy exterior while keeping the inside tender and flavorful.
- Serve and Enjoy: Serving Suggestions – Once baked, let the patties cool slightly before serving. They are perfect tucked into wraps or pita bread with lettuce, cucumber, tomatoes, and a garlicky sauce, or served alongside a salad or grain bowl. These patties can also be enjoyed warm or at room temperature, making them great for meal prep or packed lunches.
- Storage and Make-Ahead Tips: Refrigeration and Freezing – Store leftover patties in an airtight container in the refrigerator for up to 3 days. For longer storage, flash freeze patties on a sheet pan for a few hours before transferring them to a zip-top bag or airtight container. This prevents sticking and keeps them fresh. Reheat in the oven or a skillet for best texture.
Notes
- Gluten-Free Option: Substitute all-purpose flour with your preferred gluten-free flour or chickpea flour to make the patties suitable for gluten-sensitive diets.
- Herb Variations: Feel free to use cilantro, dill, or basil in place of parsley, or mix in finely chopped spinach for extra greens.
- Spice Adjustments: Adjust cumin, coriander, or black pepper to suit your taste; a pinch of smoked paprika can add a subtle depth.
- Binding Tips: If the mixture feels too wet, add an extra tablespoon of flour until it holds together easily.
- Serving Flexibility: These patties can be eaten hot, warm, or at room temperature, making them ideal for wraps, salads, or meal-prep bowls.
Chef’s Secrets For Perfect Patties
The key to perfectly textured chickpea patties lies in balancing moisture, binding, and seasoning.
For a soft yet firm patty, pulse the chickpeas until slightly chunky rather than completely smooth—this preserves texture and prevents a mushy interior.
Slightly wetting your hands before shaping prevents sticking without adding excess flour, which could dry out the patties.
Fresh herbs not only enhance flavor but also add natural moisture and brightness.
For a crispier exterior, flip the patties halfway through baking and consider a light brush of olive oil.
Using high-quality, well-rinsed canned chickpeas or freshly cooked chickpeas ensures optimal flavor and texture.
Serving Suggestions For Every Occasion
These chickpea patties are versatile enough to suit many meals.
Stuff them into a whole-wheat wrap or pita with crisp lettuce, sliced cucumbers, and diced tomatoes for a satisfying lunch.
Pair with a garlicky yogurt or tahini sauce for added creaminess.
They also make an excellent protein addition to grain bowls, salads, or alongside roasted vegetables.
For a snack or appetizer, serve mini patties with a drizzle of your favorite sauce and a sprinkle of fresh herbs.
These patties adapt beautifully to both casual meals and more polished dinner plates.
Storage Tips For Freshness
To keep chickpea patties at their best, store them in an airtight container in the refrigerator for up to three days.
Reheat gently in a 350°F (175°C) oven or on a skillet to restore crispness.
For longer-term storage, flash freeze the patties by placing them on a baking sheet until solid, then transfer them to a sealed container or zip-top bag.
This prevents sticking and allows you to grab individual patties as needed.
Avoid microwaving directly from frozen, as it can make the exterior soft—reheating in the oven or skillet ensures maximum flavor and texture.
Frequently Asked Questions
1. Can I make these patties vegan?
Yes! This recipe is naturally plant-based and vegan-friendly. Simply use a plant-based flour and ensure any sauces or wraps you serve with them are also vegan.
2. Can I use dried chickpeas instead of canned?
Absolutely. Soak dried chickpeas overnight and cook them until tender before using.
Be aware that cooked chickpeas may have slightly more moisture than canned, so you may need to adjust the flour slightly to maintain the right consistency.
3. Can I pan-fry instead of baking?
Yes, you can lightly oil a skillet and cook the patties over medium heat until golden brown on both sides. Baking is lower in fat and easier for larger batches, but pan-frying gives a rich, crispy exterior.
4. How do I prevent patties from falling apart?
Proper binding is essential. Make sure the chickpeas are chopped but not completely pureed, and use enough flour to help the mixture hold together.
Wetting your hands while shaping also prevents sticking without over-flouring.
5. Can I make these patties ahead of time?
Definitely! Prepare and shape the patties in advance and store them in the fridge for up to three days.
You can also freeze them individually or in batches using the flash-freeze method for convenient grab-and-go meals.