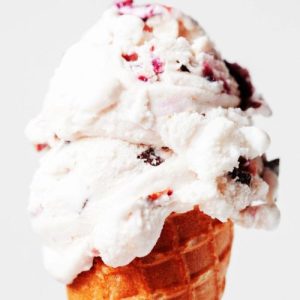
This vegan chocolate cherry ice cream is a luscious dairy-free treat that combines creamy coconut milk, roasted cherries, and rich dark chocolate for a decadent yet wholesome dessert.
Packed with plant-based fats, antioxidants from dark chocolate, and fiber-rich cherries, it’s both indulgent and nourishing.
Free from dairy and cholesterol, this recipe is a refreshing option that’s simple to prepare, perfect for everyday enjoyment, and a crowd-pleasing summer delight.
Chocolate Cherry Ice Cream
Equipment
- 1 blender
- 1 mixing bowl
- 1 Baking Sheet + Parchment Paper
- 1 Ice Cream Maker with Freezer Bowl
- 1 Loaf Pan (for freezing)
- 1 spatula
Ingredients
- 3 ⅓ cups 780 ml full-fat canned coconut milk, lightly shaken (2 cans, 13.5 oz / 400 ml each)
- ½ cup + 1 tablespoon 110 g cane sugar
- 1 teaspoon vanilla extract
- ¼ teaspoon salt
- 12 ounces 340 g cherries, pitted and halved, fresh or frozen
- 4 ounces 120 g / about ⅔ cup dark chocolate, chopped
Instructions
- Prepare the Ice Cream Maker: Before you begin, place the freezer bowl of your ice cream maker into the freezer the night before you plan to churn. This ensures it’s frozen solid and ready to whip your base into a smooth, creamy consistency. Skipping this step will result in soft, runny ice cream that doesn’t set properly, so give it plenty of time to freeze.
- Blend the Creamy Coconut Base: In a high-speed blender, combine the full-fat coconut milk, ½ cup of the cane sugar, vanilla extract, and salt. Blend the mixture on high for a full minute until it is silky smooth, slightly frothy, and fully incorporated. Transferring the mixture to a storage container, refrigerate it for at least 1 hour. For even more convenience, you can leave it chilling for up to 2 days—this step helps the base thicken and develop a richer flavor before churning.
- Roast the Cherries for Maximum Flavor: Preheat your oven to 400°F (200°C). Line a baking sheet with parchment paper and spread the halved cherries evenly across the surface. Sprinkle them with the remaining 1 tablespoon of cane sugar to enhance their natural sweetness. Roast for 10 minutes, then carefully stir the cherries so they roast evenly. Continue roasting for another 10–15 minutes until the cherries look slightly shriveled, juicy, and tender, but not dried out. Remove the pan from the oven and let the cherries cool to room temperature. To speed up the cooling process, you can place them in the fridge or freezer. Once cooled, give the cherries a rough chop directly on the baking sheet—this ensures you have bite-sized pieces that will fold easily into the ice cream.
- Start Churning the Ice Cream: When you’re ready to make the ice cream, set up your machine according to the manufacturer’s instructions. Pour the chilled coconut milk mixture into the prepared freezer bowl. Begin churning and allow the machine to work its magic, thickening and aerating the mixture into a soft, creamy texture. Most machines will take around 20–25 minutes for this process, but times may vary.
- Add Cherries and Chocolate Mix-Ins: About 2 minutes before the machine finishes churning, gradually add in the chopped roasted cherries and the dark chocolate pieces. The mixture may loosen slightly once the add-ins are stirred in, but don’t worry—the machine will quickly restore the proper texture. If you prefer, you can also fold the mix-ins in by hand simply transfer the churned ice cream into a loaf pan and gently stir in the cherries and chocolate with a spatula until evenly distributed.
- Chill for Perfect Scooping: Once the mix-ins are incorporated, transfer the ice cream to a loaf pan or airtight container. Smooth out the top with a spatula, cover, and place it in the freezer for 30–60 minutes. This short resting time helps the ice cream firm up to a scoopable consistency while still staying creamy and easy to serve.
- Scoop and Enjoy: When ready to serve, remove the ice cream from the freezer. If it’s been stored for longer than an hour, let it sit at room temperature for a few minutes to soften slightly. Use a sturdy ice cream scoop to serve generous scoops into bowls or cones. Enjoy immediately as a refreshing dairy-free dessert that combines the richness of coconut milk, the sweetness of roasted cherries, and the indulgence of dark chocolate.
Notes
- Use full-fat canned coconut milk for the creamiest texture—light coconut milk won’t provide the same richness.
- Roasting the cherries deepens their flavor and prevents excess water from making the ice cream icy.
- Chop the chocolate into small pieces to distribute evenly and avoid hard chunks.
- Chill the base for at least an hour before churning for better texture.
- If freezing for longer periods, let the ice cream sit at room temperature for a few minutes before scooping.
Chef’s Secrets for Perfect Creaminess
The secret to velvety dairy-free ice cream lies in balancing fat and sweetness.
Full-fat coconut milk gives this recipe its luscious texture, while blending the mixture thoroughly ensures no separation.
Roasting the cherries is another professional touch—this not only intensifies their natural sweetness but also reduces water content, preventing icy crystals from forming.
For best results, always chill the mixture before churning, as cold bases freeze faster and create a smoother consistency.
If you prefer softer chunks of chocolate, use a bar instead of chips, as it melts more gently in the mouth.
Serving Suggestions for Best Enjoyment
This vegan chocolate cherry ice cream is versatile enough to shine on its own, but it can also be part of a more elaborate dessert.
Serve it in waffle cones for a nostalgic summer treat, or scoop it into bowls and top with extra roasted cherries and a drizzle of melted dark chocolate for an indulgent twist.
Pair it with almond biscotti or coconut macaroons for a textural contrast, or add a sprinkle of chopped nuts for crunch.
It also makes a fantastic topping for warm brownies or fruit crisps, offering a hot-and-cold contrast that’s truly irresistible.
Storage Tips for Long Freshness
Store your ice cream in a freezer-safe airtight container to protect it from absorbing freezer odors and to minimize ice crystal formation.
A loaf pan covered tightly with plastic wrap and foil also works well.
For the creamiest scoops, enjoy it within 5–7 days of making, although it will keep for up to 2 weeks.
If the ice cream becomes too firm after extended freezing, simply let it rest at room temperature for 5–10 minutes before scooping.
Avoid repeatedly thawing and refreezing, as this can affect both flavor and texture.
Frequently Asked Questions
1. Can I use frozen cherries instead of fresh?
Yes! Frozen cherries work beautifully in this recipe. Just thaw and pat them dry before roasting to prevent excess liquid from making the ice cream icy.
2. Do I need an ice cream maker?
While an ice cream maker creates the creamiest results, you can still make this recipe without one. Simply freeze the base in a shallow container, stirring every 30 minutes until firm, to mimic the churning process.
3. Can I substitute another milk for coconut milk?
Coconut milk is ideal for creaminess, but you could experiment with cashew milk or oat milk.
Keep in mind, though, that the texture may be less rich and more icy without the fat content of coconut milk.
4. How do I keep the chocolate from getting too hard?
Chopping the chocolate finely helps prevent overly large chunks that freeze rock solid.
Alternatively, use mini chocolate chips or melt the chocolate and drizzle it in while churning for thin, delicate ribbons.
5. Can I reduce the sugar in this recipe?
Yes, but sugar doesn’t just sweeten—it also improves texture by lowering the freezing point.
Reducing it too much may result in a harder, icier ice cream. If you want a lighter version, try replacing some sugar with a natural sweetener like maple syrup or agave.