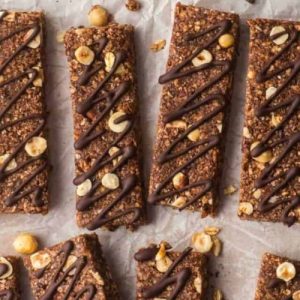
These Chocolate Hazelnut Granola Bars are a wholesome snack that balances natural sweetness with satisfying crunch.
Packed with fiber from oats and dates, plant-based protein from hazelnuts and nut butter, and healthy fats from coconut oil, they make a guilt-free treat.
Quick to prepare, easy to store, and perfect for breakfast, snacks, or on-the-go energy boosts.
Chocolate Hazelnut Granola Bars
Equipment
- 1 × 23 cm (9-inch) square baking pan
- 1 × Baking tray
- 1 × food processor
- Parchment Paper
- Mixing bowl
- Spoon or spatula
Ingredients
Bars Base:
- 270 g rolled oats
- 140 g whole hazelnuts
- 160 g pitted Medjool dates
- 120 ml maple syrup
- 80 g smooth peanut butter or alternative nut butter
- 30 ml coconut oil
- 45 ml water
- ¼ tsp fine salt
- 30 g cocoa powder
Topping:
- 50 g dark chocolate
Instructions
- Toast the Oats: Preheat your oven to 180°C (350°F). Spread the rolled oats evenly across a baking tray so they are in a single layer. Bake for 20 minutes, stirring halfway through to ensure even browning. The oats should turn golden and emit a nutty aroma. Remove from the oven and let them cool completely to retain their crunch.
- Roast and Prepare the Hazelnuts: Place the whole hazelnuts on a separate baking tray and roast them in the oven for 15 minutes, either at the same time as the oats or afterward. Once lightly golden and fragrant, remove from the oven and allow to cool slightly. Rub the hazelnuts with a paper towel, clean cloth, or your fingers to remove most of the skins. Roughly chop half and leave the other half whole for blending later.
- Make the Date Paste: In a food processor, combine the pitted Medjool dates, smooth peanut butter (or preferred nut butter), maple syrup, coconut oil, water, salt, and the whole roasted hazelnuts. Blend until a smooth, sticky paste forms. Scrape down the sides as needed to ensure all ingredients are fully incorporated. This paste serves as the natural sweetener and binder for the bars.
- Mix the Dry Ingredients: In a large mixing bowl, combine the toasted oats, chopped hazelnuts, and cocoa powder. Stir thoroughly until evenly distributed. Ensure any cocoa powder clumps are broken up so the chocolate flavor spreads evenly throughout the mixture.
- Combine Paste with Dry Ingredients: Add the smooth date paste to the oat mixture. Using a wooden spoon, spatula, or your hands, mix thoroughly until every oat flake is coated and the mixture holds together well. This step ensures the bars have a consistent chewy texture.
- Prepare the Baking Pan: Line a 23 cm (9-inch) square baking pan with parchment paper, leaving extra overhang for easy removal. Dab the pan with a little butter or coconut oil to help the parchment stick and prevent the mixture from sticking.
- Press Mixture into Pan: Transfer the oat and date mixture into the prepared pan. Using the back of a spoon, spatula, or your hands, press the mixture firmly and evenly into the pan, creating a level and compact surface. Firm pressing ensures the bars hold together after chilling.
- Chill Until Firm: Place the pan in the refrigerator for at least 2 hours. This step allows the bars to set properly, making them easier to slice and handle. For best results, leave them slightly longer if your kitchen is warm.
- Slice the Bars: Lift the bars from the pan using the parchment overhang. Place on a cutting board and slice the square in half, then each half into 6 bars, yielding 12 uniform pieces. Use a sharp knife and wipe it clean between cuts for tidy, even bars.
- Add the Chocolate Drizzle: Melt the dark chocolate in short 20-second bursts in the microwave, stirring after each burst to prevent burning. Drizzle over the bars using a spoon or piping bag. Let the chocolate set at room temperature or in the fridge for a few minutes before serving.
- Serve and Enjoy: Once the chocolate has set, the bars are ready to enjoy. Perfect for breakfast, snacks, or an energy boost, they are best stored in an airtight container at room temperature for up to 1 week or refrigerated for up to 2 weeks. Each bar is packed with fiber, protein, and healthy fats for a satisfying and nutritious treat.
Notes
- Step-by-step photos can be very helpful, especially when making the date paste and pressing the mixture into the pan.
- Toasting the oats is optional but highly recommended for added flavor and crunch. Adjust the toasting time based on your preferred level of browning.
- Removing the hazelnut skins can be done quickly by rubbing them with a towel while still slightly warm; don’t worry if a few skins remain.
- Use your hands when mixing the sticky date paste with the dry oats for better incorporation.
- Ensure the bars are refrigerated for at least 2 hours to achieve the perfect chewy yet firm texture before slicing.
Chef’s Secrets: How To Perfect Bars
The key to perfect granola bars lies in balancing texture and flavor.
Toasting the oats lightly intensifies their nutty aroma while adding crunch, and chopping some hazelnuts while keeping others whole gives both flavor and bite.
Using a food processor for the dates ensures a smooth paste that binds the bars without additional sugar.
Pressing the mixture firmly into the pan is essential—looser pressing leads to crumbling bars.
For a polished look, drizzle the chocolate with a spoon or small piping bag, and allow it to set completely for a professional finish.
Serving Suggestions: Delicious Ways To Enjoy
These Chocolate Hazelnut Granola Bars are versatile and ideal for any time of day.
Enjoy them as a quick breakfast with a glass of milk or plant-based alternative.
They make a perfect mid-morning or afternoon snack for work or school and pair beautifully with coffee or tea.
You can even break them into smaller pieces as a topping for yogurt or smoothie bowls.
Their natural sweetness and satisfying crunch make them equally suitable for an on-the-go energy boost during hikes, workouts, or long commutes.
Storage Tips: Keep Bars Fresh Longer
To maintain freshness and texture, store the bars in an airtight container.
At room temperature, they stay good for up to 1 week, while refrigeration extends their shelf life to 2 weeks.
For longer storage, individually wrap the bars and freeze them for up to 2 months; simply thaw at room temperature or in the fridge before serving.
Avoid leaving them exposed to heat or sunlight, as the chocolate topping may soften or melt.
Cutting the bars with a clean, sharp knife ensures tidy portions and reduces crumbling.
Frequently Asked Questions
1. Can I use other nuts instead of hazelnuts?
Yes! Almonds, walnuts, or cashews work well. Toast them lightly for extra flavor, and chop half while keeping some whole to maintain texture.
2. Are these bars gluten-free?
They can be, as long as you use certified gluten-free oats. The rest of the ingredients are naturally gluten-free, making them suitable for those with gluten sensitivities.
3. Can I make these bars nut-free?
Absolutely. Substitute the peanut butter with sunflower seed butter and skip the hazelnuts, or use seeds like pumpkin or sunflower for crunch.
4. How sticky should the date paste be?
The paste should be smooth, thick, and sticky enough to bind the oats together. If too dry, add 1–2 tablespoons of water to reach the right consistency.
5. Can I make these bars ahead of time?
Yes, they are perfect for meal prep. Prepare the bars up to 2 weeks in advance (refrigerated) or freeze individual bars for up to 2 months. They retain flavor, texture, and nutrition perfectly.