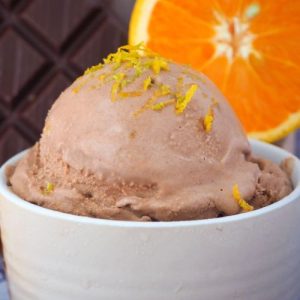
This Chocolate Orange Ice Cream is a luscious blend of velvety cocoa and vibrant citrus that delivers a perfect balance of rich and refreshing.
Made with real cream and fresh orange zest, it’s indulgent yet surprisingly light.
Packed with calcium, antioxidants, and good fats, this frozen treat offers a wholesome twist on dessert.
It’s an easy, make-ahead option ideal for everyday indulgence or special occasions.
Chocolate Orange Ice Cream
Equipment
- 1 ice cream maker
- 1 stick/immersion blender
- 1 small saucepan
- 1 fine-mesh strainer
- 1 mixing bowl
- 1 Measuring cup set
- 1 Heatproof Jug
- 1 freezer-safe storage container
Ingredients
- 1 cup 250 ml whole milk
- 2 flat teaspoons 5 g tapioca starch
- 2 cups 500 ml heavy or thickened cream
- ½ cup 110 g granulated white sugar
- ¼ cup 25 g natural unsweetened cocoa powder
- Zest of 3–5 medium oranges finely chopped
- 1 teaspoon 7.5 g glucose syrup
- A few drops food-safe orange oil not orange essence
Instructions
- Prepare the Tapioca Slurry: Begin by measuring one cup (250 ml) of whole milk. Take two tablespoons of this milk and place it in a small mixing bowl. Add the tapioca starch and stir thoroughly to create a smooth, lump-free slurry. This ensures the ice cream thickens evenly without forming clumps when heated.
- Zest and Chop Oranges: Carefully zest 3 to 5 medium oranges, avoiding the bitter white pith. Once zested, finely chop the zest into very small pieces to release the citrus oils fully. This step ensures a vibrant, natural orange flavor throughout the ice cream.
- Combine Milk, Cream, and Sugar: Pour the remaining milk, thickened cream, sugar, and glucose syrup into a small saucepan. Sift in the cocoa powder to prevent lumps and stir lightly. This creates a smooth, creamy chocolate base for the ice cream.
- Gently Heat Mixture: Place the saucepan over low heat, stirring constantly. Heat until warm enough to dissolve the sugar and cocoa powder fully, without bringing it to a boil. If the cocoa powder struggles to mix, briefly remove the saucepan from heat and blend with a stick or immersion blender until smooth.
- Infuse Orange Zest: Add the finely chopped orange zest to the warm mixture. Continue to heat on low while stirring. Taste the mixture—if a stronger citrus flavor is desired, add zest from one or two additional oranges or a few drops of food-safe orange oil to enhance the aroma.
- Incorporate Tapioca Slurry: Re-stir the tapioca slurry to ensure it is smooth, then gradually pour it into the chocolate-orange mixture while stirring continuously. This thickens the base and ensures a creamy texture once churned. Remove the saucepan from heat after fully incorporating the slurry.
- Cool the Ice Cream Base: Allow the mixture to cool for 10–15 minutes at room temperature. Cooling gradually prevents temperature shock when placing it in the fridge and helps maintain a smooth, creamy consistency.
- Strain and Chill: Pour the cooled mixture through a fine-mesh strainer into a heatproof jug to remove zest pieces and small lumps. Cover and refrigerate for at least 4 hours, preferably overnight, to fully chill the base for optimal churning.
- Prepare Ice Cream Maker: Pre-chill your storage container or freezer bowl. If using a self-refrigerating ice cream maker, turn it on about 10 minutes before churning. A pre-chilled machine ensures the ice cream freezes quickly and evenly, producing a smooth texture.
- Stir and Pour into Churner: Remove the chilled ice cream base from the fridge and stir gently to recombine any settled ingredients. Pour the mixture into your ice cream machine or pre-chilled bowl, following your machine’s instructions carefully.
- Churn the Ice Cream: Churn the mixture until it reaches a soft-serve consistency, usually around 20–30 minutes. The ice cream should be thick, creamy, and scoopable. Avoid over-churning to prevent ice crystal formation and maintain a smooth texture.
- Add Extra Orange Zest (Optional): For additional citrus flavor and visual appeal, sprinkle a small amount of extra orange zest into the churned ice cream. Stir gently but quickly to distribute evenly without melting the ice cream.
- Freeze Until Firm: Transfer the churned ice cream into a freezer-safe container. Smooth the top, cover tightly, and freeze for at least 4 hours, or until firm. This step ensures a perfect, scoopable consistency.
- Serve and Enjoy: Remove the ice cream from the freezer a few minutes before serving to soften slightly. Scoop into bowls or cones and enjoy immediately. Optional garnishes include chocolate sauce, orange syrup, fresh fruit, or crumbled cookies for extra texture and flavor.
Notes
- The total hands-on time for this ice cream is about 35 minutes, but including cooling, chilling, and freezing, the full process takes around 8–9 hours. For best results, plan ahead and make the base the day before churning.
- Using fresh orange zest instead of syrup provides a brighter, more natural citrus flavor and avoids excessive sweetness.
- Tapioca starch is key to a creamy, smooth texture and prevents ice crystallization, giving your ice cream a luxurious mouthfeel.
- You can adjust the intensity of the chocolate or orange flavor to suit your taste—add more cocoa powder for richer chocolate or a few extra drops of orange oil for a stronger citrus punch.
- Ensure all ingredients are at room temperature before heating to prevent curdling and ensure even mixing.
Chef’s Secrets For Perfect Ice Cream
To achieve a silky, rich ice cream, temperature control is essential.
Always heat the cream, milk, sugar, and cocoa mixture gently over low heat; avoid boiling, as this can cause separation and affect texture.
Using a fine-mesh strainer after adding the orange zest removes any pulp or larger zest pieces, leaving a smoother final product.
Chilling the base overnight intensifies flavor and ensures the ice cream churns evenly.
For an extra flavor boost, lightly toast the orange zest in a dry pan for 30 seconds before adding—it releases aromatic oils and enhances the citrus notes.
Lastly, patience during freezing is key; rushing the process can lead to icy, grainy results rather than the creamy consistency you want.
Serving Suggestions For Chocolate Orange
Chocolate Orange Ice Cream is versatile and can be served simply or dressed up.
Scoop it into bowls or cones for a classic treat, or pair it with a drizzle of dark chocolate sauce or orange syrup for a decadent finish.
Fresh fruit such as sliced strawberries or mandarin segments adds a refreshing contrast.
For a more indulgent dessert, serve alongside warm chocolate brownies or a slice of chocolate sponge cake—the citrus notes cut through the richness beautifully.
Even a few crushed chocolate cookies sprinkled on top can add texture and extra flavor.
This ice cream is perfect as a summer dessert, after-dinner treat, or a special occasion indulgence.
Storage Tips For Longevity
Proper storage ensures your ice cream stays creamy and flavorful.
Store it in an airtight, freezer-safe container to prevent freezer burn and odor absorption from other foods.
Place a piece of parchment paper directly on the surface before sealing the container; this minimizes ice crystal formation.
For the best texture, allow the ice cream to sit at room temperature for 2–3 minutes before scooping, even straight from the freezer.
Churned ice cream can typically be stored for up to 2 weeks; after that, texture may begin to degrade slightly.
Avoid repeated thawing and refreezing to maintain creaminess and flavor intensity.
Frequently Asked Questions
1. Can I make this ice cream without an ice cream maker?
Yes! Pour the chilled mixture into a shallow freezer-safe dish and freeze. Stir every 30 minutes for the first 2–3 hours to break up ice crystals.
While the texture may be slightly less smooth than machine-churned ice cream, it will still be creamy and delicious.
2. Can I use a different citrus instead of orange?
Absolutely! Tangerines, mandarins, or even blood oranges work well.
Adjust the zest quantity to taste, as some citrus varieties are more pungent than others. Lime or lemon can be used, but the flavor will be sharper and less sweet.
3. Can I make this recipe lower in fat?
You can substitute part of the cream with low-fat milk, but note that it may slightly alter the texture, making the ice cream less rich and creamy.
Tapioca starch helps maintain some smoothness even with lower-fat alternatives.
4. How do I adjust sweetness or chocolate intensity?
To make it sweeter, increase the sugar slightly, or add a teaspoon of honey or maple syrup.
For a deeper chocolate flavor, increase the cocoa powder by a tablespoon. Taste the mixture before chilling to ensure it meets your preference.
5. Can I prepare this recipe in advance for a party?
Yes! Make the base up to a day ahead, chill overnight, then churn and freeze. The ice cream can also be fully churned and frozen in advance for 1–2 weeks, making it ideal for meal prep or entertaining guests.