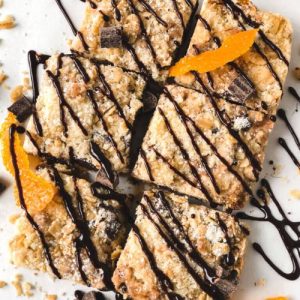
These Chocolate and Orange Marmalade Bars are a delightful blend of sweet, tangy, and rich flavors, with a satisfyingly crumbly oat base.
Packed with fiber-rich oats and the wholesome goodness of bittersweet chocolate, they offer a balanced snack with plant-based protein and good fats.
Quick to assemble and easy to bake, they make a perfect everyday treat for breakfast, dessert, or a wholesome snack.
Chocolate Orange Marmalade Bars
Equipment
- 8×8 inch baking pan
- Medium mixing bowl
- Pastry cutter or fork (or hands)
- Spoon or offset spatula
- Parchment paper (optional)
Ingredients
- 1 cup 90 g rolled oats
- 1 cup 120 g all-purpose flour
- ½ cup 98 g granulated sugar
- ¾ tsp kosher salt
- ½ tsp baking soda
- 1 stick 1/2 cup, 114 g unsalted butter, room temperature
- 1 tsp 5 ml vanilla extract (optional)
- 8 –10 oz 240–270 g orange marmalade
- ½ cup 120 g chopped bittersweet baking chocolate (>70% cacao)
Instructions
- Preheat and Prepare the Pan: Before starting your mix, set your oven to 350°F (175°C) for a conventional oven, or 335°F (170°C) if you’re using a convection/fan oven. Line an 8×8-inch baking pan with parchment paper for easy removal later, or lightly grease it with butter or baking spray. Ensure the parchment hangs over the edges so you can lift the bars out effortlessly once cooled.
- Combine Dry Ingredients: In a medium mixing bowl, add rolled oats, all-purpose flour, sugar, kosher salt, and baking soda. Stir gently using a spoon or whisk to ensure the mixture is evenly combined. This step is crucial to make sure your bars bake uniformly and every bite has a balanced flavor and texture.
- Prepare the Butter: Cut your unsalted butter into small cubes, roughly 1/2-inch (1.1 cm) each. Scatter the cubes over your dry ingredients. The small size helps the butter incorporate evenly into the oat-flour mixture, which will create a tender, crumbly texture for your bars.
- Incorporate the Butter: Using a pastry cutter, fork, or your fingertips, blend the butter into the dry ingredients. Work until the butter is evenly distributed and the mixture resembles coarse crumbs. The largest pieces of butter should be about the size of a pea. If using your hands, gently rub the butter into the dry ingredients, taking care not to overwork the mixture. This step ensures the crust and crumble topping will be buttery but not greasy.
- Add Vanilla Extract: If using, pour 1 tsp of vanilla extract into the mixture and stir gently to incorporate. Vanilla adds a warm, aromatic note that complements the bittersweet chocolate and tangy marmalade beautifully, elevating the overall flavor profile of your bars.
- Press the Base Layer: Take half to two-thirds of the oat-butter mixture and firmly press it into the bottom of your prepared baking pan. Use your fingers or the back of a spoon to smooth it evenly, ensuring the layer is compact. This will form the sturdy, buttery base that holds your marmalade and chocolate layers.
- Par-Bake the Crust: Place the pan in the preheated oven and bake the base for 10 minutes. Par-baking helps the crust set, preventing it from becoming soggy when you add the marmalade and chocolate. Keep an eye on the edges—they should be slightly golden, but not fully baked.
- Spread the Orange Marmalade: Remove the partially baked crust from the oven. Using a spoon or offset spatula, evenly spread 8–10 oz of orange marmalade over the warm crust. Be sure to cover the edges completely so each bar will have marmalade in every bite. The warm crust will slightly soften the marmalade, helping it adhere beautifully.
- Add Chocolate Layer: Sprinkle chopped bittersweet chocolate evenly over the marmalade layer. The chocolate will slightly melt during baking, creating pockets of gooey richness that perfectly complement the tart marmalade. Using high-quality chocolate ensures a deep, rich flavor.
- Add the Crumble Topping: Crumble the remaining oat-butter mixture evenly over the chocolate and marmalade layers. Gently press some crumbs down to ensure they stick, but leave plenty loose so the topping remains crisp and golden. The contrast between the soft chocolate-marmalade layer and crunchy oat topping is what makes these bars irresistible.
- Bake Until Golden: Return the pan to the oven and bake for 20–25 minutes, or until the top layer is lightly golden brown. The bars should feel set around the edges but still slightly soft in the center. The aroma of butter, chocolate, and orange will fill your kitchen—an unmistakable sign they’re ready.
- Cool Completely: Remove the pan from the oven and allow the bars to cool completely at room temperature. Cooling is essential so the layers set properly, making slicing easier without the marmalade or chocolate oozing out. Use the overhanging parchment to lift the bars out gently.
- Slice and Serve: Place the cooled block on a cutting board. Use a sharp knife to cut into 16 even bars, wiping the knife clean between cuts for neat edges. Serve immediately, or store in an airtight container at room temperature. These bars keep for at least 4 days and are perfect for snacks, dessert, or on-the-go treats.
Notes
- For the best texture, make sure your butter is at room temperature before mixing. Cold butter won’t incorporate evenly, while melted butter will make the crumble too soft.
- Bittersweet chocolate is recommended over semisweet or milk chocolate for a balanced flavor that complements the tart marmalade.
- Use a spoon or offset spatula to spread the marmalade evenly; this prevents clumping and ensures each bar has the perfect sweet-tart bite.
- Par-baking the base is essential. It sets the crust, preventing sogginess when the marmalade and chocolate are added.
- Bars can be customized with other citrus preserves or mixed with nuts for added texture.
Chef’s Secrets for Perfect Bars
The key to these bars’ irresistible flavor is balance and layering.
Press the base layer firmly for stability, but don’t over-press, or it can become too dense.
Spread marmalade over a warm crust to help it meld slightly with the base, creating a soft, cohesive layer.
Using chopped chocolate instead of chips allows for pockets of gooey richness rather than uniform melting.
For an even more luxurious touch, sprinkle a tiny pinch of sea salt over the chocolate layer before baking—it enhances both the chocolate and citrus flavors.
Serving Suggestions for Everyday Enjoyment
These bars are versatile and can be served in numerous ways.
Enjoy them as an afternoon snack with tea or coffee, or slice smaller pieces for a lunchbox treat.
They pair beautifully with vanilla ice cream or whipped cream for a dessert option.
For brunch, serve alongside fresh fruit or yogurt for a fiber-rich, satisfying bite.
They’re also perfect for gifting—stacked in a box with parchment, they make an elegant homemade treat.
Storage Tips to Maintain Freshness
To keep your bars fresh, store them in an airtight container at room temperature for up to 4 days.
If you want to keep them longer, wrap each bar individually in plastic wrap and store in the freezer for up to 2 months.
Thaw at room temperature before serving.
Avoid refrigerating unless necessary, as this can make the oat crumble slightly hard and less tender.
Frequently Asked Questions
1. Can I use different types of jam or preserves?
Yes! While orange marmalade pairs best with bittersweet chocolate, you can experiment with raspberry, apricot, or even lemon curd for a unique twist. Just ensure the preserve isn’t too runny to prevent soggy bars.
2. Can I make these bars gluten-free?
Absolutely. Substitute the all-purpose flour with a gluten-free flour blend and ensure your oats are certified gluten-free. The texture will remain crumbly and delicious.
3. Can I use salted butter instead of unsalted?
Yes, but reduce the added kosher salt to 1/4–1/2 tsp depending on your taste. This keeps the balance between sweet, tangy, and chocolatey flavors.
4. How do I prevent the top crumble from burning?
If your oven tends to run hot, loosely cover the bars with aluminum foil after 15 minutes of baking. This allows the inside to cook through while protecting the delicate oat topping.
5. Can I prepare these bars ahead of time?
Definitely! You can assemble the bars the day before baking and refrigerate them overnight. Bake as usual the next day. This makes them a great make-ahead dessert or snack for busy days.