These Cinnamon Baked Apples are a standout dessert that blends simplicity with indulgence.
Naturally sweetened and entirely plant-based, they offer a wholesome alternative to traditional sugary treats.
Beyond their comforting flavor and warm aroma, these apples provide fiber for digestive health and minimal saturated fat, making them a guilt-free dessert option.
Coconut sugar adds a subtle caramelized sweetness, while the optional coconut oil contributes a touch of healthy fat.
Quick to prepare and requiring just one bowl, this recipe is perfect for busy weeknights, holiday gatherings, or meal prep.
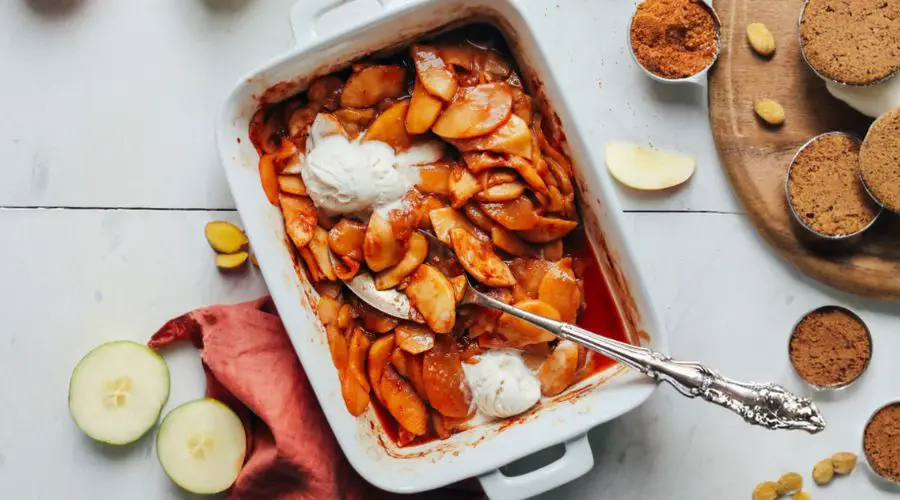
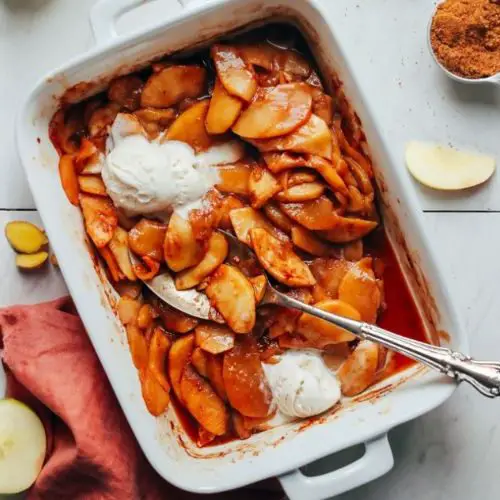
Served warm, they pair beautifully with plant-based whipped cream or coconut ice cream for a satisfying, nutrient-conscious dessert that appeals to the whole family.
Must-Have Tools for Perfect Results
9×13-Inch Baking Dish
Essential for evenly cooking the apple slices. Its generous size ensures apples roast without overcrowding, delivering consistent tenderness and caramelization. Perfect for casseroles, roasted vegetables, or sheet-pan meals.
Paring Knife
Ideal for peeling, coring, and thinly slicing apples. Offers precision for uniform cuts, which ensures even baking. Also a versatile tool for trimming fruits and vegetables in everyday cooking.
Mixing Bowl
Combines all ingredients effortlessly. A sturdy bowl keeps the apples and spices evenly coated and simplifies tossing. Essential for sauces, batters, and salads.
Aluminum Foil
Helps cover the dish during baking to lock in moisture and prevent burning. A simple tool that doubles for storage, grilling, and keeping foods fresh.
Measuring Spoons & Cups
Ensure accurate measurements of spices, sugars, and liquids. Precision contributes to perfect flavor and consistency, making them indispensable in every kitchen.
Quick Cinnamon Baked Apples
Equipment
- 1 9×13 inch baking dish
- 1 paring knife
- 1 Mixing bowl
- 1 Aluminum foil
- Measuring Spoons and Cups
Ingredients
Apples:
- 6 –7 medium apples mix of tart and sweet varieties, organic preferred
- 2 Tbsp lemon juice
- 1 Tbsp coconut oil optional
Spices & Sweeteners:
- ⅔ cup coconut sugar or organic cane sugar; optional half stevia
- 1 ½ tsp ground cinnamon
- ¾ tsp fresh grated ginger or 1/2 tsp ground ginger
- 1 pinch nutmeg
- 1 pinch sea salt
Sauce Thickener:
- 3 Tbsp cornstarch or arrowroot starch
- 3 Tbsp fresh apple juice or water
- Optional Toppings:
- Coconut whipped cream
- Vanilla bean coconut ice cream
Instructions
- Preheat Oven and Prepare Dish:Begin by preheating your oven to 350°F (176°C) to ensure even baking. Select a 9×13-inch baking dish or a similar-sized pan, lightly greasing it with a touch of coconut oil if desired. This step guarantees the apples won’t stick and allows the heat to distribute evenly throughout the dish.
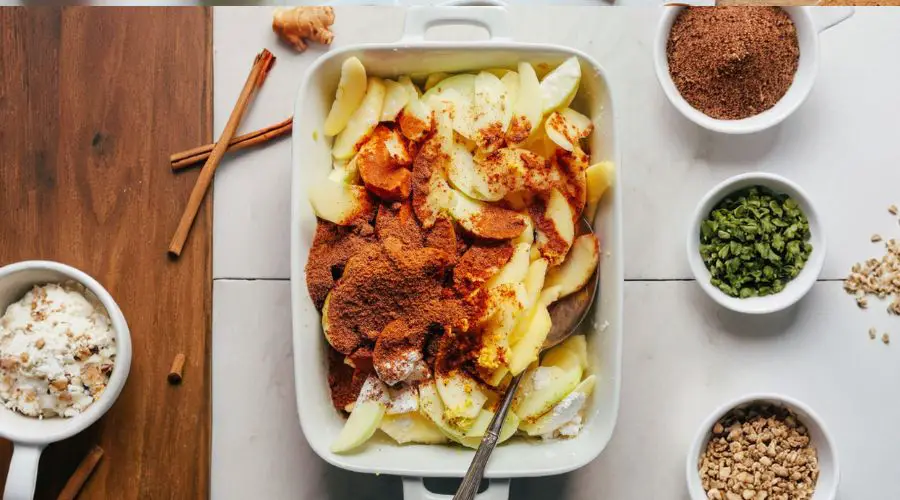
- Peel, Core, and Slice Apples:Using a sharp paring knife, carefully peel each apple, remove the core, and slice them lengthwise into thin, consistent pieces. Aim for uniform thickness so the apples bake evenly, becoming tender without turning mushy. Place all the prepared slices directly into your baking dish in an even layer for consistent cooking.
- Combine Spices and Sweeteners:In the baking dish, sprinkle the apples with coconut sugar, ground cinnamon, fresh grated ginger, a pinch of nutmeg, and sea salt. Drizzle with lemon juice and optional coconut oil to enhance flavor and add healthy fats. Toss gently with a spoon or your hands until every apple slice is fully coated with the spiced mixture.
- Prepare Thickening Mixture:In a small bowl, mix the cornstarch or arrowroot with apple juice or water until smooth and lump-free. Pour this mixture over the spiced apples to help thicken the natural juices released during baking, creating a luscious, slightly caramelized sauce. Ensure the liquid is evenly distributed for uniform coating.
- Cover and Bake Initially:Loosely cover the baking dish with aluminum foil to trap moisture and prevent the apples from drying out. Bake in the preheated oven for 45 minutes, allowing the apples to soften and release their natural juices while the spices infuse flavor. This covered baking step ensures a tender, moist texture.
- Uncover and Caramelize:Carefully remove the foil and continue baking for an additional 10–15 minutes. This step encourages the apples to caramelize slightly on top while remaining tender in the center. Monitor closely near the end to achieve a golden, slightly crispy finish without burning.
- Serve and Garnish:Once baked, allow the apples to cool slightly before serving. Enjoy them warm on their own or top with coconut whipped cream or vanilla bean coconut ice cream for a decadent, plant-based dessert. Leftovers can be stored in the refrigerator for 3–4 days or frozen for up to one month, reheating gently before serving.
Notes
- For uniform cooking, slice apples evenly; thinner slices will caramelize faster.
- Mix tart and sweet apple varieties to balance natural acidity and sweetness.
- Coconut oil is optional but adds a subtle richness and silky texture.
- Cornstarch or arrowroot ensures the sauce thickens without adding extra sugar.
- Leftovers reheat beautifully in the oven or microwave; add a splash of apple juice if the sauce thickens too much.
- For a sugar-free version, replace coconut sugar with stevia or monk fruit sweetener to taste.
- Fresh grated ginger provides a vibrant kick; ground ginger can be substituted if needed.
Chef’s Secrets for Perfect Apples
The key to perfectly baked apples lies in consistency and layering flavors.
Always slice the apples uniformly to ensure every piece cooks evenly, avoiding mushy or undercooked centers.
Tossing the apples thoroughly with spices, sugar, and lemon juice guarantees each bite is flavorful.
Covering the dish initially locks in moisture, creating tender apples, while finishing uncovered allows the top layer to caramelize beautifully.
Choosing a mix of tart and sweet apples balances the natural sugars, enhancing depth and complexity without overpowering the palate.
Serving Suggestions for Maximum Enjoyment
Serve these baked apples warm straight from the oven for the ultimate comfort dessert.
Pair them with plant-based whipped cream or a scoop of vanilla bean coconut ice cream for added creaminess and indulgence.
For a brunch twist, spoon the apples over oatmeal or pancakes.
They also make a delightful topping for vegan yogurt bowls or smoothie bowls.
Garnish with toasted nuts or a drizzle of maple syrup to elevate the flavor and presentation effortlessly.
Storage Tips to Keep Fresh
Store leftover baked apples in an airtight container in the refrigerator for 3–4 days.
To freeze, place in a freezer-safe container for up to one month, separating layers with parchment paper to prevent sticking.
Reheat gently in the oven at 350°F (176°C) covered, or use a microwave-safe dish with a splash of apple juice to revive the sauce.
Avoid overcooking during reheating to maintain texture and flavor integrity.
Frequently Asked Questions About Recipe
1. Can I use any apple variety?
Yes! Mixing tart apples like Granny Smith with sweeter ones like Honeycrisp yields a balanced flavor. Avoid overly soft varieties that may become mushy during baking.
2. Is this dessert vegan and gluten-free?
Absolutely. The recipe is entirely plant-based, uses naturally sweet ingredients, and contains no gluten, making it suitable for various dietary preferences.
3. Can I make this recipe ahead of time?
Yes, prep the apples and toss with spices a few hours in advance. Keep covered in the fridge until ready to bake. This makes it great for entertaining or busy schedules.
4. How can I thicken the sauce without cornstarch?
Arrowroot powder works as an excellent alternative. Another option is to simmer the apple juices briefly after baking to reduce and thicken naturally.
5. What toppings pair best with baked apples?
Plant-based whipped cream, coconut ice cream, toasted nuts, or a drizzle of maple syrup all complement the warm spices and natural sweetness, enhancing texture and flavor.
This recipe is inspired by minimalistbaker and has been carefully refined to enhance clarity, streamline preparation steps, and ensure accurate results. We’ve also included health benefits, nutritional highlights, and Must-Have Tools to help you get the best results every time you cook.