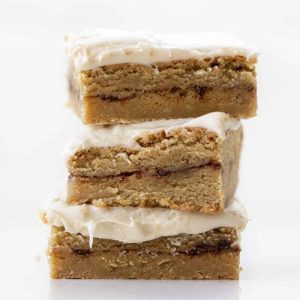
These Cinnamon Roll Blondies combine the rich, buttery sweetness of classic blondies with a gooey cinnamon swirl and light cream cheese frosting.
Packed with protein from eggs and healthy fats from butter, they’re indulgent yet satisfying.
Quick to make and perfect for dessert, snacks, or meal prep, they’re a cozy treat that balances flavor, texture, and everyday convenience.
Cinnamon Roll Blondies
Equipment
- 9×9 inch baking pan
- Parchment paper (or butter for greasing)
- Large Mixing Bowl
- Medium mixing bowl
- Small Mixing Bowl
- Rubber spatula
- Whisk
- Stand mixer with paddle attachment
Ingredients
Blondie Base:
- 1 cup 227 g unsalted butter, melted
- 1¾ cups 350 g light brown sugar, packed
- 2 large eggs room temperature
- 1 large egg yolk room temperature
- 1½ tsp vanilla extract
- 2½ cups 285 g all-purpose flour
- 2 tsp cornstarch
- 1 tsp baking powder
- 1 tsp kosher salt
Cinnamon Swirl Layer:
- 2 tbsp unsalted butter melted
- ¼ cup light brown sugar packed
- 2 tsp ground cinnamon
Whipped Cream Cheese Frosting:
- 3 oz cream cheese softened
- ¼ cup 57 g unsalted butter, softened
- 1½ cups 188 g confectioners’ sugar, sifted
- 1 tsp vanilla extract
- Pinch of kosher salt
Instructions
- Prepare Your Baking Pan: Start by preheating your oven to 350°F (175°C) to ensure even baking. Line a 9×9-inch baking pan with parchment paper, allowing a slight overhang on the sides for easy removal later. If you don’t have parchment, lightly grease the pan with butter or nonstick spray and dust with a little flour. Setting up the pan properly now prevents sticking and ensures perfectly shaped blondie bars.
- Mix Melted Butter and Sugar: In a large mixing bowl, pour in 1 cup (227 g) of melted unsalted butter. Add 1¾ cups (350 g) of tightly packed light brown sugar. Using a whisk or sturdy spatula, stir the mixture until the sugar is fully dissolved and the mixture is smooth and glossy. This step ensures your blondies will be rich, moist, and chewy rather than gritty or dry.
- Incorporate Eggs and Yolks: Add 2 large eggs one at a time to the butter-sugar mixture, whisking thoroughly after each addition. Then add 1 large egg yolk, whisking again until the batter is smooth and uniform. The eggs provide structure and a tender crumb, so make sure they are fully incorporated without overmixing, which could make the blondies dense.
- Add Vanilla for Flavor: Pour in 1½ teaspoons of pure vanilla extract and whisk gently. This step enhances the buttery sweetness and brings out the cinnamon flavor in the swirl, giving your blondies a warm, comforting aroma.
- Combine Dry Ingredients: In a separate medium-sized bowl, sift together 2½ cups (285 g) all-purpose flour, 2 teaspoons cornstarch, 1 teaspoon baking powder, and 1 teaspoon kosher salt. Whisk until fully blended. The cornstarch helps create a tender, soft texture, while baking powder gives just enough lift without making the bars cakey.
- Fold Dry Ingredients into Wet Mixture: Gradually add the dry ingredients into the butter-sugar-egg mixture using a rubber spatula. Fold carefully until fully combined and smooth, scraping the sides and bottom of the bowl to ensure no pockets of flour remain. Avoid overmixing, which can make the blondies tough. Set this batter aside while you prepare the cinnamon swirl.
- Prepare the Cinnamon Swirl: In a small bowl, combine 2 tablespoons melted butter, ¼ cup packed light brown sugar, and 2 teaspoons ground cinnamon. Stir until smooth and the sugar is evenly coated. This mixture will create the gooey, aromatic layer that gives these blondies their signature cinnamon roll flavor.
- Assemble the Blondies – First Layer: Spoon half of the blondie batter into your prepared baking pan. Use a rubber spatula to spread it evenly, pressing gently into the corners and smoothing the top. The batter will be thick, so take your time to ensure an even layer.
- Add the Cinnamon Layer: Carefully spread the cinnamon-sugar mixture over the first layer of blondie batter. Aim for an even coating, but it doesn’t need to be perfect. The cinnamon layer will bake into the blondies, creating pockets of sweet, spiced goo.
- Top with Remaining Blondie Batter: Spoon the remaining blondie batter over the cinnamon layer and gently spread it out to cover the entire surface. Smooth the top lightly with a spatula, making sure it reaches the edges. This seals the cinnamon layer inside and ensures each bite has the perfect swirl.
- Bake Until Golden: Place the pan in the preheated oven and bake for 35–38 minutes. Check for doneness by gently pressing the edges—they should be lightly golden brown. The center should no longer jiggle, though it may still look slightly soft. This ensures a chewy, fudgy texture rather than a dry or overcooked bar.
- Cool Completely Before Frosting: Once baked, remove the pan from the oven and let the blondies cool completely in the pan. This may take 45–60 minutes. Cooling is essential because the cream cheese frosting will melt if the blondies are still warm, resulting in a runny mess instead of a smooth, fluffy topping.
- Prepare the Whipped Cream Cheese Frosting: In a stand mixer fitted with the paddle attachment, combine 3 ounces of softened cream cheese, ¼ cup (57 g) softened butter, 1½ cups sifted confectioners’ sugar, 1 teaspoon vanilla extract, and a pinch of kosher salt. Mix on low speed until the ingredients just come together. Then increase to high speed and whip for 4–5 minutes until light, airy, and creamy. This creates a smooth, luscious frosting that spreads easily over the blondies.
- Frost and Finish: Spread the whipped cream cheese frosting evenly over the cooled blondies using an offset spatula or the back of a spoon. Take your time to create a smooth layer or decorative swirls for visual appeal. Once frosted, the blondies are ready to cut into 9 generous bars.
- Serve and Enjoy: Use a sharp knife to cut the blondies into squares or rectangles. Serve immediately, or store in an airtight container at room temperature for up to 3 days. These bars are also freezer-friendly and make a delicious, indulgent treat anytime.
Notes
- Use room-temperature eggs to ensure smooth, well-incorporated batter. Cold eggs can cause the melted butter to seize, resulting in a lumpy texture.
- When measuring flour, spoon it into your measuring cup and level with a knife. Avoid scooping directly, which can lead to dense blondies.
- Melt the butter gently and allow it to cool slightly before combining with eggs to prevent curdling.
- Spread the cinnamon layer carefully; it doesn’t have to be perfectly even, but avoid disturbing the bottom blondie layer to maintain distinct swirls.
- Cool the blondies completely before frosting. Warm bars will melt the cream cheese frosting and make it runny.
Chef’s Secrets for Perfect Results
Achieving the perfect blondie requires a few key techniques.
Whisking the butter and sugar together thoroughly ensures a glossy, cohesive base that bakes into a chewy texture.
Folding the flour mixture gently rather than stirring vigorously keeps the bars tender.
When creating the cinnamon layer, consider slightly softening the brown sugar to prevent graininess.
Using high-quality butter and pure vanilla extract enhances the flavor significantly, while taking the time to whip the cream cheese frosting ensures a light, fluffy topping that complements the dense blondie base.
Serving Suggestions for Maximum Enjoyment
These blondies are incredibly versatile.
Serve them as a decadent dessert with a scoop of vanilla ice cream or a drizzle of caramel sauce.
They’re also perfect for brunch or afternoon tea alongside a cup of coffee or chai.
For a fun twist, sprinkle chopped toasted nuts or mini chocolate chips on top of the frosting.
Cut into smaller squares for bite-sized treats at parties or pack them individually for on-the-go snacks.
Storage Tips to Keep Fresh
Store your blondies in an airtight container at room temperature for up to 3 days, keeping the frosting intact.
For longer storage, refrigerate for up to a week; allow the bars to come to room temperature before serving to restore their soft texture.
These blondies also freeze beautifully wrap individual bars in plastic wrap and place them in a freezer-safe bag for up to 2 months.
Thaw overnight in the refrigerator, then bring to room temperature for the best flavor and texture.
Frequently Asked Questions
1. Can I use a different pan size?
Yes, a 9×13-inch pan can be used, but the bars will be thinner and may bake slightly faster. Reduce the baking time by 5–7 minutes and check for doneness to prevent overbaking.
2. Can I make this recipe dairy-free?
You can substitute butter with a plant-based margarine and use dairy-free cream cheese. Ensure the substitutes are room temperature and fully softened to achieve the same texture and flavor.
3. Can I skip the cream cheese frosting?
Absolutely! The blondies are delicious on their own, with the cinnamon layer providing sweetness and moisture. Frosting adds richness, but you can sprinkle powdered sugar or a simple glaze as an alternative.
4. How do I get a soft, gooey center?
Avoid overbaking. The edges should be golden while the center is just set. The bars will continue to firm slightly as they cool. Also, do not overmix the batter once flour is added, as that can make the blondies tough.
5. Can I prepare these in advance for meal prep?
Yes, these blondies are excellent for meal prep. Bake, cool, and frost them, then cut into portions and store individually in airtight containers.
They make a satisfying snack or dessert throughout the week and are easily portable.