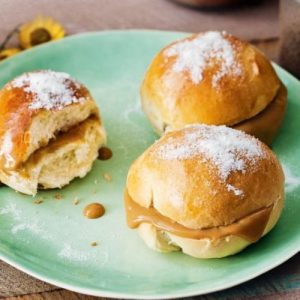
Start your day with a taste of Argentina through these soft, golden caramel buns — a delightful treat that balances sweetness with wholesome goodness.
Rich in protein and good fats from eggs and butter, these fiber-friendly pastries are perfect for breakfast or brunch.
Quick, satisfying, and ideal for meal prep, they bring indulgence without compromising everyday nutrition.
Easy Facturas
Equipment
- Large mixing bowl × 1
- Small mixing bowl × 1
- Measuring Cups and Spoons
- Wooden spoon or dough scraper × 1
- Baking trays × 2
- Baking paper × 2 sheets
- Pastry brush × 1
- Oven × 1
- Cooling rack × 1
Ingredients
- 1 teaspoon instant yeast
- 160 milliliters warm milk about 2/3 cup
- 70 grams caster sugar about 1/3 cup
- 450 grams bread flour about 3 cups
- 1 teaspoon salt
- 2 large eggs lightly whisked
- 50 grams unsalted butter melted and cooled (about 3 ½ tablespoons)
- 1 teaspoon vanilla extract
- 1 extra egg lightly whisked (for brushing)
- Water for brushing
- Extra caster sugar for sprinkling
- Nestlé Top ‘n’ Fill Caramel or any caramel spread, for filling
Instructions
- Activating the Yeast: Begin by preparing your yeast mixture to ensure the dough rises perfectly. In a small mixing bowl, combine 1 teaspoon of instant yeast with 2 tablespoons of warm milk and 2 teaspoons of caster sugar. Stir gently to combine. Cover the bowl with a clean kitchen towel or plastic wrap and set it aside in a warm, draft-free spot for about 10 minutes. You should see a frothy layer form on the surface, indicating the yeast is active and ready for use.
- Mixing the Dry Ingredients: In a large mixing bowl, add 450 grams (about 3 cups) of bread flour, 1 teaspoon of salt, and the remaining caster sugar. Stir gently with a spoon or whisk to ensure the salt and sugar are evenly distributed throughout the flour. This step helps create a balanced base for your dough and ensures even fermentation during proofing.
- Combining Wet Ingredients and Dough Formation: Make a well in the center of your dry mixture. Into this well, pour the frothy yeast mixture from Step 1, the lightly whisked eggs, 50 grams of melted and cooled unsalted butter, 1 teaspoon of vanilla extract, and half of the remaining warm milk. Using a round-bladed knife or a dough scraper, mix these ingredients with a gentle cutting motion until they start to come together. Gradually add more warm milk if the mixture feels too dry. Once combined, use your hands to knead the dough lightly in the bowl until it forms a rough ball.
- Kneading the Dough: Transfer the dough to a clean, lightly floured work surface. Knead the dough using the heel of your hand for approximately 10 minutes, applying even pressure and folding the dough over itself. This process develops the gluten, giving the buns their soft yet elastic texture. You’ll know the dough is ready when it is smooth, slightly tacky to the touch, and elastic enough to stretch without tearing.
- First Proofing of Dough: Lightly grease a large mixing bowl with butter or oil. Place the kneaded dough into the bowl and turn it over so all sides are lightly coated. Cover the bowl with a damp kitchen towel or cling wrap to retain moisture. Leave the dough in a warm, draft-free environment to prove for about 1 ½ hours or until it doubles in size. This step is essential for developing flavor and texture.
- Shaping the Buns: Line two baking trays with parchment paper to prevent sticking. Gently punch down the risen dough to release any excess air. Transfer the dough to your work surface and divide it evenly into 12 portions using a bench scraper or sharp knife. Lightly knead each portion to form smooth, round balls. This shaping ensures uniform buns that bake evenly. Place the shaped dough balls onto the prepared baking trays, leaving space between each to allow for expansion during baking.
- Second Proofing of Dough: Cover the shaped buns loosely with a clean kitchen towel. Allow them to rest and rise again for about 30 minutes in a warm environment. This second proofing step ensures the buns achieve a light, fluffy texture and the perfect golden crust during baking.
- Preparing for Baking: Preheat your oven to 180°C (350°F) to ensure it reaches the correct temperature by the time the buns are ready. Once proofed, lightly brush the tops of the buns with the extra whisked egg. This egg wash will give the buns a glossy, golden finish.
- Baking the Caramel Buns: Place the baking trays in the preheated oven on the middle rack. Bake for approximately 25 minutes or until the buns sound hollow when tapped gently on the base and have turned a beautiful golden brown. Baking times may vary slightly depending on your oven, so check them from around 22 minutes to ensure they don’t overbake.
- Cooling and Preparing for Filling: Once baked, remove the trays from the oven and place the buns onto a cooling rack. Allow them to cool slightly so they are easier to handle. This will prevent the caramel from melting excessively when applied.
- Adding the Caramel Filling: Using a pastry brush, lightly moisten the top surfaces of each bun with a little water. Sprinkle generously with extra caster sugar to add a slight crunch and sweetness. Cut each bun horizontally into two halves. Spread a generous amount of Nestlé Top ‘n’ Fill Caramel (or your preferred caramel spread) over the base halves of the buns. Place the top halves back over the caramel layer, gently pressing down to secure them.
- Serving the Facturas: Arrange your freshly prepared caramel buns on a serving platter. Serve warm for the best experience, letting the aroma of caramel and vanilla delight your senses. These buns are perfect for breakfast, brunch, or as a sweet snack with coffee or tea.
Notes
- Use warm milk (around 37°C / 98°F) to activate the yeast effectively — too hot or too cold will slow the rising process.
- Fresh yeast will work just as well, but adjust quantity accordingly.
- Kneading is essential for developing gluten — ensure the dough becomes smooth and elastic before proofing.
- For an extra glossy finish, add a second egg wash before baking.
- Let the buns cool slightly before cutting to avoid caramel spilling.
- You can substitute the caramel filling with dulce de leche or chocolate spread for a variation.
Chef’s Secrets for Perfect Buns
The secret to achieving irresistibly soft and fluffy caramel buns lies in the proofing and kneading process.
Kneading develops the gluten structure, which gives the buns their airy texture, while allowing the dough to rise twice ensures a tender crumb and a light bite.
Using fresh, warm milk improves yeast activation, giving the buns a richer flavor.
For an indulgent touch, brush the buns with butter immediately after baking — this enhances softness and adds a rich aroma.
A small tip if your kitchen is cool, create a warm proofing environment by placing the dough bowl inside an oven with only the light turned on.
Serving Suggestions for Caramel Buns
These caramel buns are versatile and can be enjoyed in many ways.
For a luxurious breakfast, serve them warm with a cup of freshly brewed coffee or chai tea.
They also pair beautifully with a glass of cold milk for a sweet afternoon treat.
For brunch gatherings, arrange them on a platter with fresh berries and lightly whipped cream for a visually appealing, indulgent option.
You can also toast the buns slightly and serve with butter and a sprinkle of cinnamon for a comforting, café-style snack.
Storage Tips for Freshness
To maintain the freshness and texture of your caramel buns, store them in an airtight container at room temperature for up to 2 days.
If you want to store them for longer, wrap each bun individually in plastic wrap and keep in an airtight container or zip-lock bag, then freeze for up to 2 months.
To enjoy frozen buns, thaw at room temperature and warm slightly in the oven or microwave before serving.
Avoid refrigerating buns for long periods, as this can dry them out and affect their texture.
Frequently Asked Questions
1. Can I make these buns ahead of time?
Yes! You can prepare the dough and shape the buns a day ahead. Simply complete the first proofing, shape them, then cover and refrigerate overnight.
In the morning, let them come to room temperature, complete the second proofing, and bake as directed. This makes them perfect for planned breakfasts or brunch.
2. Can I replace bread flour with all-purpose flour?
Yes, you can substitute all-purpose flour, but bread flour produces a slightly chewier texture and better rise. If using all-purpose flour, the buns may be softer but still delicious.
Consider adding 1 tablespoon of vital wheat gluten per cup of flour to mimic bread flour’s structure.
3. Is there a dairy-free version of this recipe?
Absolutely. Replace the milk with plant-based milk such as almond or oat milk and use dairy-free butter to make the recipe vegan-friendly.
Ensure your yeast is free from dairy or other animal products. The texture will remain soft and rich, though the flavor will vary slightly depending on your substitutions.
4. Can I add fillings other than caramel?
Definitely! These buns work well with a variety of fillings. Try dulce de leche, chocolate spread, fruit preserves, or nut butters for different flavor variations.
Simply spread your desired filling after cutting the buns in half, as instructed.
5. How do I know when the buns are perfectly baked?
The buns should have a golden-brown top and sound hollow when tapped gently on the base. The internal temperature should be around 88–90°C (190–195°F) for optimal softness.
Overbaking can dry them out, so check a few minutes before the recommended baking time to ensure they stay tender and moist.