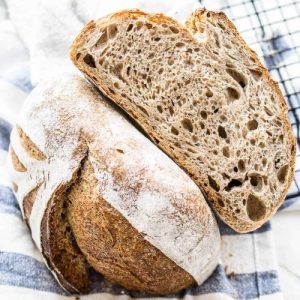
This Flaxseed Meal Sourdough Bread is a wholesome, fiber-rich loaf that’s perfect for everyday baking.
Packed with plant-based protein, healthy fats, and minimal saturated fat, it supports digestion and sustained energy.
With its slow-fermented sourdough process, it’s easy to digest, flavorful, and naturally leavened, making it an ideal choice for satisfying breakfasts, sandwiches, or meal prep staples.
Flaxseed Meal Sourdough Bread
Equipment
- Large mixing bowl (1)
- Measuring cups and spoons (1 set)
- Bench scraper or spatula – 1
- Banneton or proving basket – 1
- Shower cap or plastic bag – 1
- Oven-safe baking tray or skillet – 1
- Lame or sharp knife – 1
- Wire cooling rack (1)
Ingredients
- 396 g white bread flour ≈3 ⅕ cups
- 48 g whole wheat flour ≈⅖ cup
- 36 g flaxseed meal ≈¼ cup
- 366 g water ≈1 ½ cups
- 72 g active sourdough starter ≈4 ⅘ tbsp
- 9.6 g salt ≈1 ⅗ tsp
- 25 g boiling water ≈2 tbsp – for dissolving salt
- Semolina for dusting (optional)
Instructions
- Prepare the Starter Mixture: Measure 280 g of water into a medium bowl and add 72 g of active sourdough starter. Stir gently until the starter is fully dissolved, creating a smooth and slightly frothy liquid. This ensures the natural yeast is evenly distributed, promoting uniform fermentation later. Set aside while preparing the dry ingredients.
- Combine Dry Ingredients: In a large mixing bowl, combine 396 g of white bread flour, 48 g of whole wheat flour, and 36 g of flaxseed meal. Mix thoroughly to avoid clumps and ensure even distribution. Proper mixing of dry ingredients is essential for consistent hydration and uniform dough texture.
- Form the Initial Dough: Pour the starter mixture into the dry ingredients. Using a spatula or your hands, mix until all the water is absorbed and a rough, shaggy dough forms. Don’t worry if the dough looks uneven at this stage; it will smooth out during the stretch and fold process.
- Autolyse Rest: Cover the bowl loosely with a clean towel or plastic wrap and let the dough rest for 60 minutes. During autolyse, the flour fully absorbs water, gluten begins to form naturally, and dough handling becomes easier. This step also enhances flavor and crumb structure.
- Dissolve Salt in Hot Water: While the dough rests, combine 8 g of salt with 25 g of boiling water. Stir until fully dissolved and allow it to cool to room temperature. Adding cooled salted water prevents killing the yeast while ensuring even seasoning throughout the dough.
- Incorporate Salted Water: After autolyse, pour the cooled salted water over the dough. Mix thoroughly until fully incorporated, creating a uniform and slightly tacky dough. Salt strengthens gluten and controls fermentation speed, contributing to both flavor and texture.
- First Stretch and Fold: Perform the first stretch and fold in the mixing bowl. Lift one edge of the dough and fold it over itself. Rotate the bowl 90 degrees and repeat on all sides. Cover and rest for 30 minutes. This technique develops gluten without intensive kneading.
- Subsequent Stretch and Folds: Repeat the stretch and fold process four more times, resting 30 minutes between each. Each fold strengthens the dough, enhances elasticity, and promotes an even crumb structure. After the final fold, the dough should feel smooth, cohesive, and slightly springy.
- Shape the Loaf: Transfer the dough to a lightly floured surface. Shape it into a tight round or oval by folding the edges toward the center and rotating gently to create surface tension. Proper shaping helps the bread hold its structure during proofing and baking.
- Prepare Proofing Basket: Flour a banneton or proving basket generously and line it with a clean towel. Place the shaped dough seam-side up in the basket. Cover with a shower cap or plastic bag to prevent drying. Refrigerate overnight or up to 24 hours for slow fermentation.
- Preheat the Oven: Remove the dough from the fridge and allow it to rest at room temperature for 45 minutes. Preheat the oven to 250°C (480°F) with an oven-safe bowl of water inside to create steam. Place the baking tray or skillet in the oven to ensure it’s hot. A hot, steamy environment mimics professional bakery ovens, supporting oven spring.
- Prepare for Baking: Sprinkle semolina generously on the hot baking surface to prevent sticking. Invert the dough from the proofing basket onto the tray or skillet. Score the top of the loaf using a sharp lame or knife dipped in water. Simple slashes are sufficient, allowing controlled expansion during baking.
- Bake the Bread: Place the loaf in the oven and reduce the temperature to 220°C (428°F). Bake for 30 minutes, then flip the loaf upside down and bake an additional 5 minutes for even browning. The bread should sound hollow when tapped and have a deep golden-brown crust.
- Cool the Loaf: Remove the bread from the oven and transfer it to a wire cooling rack. Allow it to cool completely before slicing. Cooling is essential to set the crumb and prevent a gummy interior.
- Enjoy Your Bread: Slice and serve the bread with butter, olive oil, or your favorite toppings. It is perfect for sandwiches, toast, or as a meal-prep staple. Properly stored, the loaf remains fresh for several days and retains its soft, airy interior and crisp crust.
Notes
- This sourdough is beginner-friendly, but patience is key—slow fermentation develops flavor and improves digestibility.
- Use room-temperature ingredients for even hydration and consistent dough texture.
- Flaxseed meal adds nutty flavor and healthy fats; fresh-ground flaxseed works best.
- Autolyse and stretch-and-fold steps are essential for a strong gluten network without intensive kneading.
- Proofing times may vary depending on ambient temperature—look for a slightly domed, airy dough.
- For a softer crust, reduce baking time slightly; for a thicker, crunchier crust, extend by 3–5 minutes.
Chef’s Secrets: Maximizing Flavor And Texture
The secret to this loaf’s flavor lies in the slow, cold fermentation.
Letting the dough proof overnight in the fridge not only develops a rich, tangy sourdough flavor but also allows the natural enzymes to break down phytic acid, improving nutrient absorption.
Using a mix of white bread flour and whole wheat flour creates a balanced texture: soft yet structured.
Flaxseed meal enhances the nutty taste while adding fiber and omega-3 fatty acids.
Always ensure the oven is fully preheated, and use steam to encourage oven spring—this replicates a professional bakery environment and gives a crisp, glossy crust.
Serving Suggestions: Enjoying Bread Creatively
This flaxseed sourdough is versatile.
Slice it thick for hearty breakfast toast with avocado, nut butter, or soft-boiled eggs.
Thin slices make perfect bases for open-faced sandwiches, topped with smoked salmon, cream cheese, or roasted vegetables.
It also pairs beautifully with soups and stews, absorbing broths while adding a subtle nutty crunch.
Toasting the bread enhances its aroma, and a light drizzle of olive oil or a spread of creamy butter elevates every bite.
For meal prep, pre-slice and store in an airtight container or freeze individual portions for quick use throughout the week.
Storage Tips: Keeping Bread Fresh Longer
To maintain freshness, allow the loaf to cool completely before storing.
Wrap in a clean kitchen towel or place in a paper bag to prevent excess moisture while retaining softness.
For longer storage, cut into slices and freeze in airtight freezer bags—thaw slices at room temperature or toast directly from frozen.
Avoid storing in plastic at room temperature for extended periods, as this may cause the crust to soften and the bread to become gummy.
Proper storage ensures the loaf stays flavorful, with a chewy interior and crisp crust.
Frequently Asked Questions
1. Can I use whole wheat flour only?
Yes, you can, but expect a denser loaf. Whole wheat absorbs more water, so increase hydration slightly and allow extra proofing time to prevent a heavy texture.
2. How long can I keep this bread at room temperature?
Stored in a paper bag or wrapped in a towel, the bread stays fresh for 2–3 days. For longer life, freeze slices as needed.
3. Can I substitute flaxseed meal with chia or sunflower seeds?
Yes, but chia seeds absorb more water, so reduce hydration slightly. Sunflower seeds will add crunch but won’t contribute as much omega-3 nutrition as flax.
4. Why is my dough sticky or hard to handle?
Sticky dough often means underdeveloped gluten or insufficient folding. Ensure you complete all stretch-and-fold steps and allow the autolyse period. Lightly flour your hands when shaping if needed.
5. How can I achieve a crisp crust at home?
Use an oven-safe bowl with water to create steam during baking, and preheat your tray or skillet thoroughly. For an extra-crispy crust, bake 3–5 minutes longer while monitoring closely to prevent burning.