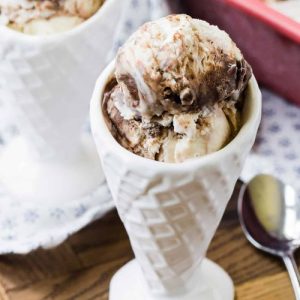
Indulge in creamy, homemade fudge swirl ice cream without an ice cream maker!
This no-churn recipe is delightfully easy, using just four wholesome ingredients to create a rich, satisfying treat.
Packed with protein from heavy cream and sweetened condensed milk, and topped with luscious chocolate fudge, it’s a quick, crowd-pleasing dessert perfect for everyday enjoyment or effortless entertaining.
Fudge Swirl Ice Cream
Equipment
- 1 large mixing bowl or stand mixer bowl
- 1 loaf pan (8 or 9-inch)
- 1 spatula or table knife
- 1 whisk or electric mixer
Ingredients
- 2 cups heavy cream chilled (at least 36% milk fat)
- 1 tablespoon pure vanilla extract
- 1 can 14 ounces sweetened condensed milk
- 1 cup hot fudge sauce room temperature
Instructions
- Prepare the Mixing Equipment: Before starting, ensure your mixing bowl or stand mixer bowl is clean and completely dry. If you are using a stand mixer, attach the whisk attachment. Chilling the bowl in the fridge for 10–15 minutes beforehand will help the cream whip faster and hold its shape better. Have your spatula and loaf pan ready for the next steps.
- Whip the Heavy Cream: Pour 2 cups of chilled heavy cream into your prepared mixing bowl. Add 1 tablespoon of pure vanilla extract for aromatic flavor. Using an electric mixer on medium-high speed (or a stand mixer), whip the cream until soft peaks begin to form. Continue whipping for about 3 minutes until the cream is fluffy and holds stiff peaks. Test by lifting the whisk—peaks should stand tall without collapsing. Be careful not to over-whip, or it may turn grainy.
- Incorporate Sweetened Condensed Milk: Measure out the 14-ounce can of sweetened condensed milk and gently pour it into the whipped cream. Using a large spatula, fold the milk into the cream in gentle sweeping motions. Take your time to combine until the mixture is silky, smooth, and uniform in texture. It’s okay if a few small lumps remain, as over-mixing can deflate the whipped cream, affecting the creaminess of your ice cream.
- Transfer to Loaf Pan: Line an 8 or 9-inch loaf pan with parchment paper if desired (this makes removing the ice cream easier later). Gently spread the ice cream mixture evenly into the pan using your spatula. Smooth the top, ensuring the mixture reaches all corners. This base layer will serve as the canvas for your decadent fudge swirls.
- Initial Freezing Stage: Cover the loaf pan tightly with aluminum foil to prevent freezer odors from affecting the ice cream. Place the pan in the freezer and allow it to firm up for about one hour. This initial freeze ensures the ice cream base sets enough to hold the fudge swirls without sinking to the bottom.
- Swirl in the Fudge: Remove the partially frozen ice cream from the freezer. Scoop room-temperature hot fudge in small spoonfuls and place them strategically across the surface. Using a table knife or the back of a spoon, gently swirl the fudge into the ice cream in sweeping, ribbon-like motions. Take care not to over-mix; you want beautiful, visible fudge streaks throughout the ice cream.
- Final Freeze for Firmness: Once the fudge is swirled in, cover the pan tightly with foil again. Return it to the freezer and allow it to set completely for at least 6 hours, or overnight if possible. This long freeze ensures a firm, scoopable texture and enhances the flavors.
- Serving Your Ice Cream: Before serving, let the ice cream sit at room temperature for 3–5 minutes to soften slightly for easier scooping. Use an ice cream scoop to portion into bowls or cones, making sure each serving gets a mix of creamy vanilla and rich fudge swirls.
- Optional Enhancements: For a personalized touch, you can fold in crushed cookies, caramel, nuts, or fruit preserves during the fudge swirling step. These additions make each batch unique and extra indulgent.
- Clean-Up Tips: Rinse your mixing bowl and spatula immediately after use to prevent residue from hardening. For the loaf pan, soaking in warm water for a few minutes makes cleaning easier, especially if fudge remnants stick to the sides.
Notes
- Always use chilled heavy cream; it whips faster and holds peaks better.
- Folding is crucial—over-mixing will deflate the whipped cream, making the ice cream less airy.
- Room-temperature fudge swirls more easily and creates visible ribbons rather than sinking.
- Loaf pan size matters: 8–9 inches works best for even freezing.
- Optional add-ins like crushed cookies, nuts, or fruit preserves can be added during the fudge swirl stage for a customized flavor profile.
Chef’s Secrets: Insider Tips For Perfection
The secret to a perfectly smooth and creamy no-churn ice cream lies in gentle handling.
Whip the cream to stiff peaks but avoid overdoing it, as the texture will suffer.
Folding in the condensed milk carefully ensures a silky base.
For the fudge, gently warm it slightly if needed—it should be soft enough to swirl but not hot enough to melt the ice cream base.
Using a table knife instead of a spoon helps achieve elegant, visible swirls that make your ice cream look bakery-quality.
Serving Suggestions: Creative Ways To Enjoy
Serve this fudge swirl ice cream in waffle cones, dessert bowls, or even alongside warm brownies or fruit cobblers for a decadent pairing.
For a refreshing summer twist, top with fresh berries or a drizzle of caramel or peanut butter.
Mini scoops can also be used as a garnish for cakes or sundaes.
Each serving can be customized with extra toppings, making it perfect for gatherings, celebrations, or a simple indulgent treat at home.
Storage Tips: Keep Ice Cream Fresh
To maintain the creaminess and prevent ice crystals, line your loaf pan with parchment paper before freezing.
Once fully frozen, lift the ice cream out and transfer to an airtight container, placing a layer of plastic wrap or parchment directly on top.
Store in the coldest part of your freezer and avoid frequent opening.
The ice cream will remain creamy for up to two weeks; after that, texture may start to degrade, though it remains delicious.
Frequently Asked Questions
1. Can I make this recipe dairy-free?
Yes! Substitute canned coconut milk or a plant-based heavy cream alternative. Keep in mind that the flavor and texture will be slightly different, but it will still create a creamy, scoopable ice cream.
2. Can I use store-bought fudge sauce?
Absolutely. Store-bought hot fudge works perfectly and saves time. Just ensure it is at room temperature for easy swirling. You can also make homemade fudge for a richer taste.
3. How long should I let the ice cream soften before serving?
Allow the ice cream to sit at room temperature for 3–5 minutes before scooping. This softens it slightly without melting, making scooping easier and preserving the visual appeal of the fudge swirls.
4. Can I add mix-ins like cookies or nuts?
Yes, fold in crushed cookies, nuts, or fruit preserves after the initial freezing step and before swirling the fudge. This creates extra texture and flavor while maintaining the creamy consistency.
5. Can I prepare this ice cream in advance?
Definitely. You can make the ice cream up to a day in advance. For longer storage, transfer to an airtight container after freezing and keep in the freezer for up to two weeks without compromising flavor.