Indulge in soft, buttery, and garlicky pull-apart bread that’s perfect for sharing or enjoying with a meal.
Packed with wholesome flour and a touch of good fats from butter, this bread offers a satisfying source of plant-based protein and energy.
Quick to prepare and simple to bake, it’s ideal for everyday meals, weeknight dinners, or cozy gatherings.
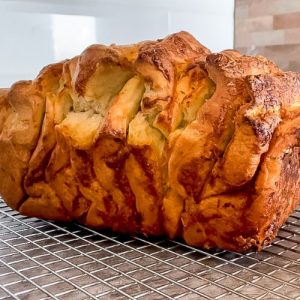
Garlic Parmesan Pull-Apart Bread
Equipment
- 1 large mixing bowl
- 1 Dough Hook or Stand Mixer
- 1-Rolling pin
- 1 Greased Bread Pan (9.25 x 5.25 inches)
- 1 Pizza Cutter or Knife
- 1 Kitchen Towel or Plastic Wrap
- 1 instant-read thermometer
Ingredients
- For the Dough:
- 1⅓ cups warm water 40–50°C
- 1½ teaspoons active dry yeast
- 2 teaspoons granulated sugar
- 2 tablespoons canola oil
- 1 teaspoon table salt
- 1 teaspoon garlic powder
- 1 teaspoon dried parsley
- 3 –4 cups all-purpose flour
- For the Garlic Butter:
- ½ cup salted butter room temperature
- 4 cloves garlic finely minced
- 1 tablespoon dried parsley
- For the Topping:
- 4 tablespoons Parmesan cheese freshly grated (or a sprinkle of dry Parmesan)
Optional:
- Mozzarella cheese for extra gooeyness
Instructions
- Activate the Yeast: Begin by pouring 1⅓ cups of warm water (ideally between 40–50°C) into a large mixing bowl. Sprinkle in 2 teaspoons of granulated sugar and 1½ teaspoons of active dry yeast. Gently stir to combine, then let the mixture rest for about 5 minutes. You should see the yeast start to foam and bubble — this means it’s alive and ready to make your dough rise beautifully. If it doesn’t foam, check the water temperature or the freshness of your yeast.
- Combine Wet Ingredients and Seasonings: Once the yeast is activated, add 2 tablespoons of canola oil, 1 teaspoon of table salt, 1 teaspoon garlic powder, and 1 teaspoon dried parsley to the yeast mixture. Stir lightly to incorporate all the flavors evenly. These ingredients will infuse the dough with subtle savory and herbaceous notes while creating a tender crumb.
- Mix in the Flour: Add 3 cups of all-purpose flour to the bowl. Turn on your stand mixer to the lowest setting with a dough hook attachment. Mix until the dough begins to come together and forms a rough ball. If the dough feels sticky and doesn’t pull away from the sides of the bowl, add the remaining 1 cup of flour gradually, allowing it to absorb fully. The dough should be soft, slightly tacky, and elastic.
- Knead to Perfection: Keep the mixer running on medium-low for several minutes, or if kneading by hand, transfer the dough to a lightly floured surface. Use a folding and pressing motion to knead. Test for the windowpane stage: take a small piece of dough and gently stretch it. If it stretches thin enough to see light through without tearing, your gluten is perfectly developed. This ensures a soft, airy bread that pulls apart effortlessly.
- First Rise: Lightly oil a clean bowl and place the dough inside. Cover with plastic wrap or a damp kitchen towel and let it rise in a warm area for about 1 hour, or until it doubles in size. This is when the yeast works its magic, producing a fluffy, airy texture inside your bread.
- Prepare the Dough for Shaping: Once the dough has risen, gently punch it down to release excess air. Transfer it to a floured surface and roll it out with a rolling pin into a rectangle approximately 18 inches by 20 inches. The dough should be even in thickness but soft enough to handle without tearing.
- Make the Garlic Butter: In a small bowl, combine ½ cup of softened salted butter with 4 finely minced garlic cloves and 1 tablespoon dried parsley. Mix until smooth and fragrant. This garlic butter mixture will soak into each layer of your pull-apart bread, creating rich, aromatic flavor in every bite.
- Spread the Butter Evenly: Using a spatula or butter knife, generously spread the garlic butter over the entire surface of the rolled-out dough. Make sure the edges are fully coated so every piece of bread has flavor.
- Cut and Stack the Dough: Using a pizza cutter or a sharp knife, cut the dough into 12 equal squares. Stack the squares carefully and arrange them inside a greased 9.25 x 5.25-inch bread pan. If you are using smaller or larger pans, you may need to adjust the number of squares or the baking time accordingly.
- Second Rise: Cover the stacked dough in the pan with a damp kitchen towel or plastic wrap. Let it rise again for about 30 minutes, until the squares puff up slightly and almost touch the top of the pan. This second rise ensures your bread will be soft and pull-apart tender after baking.
- Preheat the Oven and Add Topping: Preheat your oven to 350°F (175°C). Once the dough has risen, sprinkle 4 tablespoons of freshly grated Parmesan cheese evenly over the top. If desired, add a light layer of mozzarella for extra gooeyness. The cheese will melt and form a golden, slightly crispy crust.
- Bake to Golden Perfection: Place the pan in the preheated oven and bake uncovered for 45 minutes. Use an instant-read thermometer to check the internal temperature of the loaf — it should reach 190°F in the center. Pull-apart bread can take a bit longer in the middle than typical loaves, so don’t rush. Look for a golden-brown top and slightly crisp edges.
- Cool Slightly Before Serving: Remove the bread from the oven and let it cool for 5–10 minutes. This allows the bread to set slightly while keeping the layers soft and pull-apart ready. Serve warm for the ultimate buttery, garlicky experience.
- Enjoy: Use your hands to pull apart the bread squares and savor the tender, aromatic layers. Perfect alongside soups, pasta, salads, or as a snack on its own. Store leftovers in an airtight container for up to 2–3 days, or freeze for longer storage.
Notes
- Use warm water (40–50°C) for yeast activation; too hot or too cold can hinder rising.
- Knead the dough until it passes the windowpane test for airy, soft bread.
- Allow both rises for optimal fluffiness and pull-apart texture.
- Freshly grated Parmesan enhances flavor and creates a lightly crisp topping.
- Customize with mozzarella or herbs for extra gooeyness or aromatic layers.
- Bake until the internal temperature reaches 190°F to ensure fully cooked bread.
Chef’s Secrets for Perfect Bread
The secret to truly soft, flavorful pull-apart bread lies in the dough development and layering.
Kneading the dough until it stretches without tearing ensures a tender, airy crumb.
Don’t rush the rises — both the initial and second rise are crucial for height and fluffiness.
When spreading garlic butter, be generous but even; covering the edges ensures every piece bursts with flavor.
Finally, letting the bread cool slightly before serving allows the layers to set, preventing the butter from pooling and maintaining the perfect pull-apart texture.
Serving Suggestions to Delight Guests
This pull-apart bread is versatile enough for a variety of meals.
Serve it alongside soups like creamy tomato bisque or hearty minestrone for a comforting dinner.
It pairs beautifully with pasta dishes, from rich Alfredo to tangy marinara.
For casual gatherings, arrange it on a platter with dipping oils, roasted garlic, or marinara sauce.
Warm slices with a sprinkle of fresh herbs can also elevate breakfast or brunch spreads, making it a crowd-pleaser for any occasion.
Storage Tips for Maintaining Freshness
To keep your bread soft and flavorful, store it in an airtight container at room temperature for up to 2–3 days.
If you want to extend its life, wrap it tightly in plastic wrap or aluminum foil and freeze for up to 1 month.
To enjoy it later, thaw overnight at room temperature and reheat briefly in the oven at 300°F for 5–10 minutes to restore the golden crust and melted garlic butter goodness.
Avoid refrigeration, as it can dry out the bread.
Frequently Asked Questions
1. Can I use whole wheat flour instead?
Yes! Substituting half of the all-purpose flour with whole wheat flour adds fiber and a nutty flavor, though the bread may be slightly denser.
Ensure the dough is kneaded well and allow a slightly longer rise.
2. Can I make this bread ahead of time?
Absolutely. You can prepare the dough, shape it, and refrigerate it overnight. Bring it to room temperature before the second rise, then bake as directed. This makes it perfect for meal prep or entertaining.
3. What if my yeast doesn’t foam?
If the yeast fails to bubble, your water may be too hot or cold, or the yeast may be expired. Always use fresh yeast and water between 40–50°C for best results.
4. Can I add other cheeses?
Yes, mozzarella, cheddar, or a blend can be added to the topping for extra gooeyness. Sprinkle the cheese evenly and watch it melt into the layers during baking.
5. How do I reheat leftover bread?
Reheat slices in a preheated oven at 300°F for 5–10 minutes. This refreshes the crust and melts the garlic butter, giving the bread its original soft, pull-apart texture. Avoid microwaving, which can make it chewy or soggy.