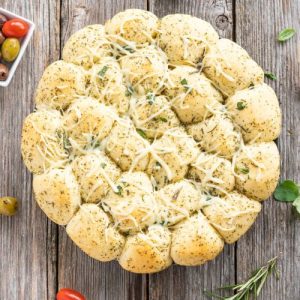
This garlic pull-apart bread is the ultimate crowd-pleaser—soft, golden dough balls infused with fragrant herbs and a touch of cheese for irresistible flavor.
Not only is it comforting and satisfying, but it also offers a good balance of energy-giving carbs, plant-based protein from flour, and healthy fats from olive oil.
Easy to make and perfect for sharing, it’s a simple yet impressive recipe for everyday meals or gatherings.
Cheesy Garlic Pull-Apart Bread
Equipment
- 1 large mixing bowl
- 1 dough scraper or sharp knife
- 1 round baking pan or springform pan (11 in / 28 cm)
- 1 pastry brush
Ingredients
For the Dough:
- 450 g 3 ⅔ cups all-purpose flour
- 7 g 1 sachet dry yeast
- ½ tsp sugar
- 90 ml 6 tbsp lukewarm water
- 160 ml ¾ cup lukewarm milk
- 1 ½ tsp salt
- 30 g 2 tbsp olive oil
- 1 tsp fresh herbs chopped
For Brushing and Filling:
- 140 g ⅔ cup herb butter
- 1 tsp fresh herbs chopped
- 70 g ⅔ cup grated cheese (optional)
Instructions
- Activate the Yeast Mixture: In a small bowl, combine the lukewarm water, lukewarm milk, sugar, and dry yeast. Stir gently and let the mixture sit for 5–7 minutes until it becomes frothy and bubbly on top. This step ensures the yeast is alive and active, which is crucial for the dough to rise properly. If the mixture does not foam, discard it and start again with fresh yeast.
- Prepare the Dough Base: In a large mixing bowl, add the flour and salt. Make a well in the center and pour in the yeast mixture, olive oil, and freshly chopped herbs. Using a wooden spoon or spatula, begin mixing from the center outward, gradually pulling in the flour until the dough starts coming together.
- Knead Until Smooth and Elastic: Transfer the dough onto a lightly floured surface. Knead with the heels of your hands for about 8–10 minutes, pushing the dough away and folding it back over itself repeatedly. The dough should become smooth, elastic, and slightly tacky but not sticky. If it feels too wet, add a tablespoon of flour at a time; if too dry, add a teaspoon of water.
- First Dough Rise: Place the kneaded dough into a lightly oiled bowl, turning it once so the surface is coated with oil to prevent drying. Cover the bowl with a clean kitchen towel or plastic wrap and let it rise in a warm, draft-free place for about 45 minutes, or until it has doubled in size. This slow rise allows the dough to develop flavor and a light texture.
- Divide and Shape the Dough Balls: Once risen, punch down the dough gently to release excess air. Transfer it back to your work surface and divide it into two equal halves. Cut each half into smaller pieces, continuing until you have about 26–30 portions of roughly equal size. Roll each portion gently between your palms to form smooth, round dough balls.
- Prepare the Baking Pan: Generously grease the bottom and sides of your round baking pan (about 11 in / 28 cm) with about 40 g (3 tbsp) of herb butter. This prevents sticking and also infuses the bread with rich flavor. Arrange the dough balls snugly side by side inside the pan, leaving just a little space between them to allow for rising.
- Second Dough Rise: Cover the shaped dough balls loosely with a clean towel and let them rest for 20–25 minutes in a warm place. During this time, the balls will puff up slightly and fill in the gaps, ensuring the bread bakes evenly into a pull-apart style loaf. Meanwhile, preheat your oven to 180°C (360°F).
- Brush with Herb Butter: Melt the remaining herb butter and, using a pastry brush, carefully coat the tops of the risen dough balls. This not only gives the bread a glossy golden crust but also locks in flavor. Sprinkle over the additional chopped herbs for freshness. If using cheese, set it aside to add later during baking.
- Bake to Perfection: Place the pan in the preheated oven and bake for about 20 minutes, or until the tops are lightly golden. At this stage, remove the pan, sprinkle the grated cheese evenly over the bread, and return it to the oven for another 5–10 minutes. The bread is ready when the cheese is melted and bubbly, and the tops are a rich golden brown.
- Cool Slightly and Serve Warm: Remove the bread from the oven and let it cool in the pan for about 5 minutes. This brief resting time allows the crumb to set while still keeping the bread soft and steamy inside. Serve warm, allowing guests to pull apart the fluffy, buttery pieces with their hands.
Notes
- Use fresh herbs like parsley, basil, or chives for the best flavor.
- Make sure liquids are only lukewarm; hot liquid can kill yeast.
- Knead the dough until smooth and elastic—this step builds structure.
- Rising time may vary depending on room temperature.
- Cheese is optional but adds richness and a gooey texture.
- Herb butter gives a stronger flavor than plain butter.
- Perfect for serving warm, directly from the pan.
Chef’s Secrets for Perfect Results
The key to making irresistible pull-apart bread is patience with the dough.
Allowing the yeast mixture to activate fully before mixing guarantees a fluffy, light texture.
Kneading for a full 8–10 minutes is essential—it develops the gluten, which gives the bread its signature springy bite.
Another trick is brushing the dough with melted butter twice: once before baking to keep the crust tender, and again after baking for shine and extra flavor.
For an elevated twist, try mixing garlic powder directly into the dough or layering in finely chopped roasted garlic between the balls.
Serving Suggestions for Every Occasion
This bread is meant to be shared, making it the star of family meals, potlucks, and barbecues.
Serve it warm alongside grilled meats, roasted vegetables, or hearty soups—it’s especially delicious with tomato-based dishes and creamy pasta sauces.
For casual gatherings, place the bread in the center of the table and let everyone pull off fluffy, buttery pieces by hand.
If you’d like to make it more filling, pair it with a dipping sauce such as marinara, pesto, or garlic aioli.
Adding cheese during baking turns it into a snack on its own, perfect for movie nights or weekend treats.
Storage Tips for Lasting Freshness
Pull-apart bread tastes best fresh out of the oven, but you can easily store leftovers.
Allow the bread to cool completely, then wrap it tightly in foil or place it in an airtight container.
It will stay soft at room temperature for up to two days.
For longer storage, freeze the bread in portions—this makes it easy to reheat only what you need.
To revive the texture, warm it in the oven at 150°C (300°F) for 8–10 minutes; it will taste almost freshly baked again.
Avoid storing in the fridge, as this tends to dry out the crumb.
Frequently Asked Questions
1. Can I make the dough ahead of time?
Yes, the dough can be prepared in advance. After kneading, cover it tightly and refrigerate overnight. The cold rise will enhance the flavor. Just bring it to room temperature before shaping into balls.
2. Can I use whole wheat flour instead of all-purpose flour?
You can replace up to half of the all-purpose flour with whole wheat flour for a nuttier taste and added fiber.
Keep in mind that the texture will be denser, so avoid using 100% whole wheat unless you prefer a heavier bread.
3. What herbs work best in this recipe?
Fresh parsley, basil, oregano, rosemary, or thyme all work beautifully. You can mix and match according to your preference.
Dried herbs can also be used, but they should be added sparingly as their flavor is more concentrated.
4. How do I know the bread is fully baked?
The tops should be golden brown, and the bread should sound slightly hollow when tapped on the surface.
If using cheese, look for bubbling and browning on top. Baking times may vary slightly depending on your oven, so keep an eye in the last few minutes.
5. Can I make this bread without cheese?
Absolutely! The bread is just as flavorful without cheese because the herb butter infuses it with rich taste. Cheese is optional and adds indulgence, but the recipe works perfectly as a dairy-light version too.