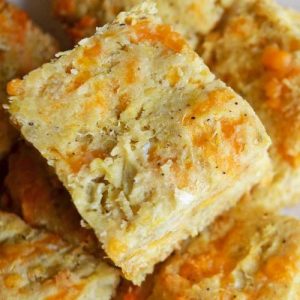
This cheesy garlic zucchini bread is the ultimate balance of flavor and nutrition.
Loaded with zucchini for fiber and moisture, sharp cheddar for protein and richness, and garlic for a savory punch, it makes a wholesome and satisfying bite.
The recipe is high in protein, provides plant-based nutrients, and is naturally lower in carbs than many breads.
Quick to prepare, versatile for meals or snacks, and perfect for meal prep—it’s comfort food with a healthy twist.
Garlic Zucchini Bread
Equipment
- 1 7×11 inch baking dish (or 9×9 inch alternative)
- 1 Medium mixing bowl
- 1 small mixing bowl
- 1-Colander
- 1 whisk
- 1 fork
- 1 grater (for zucchini and cheese)
- 1 Measuring cup set
- 1 Measuring Spoon Set
- 1 wire rack
Ingredients
- 3 cups zucchini grated
- 2 teaspoons salt
- 1 ½ cups all-purpose flour or whole wheat flour; gluten-free blend works too
- 1 tablespoon baking powder
- 1 medium onion diced
- 2 cups cheddar cheese grated
- 1 tablespoon garlic powder
- 1 teaspoon black pepper
- ½ cup butter melted
- 3 large eggs beaten (or 2 duck eggs, beaten)
Instructions
- Prepare and Drain the Zucchini: Grate the zucchini using a box grater or food processor until you have three cups of shreds. Place them into a colander set over the sink or a large bowl. Sprinkle the zucchini evenly with salt and toss gently to coat. Let the salted zucchini sit for at least 30 minutes so excess moisture can be drawn out. After resting, gather the zucchini in a clean kitchen towel or your hands and squeeze firmly to remove as much liquid as possible. This step is essential to prevent the bread from turning soggy.
- Preheat and Prepare the Baking Dish: While the zucchini is draining, preheat your oven to 350°F (175°C). If using a glass dish, such as a 9×9-inch Pyrex, lower the oven temperature slightly to 330°F (165°C) to prevent overbrowning. Grease a 7×11-inch baking dish—or your chosen pan—generously with butter, lard, or nonstick spray, making sure to coat the corners and sides thoroughly so the bread releases easily after baking.
- Combine the Dry Ingredients: In a medium mixing bowl, whisk together the flour and baking powder until they are well blended. This ensures even distribution of the leavening agent. Add the diced onion, drained zucchini, shredded cheddar, garlic powder, and black pepper to the bowl. Use a fork to gently toss the ingredients together, breaking up any clumps of zucchini or cheese so everything is evenly coated in flour. This step helps prevent uneven pockets of moisture and creates a consistent flavor in every bite.
- Mix the Wet Ingredients: In a small separate bowl, whisk together the melted butter and beaten eggs until the mixture is smooth and uniform. Room-temperature ingredients work best here, since cold butter may solidify and not blend properly. This combination provides richness and binding, holding the zucchini bread together once baked.
- Create the Batter: Pour the butter-and-egg mixture over the bowl of dry ingredients. Gently fold everything together with a sturdy spatula or wooden spoon. Stir only until no visible streaks of flour remain. Be careful not to overmix, as that can make the bread dense. The batter will be thick and somewhat heavy, which is exactly what you want for a hearty, flavorful bread.
- Transfer and Smooth the Batter: Spoon the batter into the greased baking dish, spreading it evenly to reach all corners. Use the back of your spoon or spatula to smooth the surface so it bakes evenly. The batter will not spread much on its own, so this step helps ensure the bread cooks uniformly and forms a nice golden crust.
- Bake Until Golden and Set: Place the dish into the preheated oven and bake for 35–40 minutes, or until the top is deeply golden. The edges should begin to pull away from the sides of the dish, and the center should feel firm to the touch. If the middle looks pale or underbaked, give it an additional 5–10 minutes. Since zucchini holds a lot of moisture, bake times may vary slightly.
- Cool and Serve: Remove the pan from the oven and place it on a wire rack. Let the bread rest in the pan for about 5 minutes before slicing. This short cooling period allows the bread to set so it holds its shape. Slice into squares or rectangles and serve warm for gooey, melty cheese, or let cool completely for a firmer texture.
- Store and Reheat if Needed: If you have leftovers, store them in an airtight container in the refrigerator for up to four days. For longer storage, freeze individual slices wrapped in parchment and placed in a resealable freezer bag for up to two months. To reheat, place slices in a toaster oven or conventional oven until warm and crisp again. Avoid microwaving, as it tends to make the bread rubbery.
Notes
- Salting and draining the zucchini is essential to prevent a soggy texture.
- Cheddar cheese adds sharp flavor, but other cheeses like mozzarella or Monterey Jack work too.
- Using room-temperature eggs helps the batter mix more evenly.
- Baking time may vary based on oven type and dish material—always check for golden edges and a firm center.
- This bread tastes great warm but is equally good at room temperature, making it versatile for snacks or meal prep.
Chef’s Secrets for Best Results
The secret to perfect cheesy garlic zucchini bread lies in how you handle the zucchini.
Taking the time to salt and thoroughly squeeze out the liquid makes all the difference between a light, sliceable bread and a heavy, watery one.
Another key detail is the cheese—using freshly grated cheddar instead of pre-shredded varieties ensures a creamier texture because packaged cheese often contains anti-caking agents that can affect melting.
Finally, don’t rush the baking process.
Allowing the bread to bake until the entire surface is golden ensures the interior sets properly without being gummy.
Serving Suggestions to Enhance Enjoyment
This zucchini bread is versatile enough to serve in many ways.
It makes a fantastic side dish for grilled chicken, steak, or fish, adding a comforting, savory element to the plate.
It can also stand on its own as a snack with a dollop of sour cream, salsa, or even a swipe of cream cheese.
For a lighter meal, pair it with a fresh garden salad or tomato soup, where the bread provides heartiness without feeling too heavy.
Cut into smaller squares, it also works beautifully as a party appetizer or picnic food.
Storage Tips for Freshness and Flavor
To keep your zucchini bread fresh, allow it to cool completely before storing.
Place slices in an airtight container and refrigerate for up to four days.
For longer storage, wrap individual squares in parchment paper and freeze in a resealable bag for up to two months.
When ready to enjoy, reheat frozen bread directly in the oven until warm and crisp, or thaw overnight in the refrigerator.
Avoid microwaving, as it can make the bread rubbery; instead, use a toaster oven for the best texture.
Frequently Asked Questions
1. Can I use a different type of cheese?
Yes, while cheddar provides sharp flavor, you can use mozzarella for a milder taste, pepper jack for some spice, or a mix of cheeses for added complexity.
2. Do I need to peel the zucchini first?
Not necessarily. Younger zucchini has tender skin that blends right into the bread. For larger or overgrown zucchini, peeling and removing the seeds can improve the final texture.
3. How do I know when the bread is fully baked?
The top should be evenly golden, and the center should feel firm when pressed lightly. A toothpick inserted in the middle may still show a little moisture due to the cheese but should not have raw batter clinging to it.
4. Can this recipe be made gluten-free?
Absolutely. A high-quality gluten-free flour blend works well in place of all-purpose flour. Just be sure to choose one that includes a binding agent like xanthan gum for the best texture.
5. What’s the best way to reheat leftovers?
For the tastiest results, reheat slices in the oven or toaster oven at 350°F for 5–7 minutes. This restores the crisp edges and gooey cheese, unlike microwaving which can make it soggy.