These Hazelnut Chocolate Bars are a wholesome, satisfying treat perfect for anyone craving a sweet bite without the guilt.
Packed with plant-based protein from almond butter and fiber from dates and hazelnuts, they provide lasting energy while keeping saturated fat low.
Quick to assemble and freezer-friendly, they make a perfect snack, lunchbox addition, or on-the-go indulgence.
Hazelnut Chocolate Bars
Equipment
- 1 – 8×8-inch square baking dish
- 1 food processor
- 1 – Wide glass (for pressing mixture)
- 1 – Medium microwave-safe bowl
- Parchment Paper
- Knife
- spatula
Ingredients
- 8 oz 1 cup pitted medjool dates
- 1 cup roasted hazelnuts
- ¾ cup almond butter
- 1 tbsp vanilla extract
- ¼ tsp sea salt
- 12 oz dark chocolate or semi-sweet/milk chocolate as preferred
- Optional: extra crushed hazelnuts for topping
Instructions
- Prepare the Baking Dish: Line an 8×8-inch square baking dish with parchment paper, making sure the paper extends slightly over the edges for easy removal later. This prevents the hazelnut mixture from sticking to the dish and ensures you can lift the bars out effortlessly after freezing. Lightly grease the parchment with a small amount of oil if desired for extra non-stick assurance.
- Blend the Dates and Nuts: Place the pitted medjool dates and roasted hazelnuts into a food processor. Pulse them together until the mixture is crumbly but still slightly sticky. The goal is to break down the dates and nuts into a coarse, even texture while maintaining a little bite for chewiness. Scrape down the sides as needed to ensure even processing.
- Add Almond Butter and Flavorings: Add the almond butter, vanilla extract, and sea salt to the date and hazelnut mixture. Pulse again until the ingredients are fully combined into a smooth, sticky dough. The mixture should be thick, cohesive, and hold together when pressed. Taste a small amount to check the balance of sweetness and saltiness, adjusting slightly if needed.
- Press the Mixture Into the Dish: Transfer the blended mixture into the prepared baking dish. Using the bottom of a wide glass or a spatula, firmly press it down into an even layer. Make sure the surface is smooth and compact, as this helps the bars hold their shape during freezing and later chocolate dipping.
- Freeze the Base Layer: Place the baking dish in the freezer and allow the hazelnut mixture to freeze for at least 1 hour. This step is crucial because the firmness of the base ensures that the bars won’t crumble or break when dipping into chocolate later.
- Melt the Chocolate: While the bars are freezing, break the dark chocolate into small, even pieces and place them in a medium microwave-safe bowl. Heat the chocolate in the microwave in 30-second intervals, stirring thoroughly after each interval to prevent burning. Continue this process until the chocolate is completely melted, smooth, and glossy. Allow the chocolate to cool slightly, around 5-10 minutes, so it’s not too hot for dipping.
- Cut the Frozen Base Into Bars: Once the hazelnut mixture is fully frozen, remove it from the freezer. Lift the parchment paper carefully to remove the solid block from the baking dish. Using a sharp knife, cut the block into 16 equal-sized bars. Cutting while frozen helps maintain clean edges and prevents the mixture from sticking to the knife.
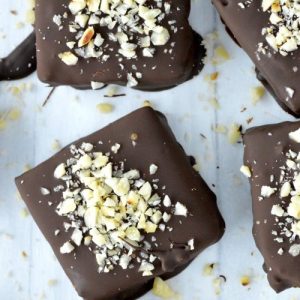
- Dip Bars in Chocolate: One by one, dip each bar into the melted chocolate, coating it evenly on all sides. Use a fork or dipping tool to lift the bar, letting excess chocolate drip back into the bowl. If desired, sprinkle extra crushed hazelnuts on top immediately after dipping for added crunch and a beautiful presentation.
- Set the Chocolate: Place the chocolate-coated bars on a parchment-lined tray or plate. Transfer them to the refrigerator for at least 30 minutes, or until the chocolate has fully hardened. This step ensures a firm, crisp chocolate coating that complements the chewy hazelnut base.
- Serve and Store: Serve the bars immediately for a fresh, indulgent snack. Store any leftovers in an airtight container in the refrigerator for up to 1 week, or freeze for up to 6 months for long-term storage. If frozen, allow the bars to thaw for 10-15 minutes at room temperature before enjoying.
Notes
- Always line the baking dish with parchment paper for easy removal.
- Use high-quality, fresh dates and roasted hazelnuts for best flavor.
- Press the hazelnut mixture firmly into the dish to hold shape.
- Freeze the mixture completely before cutting or dipping to prevent crumbling.
- Choose dark chocolate for rich flavor; semi-sweet or milk chocolate works too.
- Optional: sprinkle extra crushed hazelnuts on top for added crunch and visual appeal.
- Bars can be made ahead and stored in the fridge or freezer.
Chef’s Secrets for Best Results
The key to these bars lies in texture balance.
Blend the dates and nuts just enough to achieve a sticky, cohesive mixture—over-processing can make it overly pasty.
Use a wide glass to press the mixture evenly into the pan, ensuring uniform thickness so bars freeze consistently.
When melting chocolate, stir frequently and let it cool slightly before dipping; this prevents cracking or melting the bar.
Finally, topping with crushed hazelnuts not only adds crunch but also enhances visual appeal, making these bars look as good as they taste.
Serving Suggestions and Pairings
These chocolate hazelnut bars are versatile and can be enjoyed in many ways.
Serve them as an afternoon pick-me-up with a cup of coffee or tea, or as a post-workout snack to boost energy with plant-based protein and fiber.
They also pair beautifully with fresh berries or a dollop of yogurt for a more indulgent yet healthy dessert.
For parties, arrange them on a platter with nuts and dried fruits to create an inviting, colorful presentation.
Storage Tips for Long-Term Freshness
To maintain the texture and flavor of the bars, store them in an airtight container in the refrigerator for up to 7 days.
For longer storage, freeze them in a single layer initially, then stack with parchment paper between layers to prevent sticking; they can last up to 6 months this way.
When ready to eat, allow frozen bars to sit at room temperature for 10-15 minutes, which softens the center slightly while keeping the chocolate crisp.
Avoid leaving bars at room temperature for extended periods, as the nut butter can soften and the chocolate may bloom.
Frequently Asked Questions
1. Can I use other nuts instead of hazelnuts?
Yes! Almonds, cashews, or walnuts work well. Roasting them beforehand enhances flavor, but ensure they’re finely chopped or processed for proper texture.
2. Can I make these bars nut-free?
Absolutely. Substitute nut butter with sunflower seed or pumpkin seed butter and replace hazelnuts with seeds like pumpkin, sunflower, or roasted chickpeas for crunch.
3. How do I prevent chocolate from cracking?
Allow the melted chocolate to cool slightly before dipping. Also, ensure the bars are frozen solid—warm centers can cause chocolate to crack or slide off.
4. Can I use a different sweetener instead of dates?
While dates are ideal for natural sweetness and binding, you can use dried figs, apricots, or raisins. Keep in mind the flavor and texture may vary slightly.
5. Are these bars suitable for meal prep?
Yes! They freeze beautifully, making them excellent for weekly meal prep. Portion them individually so they can be grabbed on the go, providing a quick, protein-rich snack anytime.