These Crunchy Herbed Whole Wheat Breadsticks are a wholesome twist on a classic snack, offering a perfect balance of flavor and nutrition.
Packed with fiber-rich whole wheat and healthy fats from olive oil and sesame seeds, they make a nourishing choice for everyday meals.
Quick to prepare and endlessly versatile, they pair beautifully with dips, soups, or salads.
Herbed Whole Wheat Breadsticks
Equipment
- 1 small mixing bowl
- 1 large mixing bowl or stand mixer with hook attachment
- Rolling Pin
- Baking Sheet
- Parchment Paper
- Measuring Cups and Spoons
- Sharp knife or dough cutter
Ingredients
- 2 tsp 4 g active dry yeast
- 1 tsp 5 g sugar
- 1 cup 150 g extra coarse wholemeal flour
- 1½ cups 225 g whole wheat atta
- ¼ cup lukewarm water
- 1 cup milk vegan milk optional
- 2 tbsp sesame seeds
- 1 tbsp mixed dry herbs
- 1 tbsp olive oil
- Salt to taste
- Extra flour for dusting
Instructions
- Prepare the Yeast Starter: In a small mixing bowl, pour the lukewarm water (about ¼ cup) and add the sugar and active dry yeast. Stir gently to dissolve the sugar and yeast completely. Let it rest for 8–10 minutes at room temperature until it becomes frothy and bubbly. This step ensures the yeast is active, which is essential for achieving light, airy breadsticks.
- Combine Dry Ingredients: In a large mixing bowl or the bowl of a stand mixer fitted with a hook attachment, add the extra coarse wholemeal flour and whole wheat atta. Mix thoroughly to evenly blend the flours. This combination provides a nutty flavor and rich fiber content, enhancing both taste and nutrition.
- Add Yeast Mixture to Flour: Pour the prepared yeast mixture into the flour blend. Stir gently to combine until the mixture begins to form a rough dough. This initial mixing ensures that the yeast is evenly distributed, helping the breadsticks rise uniformly.
- Incorporate Herbs and Seeds: Add the sesame seeds and mixed dry herbs directly into the dough mixture. For maximum flavor, crush the herbs slightly between your fingers before adding. Sprinkle in salt according to taste and mix thoroughly to ensure the seasoning is evenly spread. This step adds aromatic, flavorful layers to the breadsticks.
- Add Milk Gradually: Begin adding lukewarm milk slowly, starting with about half a cup, while mixing. Different flours absorb liquids differently, so adding milk gradually allows you to control the dough’s consistency. The goal is a soft yet firm dough that is not overly wet or sticky.
- Knead the Dough: Transfer the dough to a lightly floured surface or keep it in the stand mixer. Knead for 2–3 minutes in the mixer or 5–6 minutes by hand. Kneading develops gluten, which provides structure and chewiness. The dough should become smooth, elastic, and slightly tacky to touch.
- Add Olive Oil and Shape Dough Ball: Drizzle olive oil over the kneaded dough and knead gently for about one minute to incorporate it. The oil adds tenderness and flavor to the breadsticks. Shape the dough into a rough ball and place it in a lightly greased bowl. Cover with a clean kitchen towel or plastic wrap to allow resting and rising.
- First Proofing: Let the dough rest in a warm, draft-free place for about 1 to 1.5 hours, or until it doubles in size. This proofing process allows yeast fermentation, which develops flavor and creates airy breadsticks. A warm kitchen or slightly preheated oven (turned off) works well for proofing.
- Prepare for Shaping: Once the dough has doubled, gently punch it down to release built-up gas. Transfer to a lightly floured surface and knead briefly to redistribute the yeast, making the dough easier to work with.
- Divide Dough for Breadsticks: Divide the dough into two equal portions for easier handling. This step ensures uniform breadstick size and even baking. Keep the dough portions covered with a towel to prevent drying out while shaping.
- Roll the Dough: Using a rolling pin, roll each portion of dough into a large rectangle approximately ½ cm thick. Dust lightly with flour if it sticks. Uniform thickness ensures even baking and consistent crunchiness.
- Cut and Shape Breadsticks: Cut each rectangle into strips about 1–1.5 cm wide using a sharp knife or dough cutter. Roll each strip gently between your hands to form smooth sticks, keeping them uniform in size for even baking.
- Arrange on Baking Sheet: Place the shaped breadsticks on a baking sheet lined with parchment paper. Leave space between each breadstick to allow expansion during baking. This ensures crisp edges and prevents them from sticking together.
- Optional Milk Brushing: Brush the tops of breadsticks lightly with milk for a golden, glossy finish. This is optional but gives a lovely color and appealing appearance.
- Bake the Breadsticks: Preheat the oven to 200°C (390°F). Place the baking sheet in the oven and bake for 20–30 minutes, turning halfway if desired for even browning. Breadsticks should be crisp and golden brown when fully baked.
- Cooling and Storing: Allow breadsticks to cool completely on the baking sheet before storing. This preserves crispness. Store in an airtight container at room temperature for up to 3 days. To re-crisp softened breadsticks, bake at 100–120°C for 30–40 minutes before serving.
Notes
- Always use lukewarm water and milk to activate the yeast effectively without killing it.
- Blooming the yeast is an essential step — wait until it becomes frothy before adding to the flour mixture.
- Adding herbs and sesame seeds directly to the dough gives the breadsticks even flavor throughout.
- Different brands of whole wheat flour absorb liquid differently — add milk gradually for perfect dough consistency.
- Breadsticks will crisp better if cooled completely before storage.
- To re-crisp softened breadsticks, bake at 100–120°C for 30–40 minutes.
Chef’s Secrets for Perfect Breadsticks
The secret to making irresistibly crunchy, flavorful breadsticks lies in technique and ingredient quality.
Start with fresh yeast — it ensures the breadsticks rise beautifully.
Blooming yeast in lukewarm liquid allows it to activate fully, giving the bread a light texture.
Using a mix of flours, like extra coarse wholemeal and whole wheat atta, adds depth in flavor and enhances fiber content.
Crushing dry herbs before adding them releases their oils, infusing the dough with aromatic notes.
Olive oil enriches the texture and improves shelf life.
Rolling breadsticks uniformly ensures even baking, and brushing them lightly with milk gives a golden, appetizing finish.
Serving Suggestions for Breadsticks
These herbed whole wheat breadsticks are delightfully versatile.
Serve them warm alongside a bowl of creamy tomato soup, a fresh garden salad, or a platter of cheese and olives for a wholesome appetizer.
They also pair beautifully with dips such as hummus, pesto, or yogurt-based dressings.
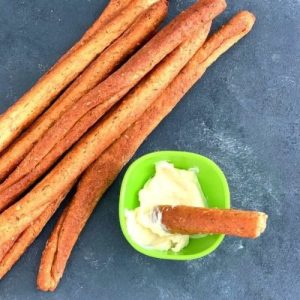
For a light snack, enjoy them with a spread of butter and a sprinkle of sea salt.
Their crunchy texture and herb-infused flavor make them equally perfect for casual weekday meals or elegant dinner parties.
Storage Tips for Fresh Breadsticks
To maintain the crunchiness and freshness of your breadsticks, store them in an airtight container at room temperature once they have cooled completely.
Avoid storing in plastic bags without ventilation, as this can cause them to soften.
Breadsticks can stay fresh for up to 3 days.
If they lose their crunch, reheat them in the oven at 100–120°C for 30–40 minutes to restore their crisp texture.
For longer storage, freeze them in an airtight bag for up to one month, then reheat before serving.
Frequently Asked Questions
1. Can I make these breadsticks vegan?
Yes! Simply replace dairy milk with any plant-based milk, such as almond, soy, or oat milk. The result will be equally delicious, with the same texture and crunch.
2. Can I use regular wheat flour instead of whole wheat flour?
You can, but the texture and fiber content will change. Whole wheat flours give these breadsticks a nutty flavor and a denser, heartier texture, while regular wheat flour results in lighter breadsticks.
3. How can I make the breadsticks more flavorful?
You can enhance flavor by adding finely grated parmesan, garlic powder, or crushed rosemary to the dough. Sprinkling coarse sea salt or sesame seeds before baking also adds a savory kick.
4. Can I prepare the dough in advance?
Yes, you can prepare the dough and refrigerate it overnight. Allow it to come to room temperature and rise before shaping into breadsticks. This slow fermentation will also deepen the flavor.
5. How do I ensure my breadsticks are crunchy and not soft?
Make sure to bake them until they’re golden brown and allow them to cool completely before storing. If they soften over time, re-crisp them in the oven at a low temperature for 30–40 minutes before serving.