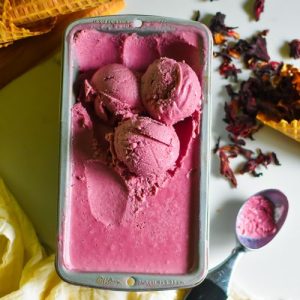
Indulge in this vibrant, no-churn hibiscus ice cream, a creamy treat infused with aromatic ginger, warming spices, and rich coconut milk.
Naturally plant-based and fiber-friendly, it offers a healthy dose of good fats while remaining easy to prepare.
Perfect for quick desserts, meal-prep-friendly servings, or a refreshing snack, it’s an effortless way to impress with minimal fuss.
Hibiscus Ice Cream
Equipment
- 1 cutting board
- 1 knife
- 1 small saucepan
- 1 kitchen spoon
- 1 food processor, blender, or mixer
- 1 freezer-safe container
- 1 ice cream scooper
Ingredients
- 1 ½ cups brown sugar
- 1 ½ cups water
- 1 cup dried hibiscus
- 2 inches fresh ginger
- 1 cinnamon stick
- 2 whole cloves
- 16 ounces full-fat coconut milk
- 6 ounces sweetened condensed milk
- 6 ounces evaporated milk
- 1 teaspoon vanilla extract
- 2 pinches fine sea salt
Instructions
- Prepare the Hibiscus Syrup: Begin by making the flavorful hibiscus syrup, which forms the heart of this ice cream. In a small saucepan, combine 1 ½ cups water and 1 ½ cups brown sugar, stirring gently to help dissolve the sugar. Add 1 cup dried hibiscus, 2 inches of fresh ginger (sliced thinly), 1 cinnamon stick, and 2 whole cloves. Place the saucepan over medium heat and bring the mixture to a gentle boil. Allow it to simmer just until the sugar fully dissolves and the liquid becomes fragrant, usually around 3–5 minutes. Once boiling, remove the pan from heat and let the syrup steep for at least 15–20 minutes. This allows the hibiscus to release its vibrant color and deep floral flavor while the spices infuse subtle warmth.
- Strain the Syrup: After the syrup has steeped, it’s time to remove the solids. Using a fine-mesh strainer or sieve, carefully pour the syrup into a heat-safe bowl, pressing lightly on the hibiscus and ginger to extract every bit of flavor. Discard the solids. The resulting liquid should be a rich, deep purple with aromatic notes of hibiscus, ginger, and warm spices—a beautiful base for the ice cream. Allow the syrup to cool completely before proceeding to the next step to ensure smooth blending.
- Combine the Ice Cream Base: Once the syrup has cooled, gather your dairy and flavoring ingredients. In a large food processor, blender, or electric mixer, pour in 16 ounces full-fat coconut milk, 6 ounces sweetened condensed milk, and 6 ounces evaporated milk. Add the cooled hibiscus syrup to the mixture. Sprinkle in 2 pinches of fine sea salt and 1 teaspoon vanilla extract.
- Blend Until Smooth: Secure the lid on your blender or food processor. Blend the mixture on high speed for 5–7 minutes. This step is crucial—it not only thoroughly combines the ingredients but also slightly thickens the mixture, creating a smooth and creamy texture that will translate into luscious ice cream. Stop occasionally to scrape down the sides with a spatula to ensure everything is fully incorporated. You should see a uniform, slightly thick liquid with a gorgeous pink-purple hue.
- Transfer to Freezer-Safe Container: Carefully pour the blended mixture into a freezer-safe container. Smooth the top with a spatula to create an even surface. For an extra layer of protection against freezer burn or frost, you can press a sheet of plastic wrap directly onto the surface of the ice cream before covering the container with a lid.
- Freeze Until Firm: Place the container in the freezer and allow the ice cream to set for at least four hours, or until fully firm. Because this is a no-churn recipe, there’s no need to stir during freezing. The ice cream will set naturally, retaining its creamy texture and vibrant color. For best results, avoid opening the freezer frequently while it sets.
- Scoop and Serve: Once frozen, remove the ice cream from the freezer. Allow it to sit at room temperature for 3–5 minutes if it’s too firm to scoop. Using an ice cream scooper, serve generous portions into bowls or cones. The rich purple color and aromatic blend of hibiscus and spices make this dessert both visually stunning and deliciously fragrant.
- Optional Garnishes: Enhance the flavor and presentation by adding optional toppings such as toasted coconut flakes, fresh berries, a drizzle of honey, or a sprinkle of crushed nuts. These add texture, sweetness, and contrast to the creamy hibiscus ice cream.
- Enjoy Mindfully: Savor the creamy, floral, and subtly spiced notes of your homemade hibiscus ice cream. This dessert is not only a feast for the senses but also plant-based, fiber-rich, and made with good fats from coconut milk. Perfect for sharing with family or enjoying as a guilt-free treat after a meal.
Notes
- The hibiscus syrup is the flavor powerhouse of this ice cream. Let it steep for at least 15–20 minutes to extract maximum color and taste. Don’t rush this step!
- Use full-fat coconut milk to ensure a creamy, rich texture. Light coconut milk will make the ice cream less smooth and more icy.
- Blending time matters: blend the ice cream base until slightly thickened to achieve a silky texture once frozen.
- For even freezing, cover the mixture with plastic wrap pressed directly onto the surface to prevent ice crystals from forming.
- This recipe is naturally plant-based and gluten-free, making it suitable for a wide variety of dietary preferences.
Chef’s Secrets: Enhance Flavor And Texture
One of the best secrets for this hibiscus ice cream is controlling the steeping process.
The longer the hibiscus and spices steep, the deeper the color and more complex the flavor profile.
Another trick is gently warming the coconut milk before blending—it helps the syrup and milks combine more seamlessly.
To add an extra layer of texture, fold in lightly toasted coconut flakes or finely chopped crystallized ginger just before freezing.
Using quality, fresh spices ensures the delicate ginger, cinnamon, and clove notes shine without overpowering the floral hibiscus.
Serving Suggestions: Creative Ways To Enjoy
This ice cream is incredibly versatile and can be enjoyed on its own or with a variety of accompaniments.
Serve in a bowl with fresh berries for a refreshing summer treat, or pair with warm fruit compotes like mango or pineapple for a tropical twist.
For a more indulgent experience, drizzle with dark chocolate or caramel sauce, or add a sprinkle of toasted nuts for crunch.
Its vibrant purple color also makes it an excellent choice for entertaining, as it looks striking on a dessert platter.
Storage Tips: Keep Ice Cream Fresh
Store your hibiscus ice cream in a tightly sealed, freezer-safe container to maintain its creamy texture and prevent ice crystal formation.
For best results, consume within one month, though it can last up to six months.
If the surface hardens or develops frost, allow it to sit at room temperature for a few minutes before scooping.
Avoid repeated thawing and refreezing, as this can affect the texture and flavor.
Plastic wrap pressed against the ice cream surface is an effective trick for long-term storage.
Frequently Asked Questions
1. Can I make this recipe without coconut milk?
Yes, you can use another plant-based milk like cashew or oat milk, but the texture may be less creamy. Full-fat coconut milk gives the richest results.
2. How do I get a smooth, creamy texture without churning?
Blending the base thoroughly until slightly thickened is key. Covering the ice cream with plastic wrap while freezing also prevents ice crystals and keeps it silky.
3. Can I adjust the sweetness?
Absolutely! Reduce the brown sugar or sweetened condensed milk slightly to suit your taste, but be mindful that too little sweetness can affect freezing and texture.
4. Can I make this ahead of time for parties?
Yes, this ice cream is perfect for advance preparation. Make it up to a day or two in advance, freeze completely, and scoop directly for serving.
5. Can I add mix-ins like chocolate or nuts?
Definitely. Fold in your favorite add-ins after blending but before freezing. Toasted coconut, finely chopped nuts, or chocolate chips work wonderfully without affecting the ice cream’s consistency.