Indulge in this creamy, homemade avocado ice cream that’s both wholesome and irresistibly smooth.
Packed with healthy fats from avocado and coconut milk, natural sweetness from banana and maple syrup, and a refreshing hint of mint, this vegan, paleo-friendly dessert is rich in fiber, low in processed sugars, and ready in minutes—perfect for a guilt-free treat anytime.
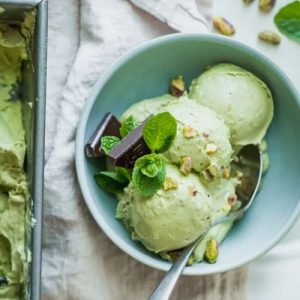
Homemade Avocado Ice Cream
Equipment
- 1 Aluminized Steel Loaf Pan
- 1 High-Speed Blender
- 1 ice cream scoop
Ingredients
- 1 14-ounce can full-fat coconut milk, refrigerated overnight
- 2 ripe avocados halved, pitted, and peeled
- 1 ripe banana sliced and frozen
- 3 tablespoons maple syrup
- 2 tablespoons lemon juice
- 4 –5 fresh mint leaves
Instructions
- Chill the Pan: Begin by placing your loaf pan in the refrigerator for at least 30 minutes, though ideally up to 24 hours. This step ensures that the ice cream mixture will freeze evenly and develop a smooth, creamy texture. A cold pan also prevents the mixture from sticking and makes scooping easier later.
- Prepare the Coconut Milk: Take your can of full-fat coconut milk that has been refrigerated overnight. Open it carefully, and scoop out the thick, solid cream from the top, leaving the liquid portion behind (you can save the liquid for smoothies or other recipes). The coconut cream is what gives this ice cream its ultra-rich, creamy consistency.
- Prep the Avocados: While the pan chills, halve, pit, and peel your avocados. Make sure they are perfectly ripe—soft but not mushy—for optimal creaminess. Scoop the avocado flesh directly into your high-speed blender. Avocados add natural creaminess, healthy monounsaturated fats, and a subtle, buttery flavor to the ice cream.
- Add the Banana: Peel and slice a ripe banana, then freeze it ahead of time. Frozen banana adds natural sweetness, enhances creaminess, and helps the ice cream hold its shape without the need for an ice cream maker. Add the frozen banana pieces to the blender along with the avocado and coconut cream.
- Sweeten and Flavor: Add 3 tablespoons of pure maple syrup to the blender for natural sweetness. Then, squeeze in 2 tablespoons of fresh lemon juice. The lemon juice balances the sweetness, prevents the avocado from browning, and adds a subtle tang that enhances the overall flavor.
- Incorporate Fresh Mint: Add 4–5 fresh mint leaves into the blender. The mint introduces a refreshing, aromatic note that complements the richness of avocado and coconut milk. You can adjust the amount of mint depending on how pronounced you want the mint flavor to be.
- Blend Until Ultra Smooth: Secure the lid on your high-speed blender. Blend the mixture on high speed for 1–2 minutes until it becomes silky, creamy, and fully combined. Stop occasionally to scrape down the sides of the blender to ensure no chunks remain. The final mixture should be thick, glossy, and completely smooth.
- Transfer to Chilled Pan: Remove the chilled loaf pan from the refrigerator. Pour the blended mixture into the pan, using a spatula or the back of a spoon to spread it evenly. Smooth the top so that it freezes uniformly. Cover tightly with plastic wrap, making sure the wrap touches the surface of the ice cream to prevent ice crystals from forming.
- Freeze Until Firm: Place the pan in the freezer for at least 4 hours or ideally overnight. Freezing slowly ensures the ice cream achieves a creamy texture without becoming icy. Check after a few hours to make sure the surface is solidified.
- Soften Before Serving: For best results, remove the ice cream from the freezer 10–15 minutes before serving. This allows it to soften slightly, making it easier to scoop and enhancing the creamy, velvety mouthfeel. Use an ice cream scoop warmed slightly in hot water for perfect, smooth scoops.
- Serve and Enjoy: Scoop the avocado ice cream into bowls or cones and enjoy immediately. Optionally, garnish with extra mint leaves, cacao nibs, or a drizzle of maple syrup for an elegant touch. This ice cream is rich, creamy, and full of natural flavors that will impress anyone, whether served as a snack or dessert.
Notes
- For optimal flavor and creaminess, use ripe, soft avocados and fully ripened bananas.
- Refrigerate the coconut milk overnight to separate the cream from the liquid, ensuring a rich texture.
- Cover the ice cream surface with plastic wrap before freezing to prevent ice crystals and browning.
- Eat within 48 hours for the best texture and freshness.
- You can adjust the sweetness with more or less maple syrup according to taste.
Chef’s Secrets: Tips For Perfect Texture
Achieving ultra-smooth, creamy avocado ice cream is all about preparation and blending technique.
Using fully ripe avocados and frozen bananas ensures natural sweetness and creaminess without added dairy.
A high-speed blender helps create a silky texture, but be sure to scrape down the sides while blending to eliminate any small chunks.
Chilling the loaf pan before pouring the mixture allows the ice cream to freeze evenly, preventing icy patches.
For a subtle flavor twist, consider adding a pinch of vanilla extract or a small splash of coconut cream on top.
Serving Suggestions: Creative Presentation Ideas
This avocado ice cream shines as both a simple treat or a plated dessert.
Serve scoops in small bowls with a sprinkle of cacao nibs, toasted coconut flakes, or crushed nuts for added texture.
Drizzle a little maple syrup or a dusting of cinnamon for extra flair.
For a refreshing summer option, pair it with fresh berries or a tropical fruit salad.
It also works beautifully in a vegan ice cream sandwich with soft cookies or as a creamy topping for warm brownies or fruit crumbles.
Storage Tips: Keep Ice Cream Fresh Longer
To maintain the creamy texture, store the ice cream in an airtight container or tightly wrapped loaf pan.
Place plastic wrap directly on the surface before covering the container to prevent ice crystals from forming.
Keep the freezer at a consistent temperature, ideally around 0°F (-18°C).
For best flavor, consume within 2–3 days, though it can last up to a week.
If the ice cream becomes too firm, let it sit at room temperature for 10–15 minutes before scooping for easier serving.
Frequently Asked Questions
1. Can I make this ice cream without a blender?
A high-speed blender is recommended for smooth texture, but a strong food processor can work in a pinch. You may need to blend in smaller batches and scrape the sides thoroughly to ensure no chunks remain.
2. Can I substitute banana with another fruit?
Yes, frozen mango or pear works well as a natural sweetener and helps maintain creaminess. Keep in mind that bananas provide both sweetness and a dense, creamy texture, so substitutes may slightly alter consistency.
3. How long does homemade avocado ice cream last?
For the best texture and flavor, enjoy within 48 hours. Stored properly in an airtight container, it can last up to 5–7 days in the freezer, though it may harden and require a brief softening period before serving.
4. Can I make this recipe nut-free?
Absolutely! This recipe is naturally nut-free as it relies on coconut milk for creaminess. Ensure your maple syrup is pure and not processed in facilities handling nuts if serving to someone with a severe allergy.
5. Why is my ice cream icy instead of creamy?
Icy texture usually results from using unripe fruit, not chilling the pan, or blending inadequately. Make sure your avocados and bananas are fully ripe, the pan is well-chilled, and you blend until perfectly smooth.
Covering the ice cream surface with plastic wrap also prevents ice crystals from forming during freezing.