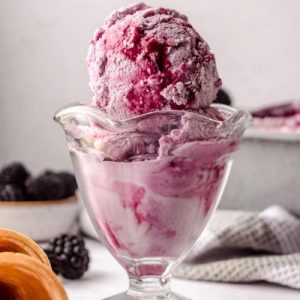
Indulge in this creamy, homemade blackberry ice cream that balances fresh fruit flavor with a rich vanilla base.
Naturally egg-free and easy to prepare, it’s a fiber-rich treat with antioxidants from fresh blackberries and satisfying healthy fats from cream.
Perfect for everyday dessert or special occasions, it’s simple to make, freezer-friendly, and delightfully swirled with homemade berry syrup.
Homemade Blackberry Ice Cream
Equipment
- 1 Ice cream maker (pre-frozen)
- 1 stand mixer with dasher attachment
- 1 blender or food processor
- 2 Medium bowls
- 1 small saucepan
- 1 mesh strainer
- 1 Freezer-safe pan (approx. 9" x 5")
- 1 whisk
- 1 Butter knife
Ingredients
Blackberry Syrup:
- 5 oz 142 g fresh blackberries
- ¼ cup 50 g granulated sugar
- 1 tsp cornstarch
Blackberry Ice Cream:
- 8 oz 227 g fresh blackberries
- ¾ cup 150 g granulated sugar
- 2 cups 480 mL heavy cream
- 1 cup 240 mL whole milk
- 2 tsp vanilla extract
- ⅛ tsp salt
Instructions
- Prepare Your Equipment: Before diving into the recipe, ensure your ice cream maker is completely frozen according to the manufacturer’s instructions. If you’re using a stand mixer attachment, assemble it with the dasher fitted securely. Having all tools ready—blender or food processor, mesh strainer, saucepan, bowls, whisk, and freezer-safe pan—will make the process smooth and stress-free.
- Make the Blackberry Syrup: Place the blackberries, sugar, and cornstarch into a small saucepan. Cook over medium-low heat, gently mashing the berries with a spoon or spatula as they soften. Stir consistently to prevent sticking or burning, letting the mixture simmer for about 5 minutes until it thickens into a smooth syrup. Once thickened, transfer the mixture to a mesh strainer over a small bowl and press gently with a spatula or spoon to remove the seeds. Collect the smooth syrup in the bowl and refrigerate it while preparing the ice cream base. Discard the remaining seeds and pulp, or save for smoothies.
- Macerate the Blackberries: In a medium-sized mixing bowl, combine the blackberries with the sugar. Gently mash the berries with a spoon or fork to release their natural juices. Allow the mixture to sit at room temperature for 15 minutes. This step softens the fruit, enhances sweetness, and makes it easier to blend into a smooth puree.
- Blend and Strain the Blackberry Puree: Transfer the macerated berries into a blender or food processor. Blend until fully smooth. Place a fine mesh strainer over a large bowl and pour the blended mixture through it, pressing with a spatula to remove all seeds and residual pulp. Discard the leftover solids, leaving only a silky, seed-free blackberry puree for the ice cream base.
- Combine Ice Cream Base Ingredients: Add the heavy cream, whole milk, vanilla extract, and salt to the large bowl containing the strained blackberry puree. Whisk thoroughly until the mixture is fully combined and the sugar begins to dissolve. The liquid should appear smooth, slightly thickened, and uniformly blended. Taste carefully and adjust sweetness if needed—keep in mind the blackberry syrup will also add sweetness later.
- Churn the Ice Cream: Place the ice cream maker attachment with dasher onto your stand mixer. Turn the mixer on so the dasher begins rotating. Slowly pour the ice cream mixture into the frozen canister. Churn according to the manufacturer’s instructions, which usually takes 20–30 minutes. The mixture should thicken to a soft-serve consistency, creamy and slightly firm.
- Layer Ice Cream and Syrup: Select a freezer-safe pan, ideally a 9" x 5" loaf pan. Pour approximately one-third of the churned ice cream into the pan, spreading it evenly. Drizzle one-third of the chilled blackberry syrup over the ice cream layer. Repeat the process with another one-third of the ice cream and syrup, then finish with the remaining ice cream and syrup on top. Using a butter knife, gently swirl the syrup into the ice cream to create a marbled effect, but avoid overmixing to maintain distinct layers.
- Freeze Until Firm: Cover the pan loosely with plastic wrap or a lid and place it in the freezer. Allow the ice cream to firm up for at least 4 hours, preferably overnight, until it reaches a scoopable consistency.
- Serve and Enjoy: When ready to serve, remove the ice cream from the freezer for 5–10 minutes to soften slightly for easier scooping. Scoop into bowls or cones and garnish with fresh blackberries, a drizzle of additional syrup, or a sprig of mint if desired. Enjoy a creamy, fruity, and refreshing homemade treat that’s perfect for any occasion.
Notes
- Use fresh or thawed blackberries: Fresh berries give the brightest flavor, but frozen ones work perfectly if thawed completely. Don’t discard the juice from thawed berries—it adds natural sweetness and deep color.
- Sugar adjustments: You can tweak the sugar amount based on your berries’ sweetness. Sweeter berries may need slightly less sugar.
- Ice cream consistency: Churning times may vary by ice cream maker. Stop when the mixture reaches a soft-serve texture; it will firm up in the freezer.
- Avoid over-swizzling: When layering syrup and ice cream, swirl gently to preserve distinct ribbons of flavor. Overmixing can flatten the texture.
- Room temperature prep: Let heavy cream and milk sit at room temperature for 15–20 minutes before mixing; this helps the sugar dissolve evenly.
Chef’s Secrets: Enhance Flavor And Texture
The secret to a perfectly balanced blackberry ice cream lies in layering flavors.
Macerating the berries with sugar before blending draws out natural juices and intensifies their sweetness.
Straining the puree removes seeds, leaving a silky texture.
For a creamier result, chill the ice cream base in the refrigerator for 30 minutes before churning—it helps the mixture thicken faster.
Using a light swirl technique for the syrup creates a marbled effect that’s visually appealing and gives bursts of concentrated berry flavor in every bite.
Serving Suggestions: Enjoy Your Dessert Perfectly
Serve this blackberry ice cream on its own for a refreshing summer treat, or elevate it with toppings like crushed graham crackers, dark chocolate shavings, or fresh mint leaves.
It pairs beautifully with fruit pies, shortcakes, or a drizzle of balsamic reduction for an elegant twist.
For a fun twist, serve in waffle cones or bowls lined with crushed nuts for added texture.
The vibrant purple swirl makes it ideal for both casual snacks and special occasions.
Storage Tips: Keep Ice Cream Fresh
To maintain optimal flavor and texture, store the ice cream in an airtight container in the coldest part of your freezer.
Press a piece of parchment or wax paper directly onto the ice cream surface to prevent ice crystals.
Homemade ice cream is best enjoyed within two weeks but can remain flavorful for up to one month if properly sealed.
When serving, let the ice cream soften for 5–10 minutes at room temperature to make scooping easier without compromising creaminess.
Frequently Asked Questions
1. Can I make this recipe without an ice cream maker?
Yes! You can create a no-churn version by whipping heavy cream to stiff peaks, folding in the milk, sugar, and pureed blackberries, then layering with the syrup in a freezer-safe pan.
Freeze for at least 6 hours, stirring once halfway through for a creamier texture.
2. Can I use frozen blackberries instead of fresh?
Absolutely. Thaw the berries completely and include the juices when making the puree to preserve sweetness and flavor. You may want to reduce the sugar slightly, as thawed berries release natural sugars.
3. How can I make the ice cream creamier?
Ensure the ice cream base is thoroughly chilled before churning. Using full-fat cream and whole milk helps create a rich, smooth texture.
Churning until the mixture reaches soft-serve consistency before freezing also prevents iciness.
4. How long can I store homemade blackberry ice cream?
Properly stored in an airtight container, this ice cream lasts up to one month in the freezer. For the best taste and texture, enjoy within two weeks. Avoid repeated thawing and refreezing to maintain creaminess.
5. Can I adjust the sweetness or flavor intensity?
Yes! Taste the blackberry puree before combining with cream and milk. Add more sugar for sweeter ice cream, or a splash of lemon juice to brighten the flavor.
Swirling more syrup during layering also increases berry intensity in each bite.