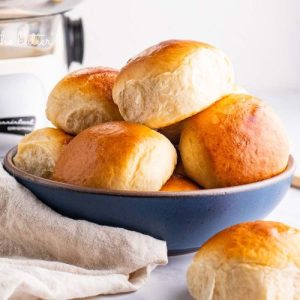
These golden, pillow-soft honey butter rolls are the ultimate comfort food for any meal.
Lightly sweetened with honey and enriched with butter, they deliver a perfect balance of fluffy texture and rich flavor.
Each serving provides a touch of protein and fiber, along with wholesome carbs for lasting energy.
With simple ingredients and easy steps, these rolls are a reliable go-to for family dinners, festive gatherings, or weekly meal prep.
Honey Butter Dinner Rolls
Equipment
- 1 large mixing bowl (stainless steel recommended)
- 1 stand mixer with dough hook (or dough roller and scraper)
- 1 whisk
- 1 small saucepan (for warming milk)
- 1 pastry brush
- 1 quarter-size baking sheet (greased)
- 1 clean kitchen towel (for covering dough)
- 1 cooking thermometer (to check milk temperature)
- 1 sharp knife or bench scraper (for dividing dough)
Ingredients
Dough:
- 1 cup whole milk warmed (100–110ºF)
- 2 ¼ teaspoons instant yeast
- 2 tablespoons granulated sugar divided
- 3 tablespoons unsalted butter softened
- 3 tablespoons honey
- ½ teaspoon salt
- 3 cups + 1 tablespoon all-purpose flour
Egg Wash:
- 1 large egg
- 1 tablespoon water
Optional Honey Butter Topping:
- 3 tablespoons unsalted butter softened
- 1 tablespoon honey
Instructions
- Prepare and Warm the Milk: Begin by gently heating the milk until it reaches between 100–110ºF. This temperature is crucial—warm enough to activate the yeast but not so hot that it kills it. The easiest way is to heat the milk in a small saucepan over low to medium heat for 1–2 minutes, stirring occasionally to avoid scorching. Check with a thermometer, or test by dipping a clean finger—the milk should feel warm but not hot. Pour the warmed milk into a large mixing bowl or the bowl of your stand mixer.
- Activate the Yeast: To the warm milk, add 1 tablespoon of sugar along with the instant yeast. Whisk gently to dissolve, then cover the bowl loosely with a lid or towel. Allow it to rest for about 6–8 minutes. You’ll know the yeast is active when the mixture develops a light foam and smells slightly sweet and yeasty. If no bubbles form, your yeast may be inactive and should be replaced before proceeding.
- Combine Wet Ingredients and Flavorings: Once the yeast mixture is foamy, add the remaining 1 tablespoon of sugar, along with the softened butter, honey, and salt. Mix these in until everything is well combined. The butter doesn’t need to fully dissolve—it will incorporate during kneading and help create a tender, buttery crumb in the finished rolls.
- Incorporate the Flour: Gradually add in the flour, starting with about 3 cups. Mix on low speed if using a stand mixer, or stir with a sturdy wooden spoon if mixing by hand. The dough should come together into a shaggy, slightly sticky mass. Add the final tablespoon of flour only if needed to bring the dough together—it should be soft and pliable but not overly dry.
- Knead the Dough to Smoothness: Fit your stand mixer with a dough hook (or dough roller and scraper attachments if using an Ankarsrum). Knead on low speed for 5–7 minutes, until the dough becomes smooth, elastic, and pulls away cleanly from the sides of the bowl. If kneading by hand, lightly flour your work surface and knead for 8–10 minutes using a push-and-fold motion. Proper kneading develops the gluten, which gives the rolls their pillowy texture.
- First Rise – Allow the Dough to Double: Lightly grease the mixing bowl with cooking spray or a thin layer of butter. Shape the dough into a ball, place it back in the bowl, and lightly coat the surface with a mist of spray or a thin butter layer to prevent drying. Cover with a clean kitchen towel or plastic wrap and set in a warm, draft-free spot. Let the dough rise until doubled in size, which typically takes 1½–2 hours depending on your room temperature.
- Punch Down and Shape the Dough: Once risen, gently press your fist into the center of the dough to deflate it. Transfer the dough to a clean, lightly floured surface. Roll or pat it into a rectangle roughly 8 × 12 inches in size. Using a sharp knife or bench scraper, divide into 12 equal pieces (a 3×4 grid works well). For even baking, you may weigh each portion if desired.
- Shape into Smooth Roll Balls: Take one portion at a time. Fold the edges underneath toward the center, pinch the seams to seal, and then place the dough seam-side down on the counter. Cup your hand over the piece and roll it gently in a circular motion until it forms a smooth, round ball. Repeat with the remaining dough portions until all are shaped.
- Arrange and Second Rise: Place the shaped rolls onto a greased quarter-sheet baking pan, leaving a little space between each for expansion. Cover loosely with a clean kitchen towel and let rise at room temperature for another 30–45 minutes, or until the rolls look noticeably puffy and have nearly doubled in size again. This second rise ensures light, airy rolls with a soft interior.
- Prepare the Egg Wash: While the rolls are finishing their rise, preheat your oven to 350ºF (175ºC). In a small bowl, whisk together the egg and water until smooth and slightly frothy. This egg wash will give the rolls a glossy, golden-brown finish.
- Bake to Golden Perfection: Once the rolls have risen, brush their tops generously with the egg wash. Place the baking sheet on the second rack level from the bottom (slightly above center) for even heat circulation. Bake for 25–28 minutes, or until the rolls are deep golden brown on top and sound hollow when tapped on the bottom.
- Optional Honey Butter Glaze: While the rolls are baking, stir together the softened butter and honey until smooth. The moment the rolls come out of the oven, brush the warm tops with this honey butter mixture for an extra layer of sweetness and shine. This step is optional but highly recommended for maximum flavor.
- Cool Slightly and Serve Warm: Allow the rolls to cool on the pan for 5–10 minutes before serving. They are best enjoyed warm, either plain, with additional butter, or as a complement to soups, stews, or holiday feasts.
Notes
- Always warm the milk to the right temperature (100–110ºF) to ensure the yeast activates properly.
- Instant yeast works best for convenience, but active dry yeast can be substituted with a slightly longer blooming time.
- The dough should feel soft and slightly tacky, but not sticky—add flour sparingly if too wet.
- Rolling the dough into smooth balls ensures even baking and a beautiful finished look.
- For extra shine and sweetness, don’t skip the honey butter glaze—it makes the rolls irresistible.
- If making ahead, the dough can be refrigerated overnight after the first rise.
Chef’s Secrets for Perfect Rolls
The secret to bakery-quality honey butter rolls lies in patience and precision.
Allowing the dough to fully double during each rise develops both flavor and texture, so don’t rush this step even if you’re eager to bake.
Kneading is another key—well-developed gluten creates the pillowy, soft structure these rolls are known for.
For consistent results, weigh your dough pieces before shaping, which ensures that all rolls bake evenly.
Finally, brushing the tops with honey butter as soon as they leave the oven locks in moisture and adds a glossy, golden finish.
Serving Suggestions for Any Occasion
These honey butter rolls are incredibly versatile and pair beautifully with both everyday meals and festive feasts.
Serve them warm alongside hearty dishes like roasted chicken, beef stew, or creamy pasta for a satisfying contrast of textures.
They also make an elegant addition to holiday spreads such as
Thanksgiving or Easter, where their slight sweetness balances savory mains.
For a casual option, split them open and use as mini sliders for pulled pork, turkey, or veggie fillings.
Even simply with a smear of butter or jam, these rolls shine as a cozy breakfast treat.
Smart Storage and Reheating Tips
Fresh rolls are always best, but storing them properly will extend their life without losing flavor.
Once cooled completely, transfer them to an airtight container or a resealable plastic bag.
At room temperature, they’ll stay fresh for 2–3 days; in the refrigerator, they last up to a week.
To reheat, warm them in the oven at 350ºF for about 8–10 minutes, or toast lightly for a crisp edge.
For longer storage, freeze the rolls for up to three months—just wrap tightly in foil and store in a freezer-safe bag.
When ready to enjoy, thaw at room temperature and reheat until warm.
Frequently Asked Questions
1. Can I use active dry yeast instead of instant yeast?
Yes, but you’ll need to bloom it longer. Dissolve active dry yeast in the warm milk with sugar and let it sit for 10–12 minutes until foamy before proceeding.
2. How do I know if my dough has risen enough?
The dough should double in size. A simple test is to poke the dough gently with your finger—if the indentation remains, it’s ready to shape.
3. Can I make the dough ahead of time?
Absolutely. After the first rise, cover the dough tightly and refrigerate overnight. Bring it to room temperature before shaping and continuing with the second rise.
4. Why are my rolls dense instead of fluffy?
Dense rolls usually result from not kneading enough or cutting the rise times short. Ensure the dough is elastic and allow plenty of time for both rises.
5. Can I make these rolls without the egg wash?
Yes, though the rolls will bake to a softer matte finish. If you prefer a glossy crust without eggs, brush them with milk or melted butter before baking.