Indulge in this creamy, naturally sweet honey ice cream that feels luxurious yet wholesome.
Made with real honey, rich cream, and whole milk, it’s a satisfying treat with good fats and protein to keep you energized.
Easy to prepare at home, this recipe delivers soft, velvety ice cream perfect for everyday enjoyment or special desserts.
Creamy Honey Ice Cream
Equipment
- 1 ice cream maker
- 1 Reusable Ice Cream Tub
- 1 ice cream scoop
- 1 medium saucepan
- 1 whisk
- 1 wooden spoon
- 1 Heat-proof Container
Ingredients
- 1 ½ cups heavy cream
- 1 ½ cups whole milk
- ½ cup honey
- ½ teaspoon kosher salt
- 1 ½ teaspoon vanilla paste or pure vanilla extract
- 4 large egg yolks
Instructions
- Prepare the Cream Base: In a medium-sized saucepan, combine 1 ½ cups of heavy cream, 1 ½ cups of whole milk, ½ cup honey, ½ teaspoon kosher salt, and 1 ½ teaspoons vanilla paste or extract. Place the pan over medium heat and stir frequently to blend the ingredients evenly. Heat the mixture gently until it begins to simmer lightly. Avoid boiling, as this can scald the cream and affect the smooth texture of your ice cream. The mixture should become warm, fragrant, and slightly steamy, releasing the rich aroma of honey and vanilla.
- Whisk the Egg Yolks: While the cream mixture is warming, separate 4 large egg yolks into a clean bowl. Whisk them thoroughly until smooth, silky, and slightly pale in color. This creates a custard base that is rich and creamy without any lumps. Properly whisked yolks are essential to achieve the soft, velvety texture that makes this ice cream exceptional. Set the whisked yolks aside, ready for the next step.
- Temper the Eggs: Carefully pour approximately 1 ½ cups of the warmed cream mixture into a separate measuring cup. Slowly drizzle this liquid into the egg yolks while whisking constantly. This process, called tempering, gradually raises the temperature of the eggs so they do not cook too quickly or scramble. Continuous, gentle whisking is crucial to ensure a smooth, silky custard base.
- Combine Custard and Cream: Pour the tempered egg mixture back into the saucepan with the remaining warm cream mixture. Stir continuously with a wooden spoon over medium heat, making sure to scrape the bottom and sides of the pan to prevent sticking or burning. Cook for about 10 minutes until the custard thickens slightly or reaches around 180°F. Look for “milk bubbles” forming at the edges—this indicates the custard has reached the perfect temperature without boiling.
- Cool the Custard: Remove the saucepan from heat and pour the custard into a heat-proof container. Allow it to cool at room temperature for approximately 30 minutes. This gradual cooling helps preserve the smooth texture and prevents the ice cream from developing ice crystals later. Cover the container with a lid or stretch film and refrigerate for at least 3 hours, or up to 24 hours. The custard must be completely chilled before churning.
- Churn the Ice Cream: Pour the thoroughly chilled custard into an ice cream maker and churn according to the manufacturer’s instructions, typically 15–20 minutes. During churning, the liquid custard transforms into a soft-serve-like texture with a light, airy consistency. The churning process incorporates air and develops the creamy, smooth texture that defines high-quality homemade ice cream.
- Transfer and Freeze: Carefully move the churned ice cream into a reusable, airtight ice cream tub. Press the back of a spoon gently onto the surface to remove air pockets and ensure even texture. Cover tightly with a lid or stretch film. Freeze for at least 3 hours, or preferably overnight, to allow the ice cream to firm up completely for optimal scooping.
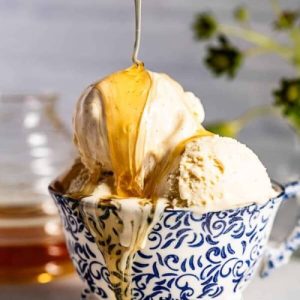
- Serve and Enjoy: Scoop the ice cream into bowls or cones. For added indulgence, drizzle with honey, sprinkle toasted nuts, or serve alongside fresh fruit. The ice cream should be creamy, smooth, and rich in flavor, with the natural sweetness of honey and the warmth of vanilla shining through in every bite.
Notes
- Yields: This recipe produces approximately 1 quart of ice cream, enough for 4 generous servings.
- Honey Selection: Use high-quality, mild-flavored honey to enhance the sweetness naturally. Darker honeys may impart a stronger, more robust taste.
- Vanilla Options: Vanilla paste is preferred for a richer, more aromatic flavor, but pure vanilla extract works if added after the custard cools slightly.
- Temperature Control: Avoid boiling the cream mixture. Gentle heating ensures a smooth custard and prevents curdling.
- Chilling: Refrigerate the custard thoroughly before churning; this ensures a creamy, soft texture when frozen.
- Soft-Serve Texture: Churned ice cream resembles soft-serve; freezing longer will produce a firmer consistency suitable for scooping.
Chef’s Secrets: Achieving Perfect Creaminess
The secret to irresistibly creamy honey ice cream lies in controlling temperature and timing.
Tempering the egg yolks gradually prevents scrambling and produces a silky custard.
Constant stirring while cooking ensures even heat distribution, avoiding any burnt edges.
Using a mix of cream and whole milk balances richness with lightness, while chilling the custard overnight allows flavors to fully meld.
For extra smoothness, strain the custard before churning to remove any tiny cooked egg bits.
Serving Suggestions: Creative Flavor Pairings
Honey ice cream is wonderfully versatile.
Serve it on its own to savor the pure honey-vanilla flavor, or pair it with warm desserts like apple pie, baked pears, or chocolate brownies.
A drizzle of caramel sauce, a sprinkle of toasted nuts, or fresh berries can elevate the dessert visually and texturally.
It’s also excellent alongside coffee or a sparkling dessert wine for a more sophisticated presentation.
Storage Tips: Maintain Freshness And Texture
Store the ice cream in an airtight container to prevent freezer burn and preserve its creamy texture.
Press a piece of plastic wrap directly onto the surface before sealing to minimize ice crystal formation.
Keep the ice cream in the coldest part of the freezer, not the door, for consistent firmness.
Properly stored, it maintains its texture and flavor for up to 2 weeks.
When ready to serve, allow the ice cream to sit at room temperature for 5–10 minutes for easier scooping.
Frequently Asked Questions
1. Can I use other sweeteners instead of honey?
Yes, maple syrup or agave can be substituted, but the flavor will vary. Honey gives a distinct floral sweetness that defines this ice cream’s character.
2. Why did my ice cream turn icy instead of creamy?
This usually happens if the custard was not chilled enough before churning or if the ice cream is stored uncovered. Thorough chilling and airtight storage prevent ice crystals.
3. Do I need an ice cream maker for this recipe?
While an ice cream maker produces the best texture, you can freeze the custard in a container and stir every 30–45 minutes until firm. The texture will be slightly less smooth but still delicious.
4. Can I make this recipe dairy-free?
Yes, substitute coconut cream and unsweetened plant-based milk. Keep in mind the texture and flavor will differ slightly, but it will still be creamy and naturally sweet.
5. How long can I store leftover ice cream?
Properly stored in an airtight container, honey ice cream lasts up to 2 weeks in the freezer. Avoid frequent thawing and refreezing to maintain its texture and flavor.