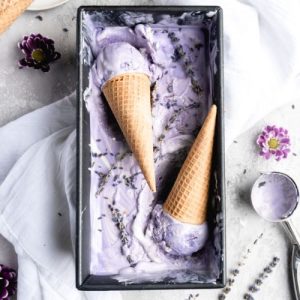
This no-churn lavender Earl Grey ice cream is a dreamy blend of floral and citrusy notes that feels indulgent yet simple to prepare at home.
Made with creamy dairy, aromatic tea, and calming lavender, it’s both refreshing and satisfying.
Naturally rich in protein and calcium from the cream and milk, and lower in processed sugars thanks to sweetened condensed milk, this recipe is a fuss-free treat perfect for everyday enjoyment.
Lavender Earl Grey Ice Cream
Equipment
- 1 small saucepan
- 2 Medium bowls
- Plastic wrap
- Fine mesh strainer
- Stand mixer with whisk attachment (or hand mixer)
- 1 Loaf pan
- 1 Knife (for swirling)
Ingredients
- ½ cup whole milk
- 1 teaspoon dried lavender
- A few drops purple food coloring optional
- 1 Earl Grey tea bag
- 1 teaspoon vanilla bean paste or vanilla extract
- 2 cups cold heavy cream
- 12 ounces sweetened condensed milk
Instructions
- Infuse the Milk Base: Pour the whole milk into a small saucepan and place it over medium heat. Allow the milk to gently warm until it just begins to simmer around the edges—avoid letting it boil. Once tiny bubbles appear, remove the saucepan from the heat immediately. Divide the warm milk evenly into two medium bowls, which will serve as the bases for your lavender and Earl Grey flavors.
- Prepare the Lavender Mixture: In the first bowl of warm milk, sprinkle in the dried lavender buds. To achieve the signature floral look, add a few drops of purple food coloring—just enough to give the mixture a soft lavender hue. Stir gently to blend. The lavender will begin releasing its oils into the milk, creating a fragrant, slightly floral infusion.
- Steep the Earl Grey and Vanilla: In the second bowl of warm milk, add one Earl Grey tea bag along with the vanilla bean paste (or vanilla extract if that’s what you have on hand). Stir to help the flavors start infusing. The tea will lend a subtle citrusy aroma, while the vanilla balances it with creamy sweetness.
- Cool and Rest the Infusions: To prevent a skin from forming on the surface, press a piece of plastic wrap directly against the top of each bowl. Place both bowls in the refrigerator for at least 2 to 3 hours, or until completely chilled. This resting period allows the lavender and Earl Grey flavors to fully steep into the milk, resulting in deeper, more complex flavors for your ice cream.
- Strain and Discard Solids: Once the milk infusions have cooled, carefully remove the plastic wrap. Take out the Earl Grey tea bag and discard it. For the lavender milk, pour the mixture through a fine mesh strainer to catch and remove the lavender buds, leaving behind only the smooth, fragrant milk. Both bowls should now hold infused liquid bases ready to be combined with cream.
- Whip the Cream to Peaks: In a stand mixer fitted with the whisk attachment (or using a hand mixer and large bowl), pour in the cold heavy cream. Beat the cream on medium-high speed until stiff peaks form. You’ll know it’s ready when the cream holds its shape and doesn’t collapse back into the bowl. Be careful not to overwhip, or it may turn grainy.
- Sweeten with Condensed Milk: Gently fold the sweetened condensed milk into the whipped cream using a spatula. Folding, rather than stirring, is important—it helps keep the airy texture of the whipped cream intact, ensuring your ice cream stays light and creamy once frozen. Continue folding until the mixture is smooth and evenly combined.
- Divide and Flavor the Cream: Split the sweetened whipped cream mixture evenly into two bowls. Pour the strained lavender milk into one bowl and the Earl Grey-vanilla milk into the other. Use a gentle folding motion to blend each flavored milk with its portion of whipped cream. The lavender mixture will turn a delicate purple shade, while the Earl Grey mixture will remain pale and creamy.
- Layer and Swirl the Mixtures: Spoon alternating dollops of the lavender and Earl Grey mixtures into a clean loaf pan, layering them as you go. Once all the cream is in the pan, use the tip of a knife to gently swirl the two flavors together, creating a marbled effect. Be careful not to overmix—you want distinct ribbons of color and flavor rather than blending everything into one.
- Freeze Until Firm: Cover the loaf pan with plastic wrap or aluminum foil and transfer it to the freezer. Allow the ice cream to freeze for at least 6 hours, or overnight for best results. The longer freezing time ensures the ice cream sets completely, making it easy to scoop and serve.
- Serve and Enjoy: When ready to enjoy, remove the pan from the freezer and let it sit at room temperature for a few minutes to soften slightly. Use an ice cream scoop dipped in warm water to portion out scoops. Serve in bowls or cones, and enjoy the delightful balance of creamy vanilla, floral lavender, and fragrant Earl Grey tea in every bite.
Notes
- No ice cream maker required—this is a no-churn method.
- Lavender adds a delicate floral aroma without overpowering the flavor.
- Earl Grey tea balances the lavender with subtle citrus and bergamot notes.
- Sweetened condensed milk keeps the texture creamy and smooth.
- Whipping the cream correctly is key for light, airy ice cream.
- Freezing time is essential—patience ensures perfect scoops.
- You can adjust food coloring for a stronger or softer lavender hue.
Chef’s Secrets for Best Results
The secret to making this ice cream shine is balance—lavender can easily become too strong, so measure carefully and always strain the buds out once steeped.
Using high-quality Earl Grey tea with real bergamot oil makes a noticeable difference in flavor depth, so opt for loose-leaf or premium bags when possible.
Be sure your heavy cream is very cold before whipping; chilled cream whips faster and holds its shape better.
Another trick is to fold ingredients gently instead of stirring vigorously, which helps preserve the air in the whipped cream and keeps the texture light.
Finally, don’t skip the chilling step for the milk infusions—this ensures maximum flavor infusion without melting the whipped cream when combined.
Serving Suggestions and Pairing Ideas
This ice cream is elegant enough for a dinner party yet simple enough for a weeknight treat.
Serve scoops in classic waffle cones for a nostalgic touch, or present them in clear glass bowls to show off the marbled swirl.
Pair with buttery shortbread cookies, almond biscotti, or lemon bars for a delightful contrast of textures and flavors.
If you’re feeling creative, serve a scoop alongside a warm slice of pound cake or drizzle with a light honey syrup for extra sweetness.
For a beverage pairing, it complements hot tea, iced lattes, or sparkling water with citrus slices beautifully.
Storage Tips to Keep Freshness
To keep your ice cream creamy and free from freezer burn, always cover the surface tightly with plastic wrap before sealing the loaf pan with a lid or foil.
This prevents ice crystals from forming on top.
Store the pan toward the back of the freezer where the temperature is most stable, rather than near the door where warm air can cause thawing and refreezing.
For longer storage, you can transfer portions into individual airtight containers—this makes it easier to grab a serving without exposing the entire batch to air.
Properly stored, the ice cream will keep its flavor and texture for up to two weeks.
Frequently Asked Questions
1. Can I use fresh lavender instead of dried?
Yes, but use it sparingly. Fresh lavender can be more potent than dried, so reduce the quantity by half.
Always taste the milk infusion before adding to the cream to ensure the flavor isn’t too strong.
2. What if I don’t have food coloring?
The food coloring is optional and only affects appearance, not taste. Your ice cream will still be delicious without it—it just won’t have the purple hue.
3. Can I make this dairy-free?
Yes, you can substitute coconut cream for the heavy cream and sweetened condensed coconut milk for the dairy version.
The flavor will have a subtle coconut undertone but still pair beautifully with lavender and Earl Grey.
4. How long does it take to freeze fully?
At least 6 hours is recommended, but overnight freezing gives the best texture. The ice cream needs time to firm up completely before scooping.
5. Why is my ice cream icy instead of creamy?
This usually happens if the cream wasn’t whipped enough or if the mixtures were stirred instead of folded.
Also, improper covering during freezing can cause ice crystals to form. Be sure to whip until stiff peaks, fold gently, and seal tightly before freezing.