This Lemon Raspberry Ice Cream is a refreshing and indulgent treat, perfectly blending tangy citrus with sweet, luscious raspberries.
Rich in protein from egg yolks and cream, and naturally flavored with real fruit, it offers a nutritious twist to a classic dessert.
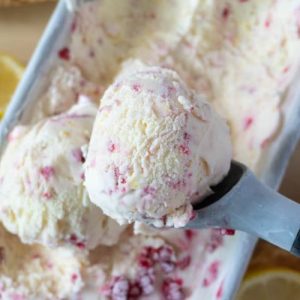
With a smooth custard base and vibrant raspberry swirls, it’s an easy yet elegant option for everyday indulgence or special occasions.
Lemon Raspberry Ice Cream
Equipment
- 1 medium saucepan
- 1 mixing bowl
- 1 whisk
- 1 measuring cup
- 1 Measuring Spoon Set
- 1 Ice cream machine (manufacturer’s preferred model)
- 1 Freezer-safe container with lid
- 1 Ice bath container
Ingredients
Ice Cream Base:
- 400 ml heavy cream
- 400 ml whole milk
- 2 tbsp skim milk powder
- 2 tbsp corn syrup 40 g
- 1 large egg yolk
- ¾ cup granulated sugar 150 g
- ¼ tsp salt
- Zest of 2 lemons
- 2 tsp lemon extract
- ½ cup frozen raspberries
Raspberry Sauce:
- ½ cup fresh or frozen raspberries
- 3 tbsp granulated sugar
- Pinch of salt
- ½ tsp cornstarch
- 1 tsp water
Instructions
- Prepare Lemon-Sugar Mixture: Begin by zesting two fresh lemons. Place the lemon zest into a small mixing bowl with ¾ cup (150 g) granulated sugar. Using your fingers, gently massage the zest and sugar together for about 2–3 minutes. This process releases the natural oils from the lemon zest, infusing the sugar with a vibrant citrus aroma that will enhance the flavor of the ice cream base.
- Whip Egg Yolks and Sweeteners: In a medium mixing bowl, add one large egg yolk along with one-third of the lemon-scented sugar and the corn syrup (40 g). Using a whisk or an electric mixer, beat these ingredients together until they turn pale yellow, become fluffy, and form a thick ribbon when the whisk is lifted. This step is crucial for building a rich custard base that ensures a smooth, creamy texture for the ice cream.
- Heat Cream Mixture: In a medium saucepan, combine 400 ml heavy cream, 400 ml whole milk, 2 tablespoons skim milk powder, the remaining sugar, and ¼ teaspoon salt. Place the saucepan over low heat and stir occasionally until the mixture is hot and just about to simmer. It’s important not to bring it to a full boil, as boiling may alter the texture of the custard and curdle the eggs later.
- Temper the Egg Yolks: Slowly pour about half a cup of the hot cream mixture into the egg yolk mixture while whisking constantly. This gradual incorporation of heat prevents the eggs from cooking too quickly, avoiding curdling. Once combined, add another half cup of the cream mixture while continuing to whisk gently. This process is called tempering, and it ensures a smooth custard without lumps.
- Cook Custard Base: Return the tempered egg yolk mixture to the saucepan with the remaining cream mixture. Place it over medium-low heat and stir constantly with a wooden spoon or heat-resistant spatula. Gradually heat until the custard reaches about 175°F (79°C). You’ll notice the mixture thickening slightly; this is the sign that the custard is ready. Be careful not to overheat or boil, as this could cause the mixture to curdle.
- Cool Custard Base: Once the custard has reached the correct temperature, transfer the saucepan into an ice bath. Stir the custard gently for several minutes to bring the temperature down to room level quickly. This cooling step is important to preserve texture and flavor. Once cooled, stir in 2 teaspoons of lemon extract for a concentrated citrus boost.
- Chill Overnight: Pour the custard base into a leak-proof bag or airtight container. Refrigerate for at least 8 hours or overnight. This resting period allows the flavors to meld and develops a richer taste, while also ensuring the mixture is perfectly cold for churning.
- Prepare Raspberry Sauce: In a small saucepan, combine ½ cup fresh or frozen raspberries, 3 tablespoons sugar, and a pinch of salt. Place over medium heat and stir gently. As the raspberries cook, use the back of a spoon to mash them until they break down completely into a thick liquid. In a separate small bowl, mix ½ teaspoon cornstarch with 1 teaspoon water to create a slurry. Stir this slurry into the raspberry mixture and cook for an additional 2–3 minutes until the sauce thickens to a smooth consistency. Remove from heat and allow it to cool.
- Churn Ice Cream: Set up your ice cream machine according to the manufacturer’s instructions. Once chilled, pour the custard base into the machine while it’s spinning. Churn for approximately 25–30 minutes. You should notice the mixture transforming into a thick, creamy soft serve. The ideal churning temperature is between -6°C and -10°C (21.2°F–14°F), which ensures small ice crystals and a smooth texture.
- Layer Ice Cream with Raspberry Swirl: In a freezer-safe container, add about half of the churned ice cream. Spoon in 2–3 tablespoons of raspberry sauce and sprinkle half of the frozen raspberries. Use a spatula or spoon to gently swirl the sauce into the ice cream, creating a marbled effect. Add the remaining ice cream on top and repeat with another swirl of raspberry sauce and frozen raspberries.This layering creates a visually striking dessert with bursts of fruit flavor in every bite.
- Freeze to Set: Cover the container with an airtight lid or plastic wrap and place it in the freezer for a minimum of 4 hours. This step allows the ice cream to harden to the perfect scoopable consistency.
- Serve and Enjoy: When ready to serve, scoop the ice cream into bowls or cones. Optionally, drizzle with additional raspberry sauce for an extra burst of flavor. Enjoy this creamy, tangy, and fruity treat on a hot summer day or as a special dessert anytime.
Notes
- Always use fresh lemon zest for maximum citrus flavor — dried zest won’t deliver the same aroma or intensity.
- Use skim milk powder to improve creaminess and prevent ice crystal formation.
- For best texture, chill the custard base overnight before churning.
- Adjust sweetness in the raspberry sauce based on the natural tartness of your raspberries.
- Always swirl raspberry sauce gently to maintain a marbled effect instead of blending it completely.
Chef’s Secrets for Perfect Ice Cream
Achieving the smoothest, most flavorful ice cream requires attention to detail.
The key is in the custard base — slow cooking over low heat and constant stirring prevents curdling and ensures a silky texture.
Chilling the base overnight is crucial for flavor development and even churning.
For a more pronounced citrus aroma, zest the lemons just before making the ice cream.
When swirling the raspberry sauce, avoid over-mixing to preserve the vibrant color and create an appealing marbled pattern that enhances presentation.
Using frozen raspberries adds bursts of texture and natural fruit flavor without diluting the custard base.
Serving Suggestions for Best Enjoyment
Serve your Lemon Raspberry Ice Cream in elegant bowls for a dessert presentation, or scoop into waffle cones for a fun summer treat.
Pair it with fresh berries, lemon shortbread cookies, or a drizzle of extra raspberry sauce for an elevated experience.
For a lighter option, serve alongside a small fruit salad.
This dessert also works beautifully as part of a summer brunch or dinner party — its vibrant flavor and creamy texture make it a memorable finale to any meal.
Storage Tips for Freshness
Store the ice cream in an airtight container to prevent ice crystal formation and maintain creaminess.
For best texture, consume within two weeks of making.
If storing longer, press a sheet of parchment or plastic wrap directly onto the surface before sealing the container to reduce freezer burn.
The raspberry sauce should be stored separately in an airtight jar in the refrigerator and can be kept for up to five days.
Reheat gently before serving if you want a warm sauce swirl.
Frequently Asked Questions
1. Can I make this recipe without an ice cream machine?
Yes! You can make it without a machine by pouring the custard base into a shallow, freezer-safe container and stirring every 30 minutes until frozen.
This manual method breaks up ice crystals but will yield a slightly less smooth texture.
2. Can I use fresh raspberries instead of frozen ones?
Absolutely. Fresh raspberries work wonderfully and will produce a vibrant, fresh flavor. If using fresh berries, consider chilling them before adding to avoid altering the ice cream’s temperature and texture during swirling.
3. Can I substitute corn syrup in the recipe?
Yes, but note that corn syrup helps prevent large ice crystal formation and keeps the ice cream smooth.
You can substitute with honey or glucose syrup, though texture may slightly change. Avoid using sugar alone for the same effect.
4. How can I make this recipe vegan or dairy-free?
You can substitute coconut milk or almond milk for the cream and milk, and use a plant-based milk powder alternative.
Replace egg yolks with a cornstarch or agar-agar thickener to maintain creaminess. Note the texture and flavor will vary slightly.
5. How long does homemade ice cream last in the freezer?
For best quality, consume within two weeks of making. Homemade ice cream is freshest when eaten within the first week.
Store in airtight containers, and press parchment paper directly on the surface to minimize ice crystal formation.