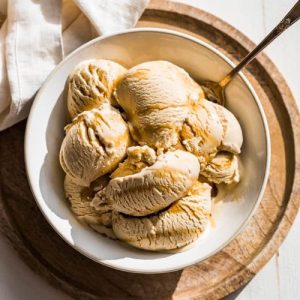
This Homemade Maple Ice Cream is a creamy, naturally sweet dessert that elevates a classic treat with rich, real maple flavor.
Made with wholesome ingredients like egg yolks, cream, and Grade B maple syrup, it delivers a good balance of protein and healthy fats.
Quick to make and incredibly satisfying, it’s perfect for everyday indulgence or special occasions.
Healthy Maple Ice Cream
Equipment
- 2-quart ice cream maker
- Medium saucepan
- Whisk
- Mixing bowl
- Fine mesh strainer
Ingredients
- 6 large egg yolks
- ¾ cup Grade B maple syrup
- 1 tsp arrowroot powder or tapioca starch/cornstarch
- ¼ tsp sea salt
- 1 ½ cups half-and-half
- 1 ½ cups heavy cream
- 1 tsp vanilla extract
Instructions
- Prepare the Custard Base: In a medium mixing bowl, start by whisking together 6 large egg yolks with 3/4 cup of Grade B maple syrup. Add 1 teaspoon of arrowroot powder (or tapioca starch/cornstarch) and 1/4 teaspoon of sea salt. Whisk continuously until the mixture becomes smooth, pale, and slightly thickened. This process ensures that the eggs and syrup blend evenly, forming the foundation of a silky ice cream custard.
- Incorporate the Dairy: Slowly pour 1 1/2 cups of half-and-half into the egg mixture, whisking constantly to prevent curdling. Take your time and ensure the liquids are fully incorporated. The gentle folding of the dairy into the egg mixture creates a velvety texture while building a stable custard base.
- Cook the Custard: Transfer the mixture to a medium saucepan and place it over medium-high heat. Using a sturdy whisk, stir constantly in a slow, circular motion. The goal is to gently thicken the custard without allowing it to boil. As it heats, the mixture should coat the back of a spoon lightly. This stage is crucial to achieving a smooth, creamy consistency without scrambling the eggs.
- Remove from Heat and Add Cream: Once the custard has thickened to a creamy, coat-the-spoon consistency, immediately remove the pan from the heat. Stir in 1 1/2 cups of heavy cream and 1 teaspoon of vanilla extract. The cream enriches the custard, creating a luxurious mouthfeel, while the vanilla enhances the natural sweetness of the maple syrup.
- Strain for Silky Smoothness: Pour the custard through a fine-mesh strainer into a clean mixing bowl. This step removes any small cooked egg bits or lumps, guaranteeing an ultra-smooth final ice cream texture. Press gently with a spatula to extract every drop of custard.
- Chill the Custard Thoroughly: Cover the strained custard with plastic wrap, ensuring the wrap touches the surface to prevent a skin from forming. Refrigerate for at least 4 hours, or until completely chilled. Cooling the custard fully is essential for proper ice cream freezing and ensures a creamy, soft scoopable texture.
- Freeze in Ice Cream Maker: Pour the chilled custard into a 2-quart ice cream maker. Follow your machine’s manufacturer instructions for freezing. Typically, this involves turning the machine on and allowing the mixture to churn until it thickens and “stands” on a spoon. This process incorporates air, giving your ice cream a light yet creamy consistency.
- Hard Freeze for Firm Texture: After churning, transfer the ice cream to an airtight container. Place it in the freezer for an additional 4–6 hours to fully firm up. This step ensures that the ice cream holds its shape for scooping and serving while locking in all the rich maple flavor.
- Serve and Enjoy: Scoop the ice cream into bowls or cones, garnishing if desired with a drizzle of extra maple syrup or a sprinkle of chopped nuts. This homemade maple ice cream is creamy, flavorful, and delightfully sweet, perfect for a simple dessert or an elegant treat for guests.
Notes
- Adjust Sweetness to Taste: Maple syrup can vary in intensity. While 3/4 cup provides a balanced sweetness, you can use 1/2 cup for a lighter flavor or 1 cup for a richer taste. Always taste the custard before chilling to ensure it’s to your liking.
- Choose Grade B Maple Syrup: Grade B syrup has a darker, more robust flavor compared to Grade A. It enhances the maple depth without adding extra sweetness.
- Arrowroot Substitutions: If you don’t have arrowroot, cornstarch or tapioca starch works perfectly to stabilize the custard. Avoid overusing—1 teaspoon is sufficient.
- Chilling is Essential: Properly chilling the custard before freezing ensures smooth texture and prevents ice crystals from forming. Overnight refrigeration is ideal.
- Prevent Egg Curdling: Constant whisking during heating and removing from heat as soon as thickened ensures a silky custard. Never allow it to boil.
Chef’s Secrets: Insider Tips For Perfection
The secret to a luxurious maple ice cream lies in balancing temperature, texture, and flavor.
Always whisk the egg-syrup mixture thoroughly before adding dairy to prevent lumps.
When cooking the custard, patience is key—constant stirring over medium heat allows the mixture to thicken evenly without scrambling the eggs.
Straining through a fine-mesh sieve guarantees a smooth, creamy ice cream without any stray bits.
For an extra flavor boost, a small pinch of cinnamon or nutmeg can enhance the natural maple aroma without overpowering it.
Finally, using high-quality Grade B maple syrup ensures a deep, rich flavor that makes every scoop irresistible.
Serving Suggestions: Ideas To Impress Guests
This ice cream shines on its own but can be paired beautifully with warm desserts.
Serve a scoop atop apple pie, bread pudding, or spiced pear cobbler for a decadent treat.
For a lighter option, add fresh berries or a handful of toasted nuts to create texture and color contrast.
Drizzling a bit of extra maple syrup or chocolate sauce elevates the presentation.
You can even serve it with a sprinkle of sea salt or crushed graham crackers for an added layer of flavor.
Its creamy, smooth texture makes it ideal for both casual family desserts and elegant dinner parties.
Storage Tips: Keep Ice Cream Perfect
Store your homemade maple ice cream in an airtight container to prevent freezer burn and maintain flavor.
Press a piece of parchment paper or plastic wrap directly onto the surface before sealing to reduce ice crystal formation.
Keep the container in the coldest part of the freezer rather than the door for consistent freezing.
Properly stored, the ice cream will remain fresh for up to 2 weeks.
Before serving, allow it to sit at room temperature for 5–10 minutes for easier scooping while preserving its creamy texture.
Frequently Asked Questions
Can I make this without an ice cream machine?
Yes! Pour the chilled custard into a shallow, freezer-safe dish. Freeze for 1 hour, then whisk vigorously to break up ice crystals.
Repeat every 30–40 minutes until creamy and fully frozen. While it won’t be as airy as churned ice cream, it will still be delicious.
What’s the best maple syrup to use?
Grade B maple syrup is preferred for its deeper, more pronounced flavor. Grade A is milder and may produce a less robust maple taste. Avoid artificial syrups—they lack the natural complexity.
Can I make this recipe ahead of time?
Absolutely! The custard can be prepared up to 24 hours in advance and stored in the refrigerator before churning. This makes it perfect for meal prep or entertaining.
How do I prevent icy or grainy ice cream?
Constant whisking while cooking the custard, thorough straining, and fully chilling before freezing are essential.
Using the correct ratio of cream to half-and-half also ensures a creamy texture with minimal ice crystal formation.
Can I add mix-ins or flavors?
Yes! Chopped nuts, chocolate chips, or swirls of caramel can be gently folded into the ice cream after churning. Avoid adding ingredients that release a lot of moisture, as this can affect texture.