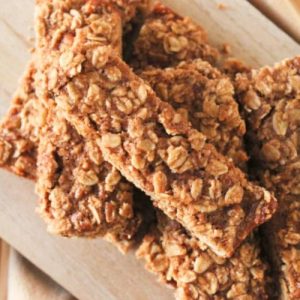
These Maple Pecan Granola Bars are a wholesome, satisfying snack that’s perfect for busy mornings or on-the-go energy.
Packed with fiber-rich oats, protein from eggs and flax seeds, and heart-healthy fats from pecans and coconut oil, they’re naturally sweetened with maple syrup.
Quick to make and freezer-friendly, they’re ideal for everyday meal prep or a nutritious treat.
Maple Pecan Granola Bars
Equipment
- 9×9 inch baking pan
- Parchment Paper
- Large Mixing Bowl
- Whisk
- Spoon or spatula
Ingredients
- 1 cup certified gluten-free oats
- ½ cup certified gluten-free oat flour
- ¼ cup ground flax seeds
- ¾ cup pecans finely chopped
- 2 ½ tsp ground cinnamon
- ¼ tsp salt
- ½ cup pure maple syrup
- ¼ cup coconut oil melted
- 1 tsp vanilla extract
- 1 large egg
Instructions
- Preheat and Prepare the Pan: Before you start mixing ingredients, preheat your oven to 350°F (175°C). Line a 9×9-inch baking pan with parchment paper, leaving about 2 inches of overhang on opposite sides. This overhang acts like handles, making it easy to lift the bars out once baked. Ensuring the pan is well-prepared prevents sticking and keeps the bars intact.
- Combine the Dry Ingredients: In a large mixing bowl, add all your dry ingredients oats, oat flour, ground flax seeds, finely chopped pecans, cinnamon, and salt. Use a spoon or spatula to stir everything together thoroughly. The goal is to evenly distribute the cinnamon, salt, and nuts so every bite has a consistent flavor and texture.
- Create a Well for Wet Ingredients: Push the dry ingredients toward the sides of the bowl to create a small well in the center. This little “nest” is where you’ll pour in the wet ingredients, which makes mixing smoother and helps prevent overworking the oats and nuts.
- Mix Wet Ingredients Separately: In the center well, add the maple syrup, melted coconut oil, vanilla extract, and egg. Use a whisk to combine them gently until the mixture is smooth and slightly glossy. Properly whisking the wet ingredients ensures the egg is fully incorporated and the syrup and oil blend seamlessly.
- Combine Wet and Dry Ingredients: Now, carefully fold the wet mixture into the dry ingredients. Use a spatula or spoon to stir thoroughly, making sure every oat flake, nut piece, and flax seed is coated. The mixture should be slightly sticky but well-combined, forming a cohesive dough that will hold together after baking.
- Transfer to Pan and Press Evenly: Pour the mixture into your prepared 9×9-inch pan. Using a spatula or the back of a spoon, spread it evenly across the pan, pressing it down firmly. A flat, even layer ensures the bars bake uniformly and hold their shape when cut. Smooth the top carefully for an attractive finish.
- Bake to Golden Perfection: Place the pan in the preheated oven and bake for 25–30 minutes. Keep an eye on the edges and top—they should be slightly golden and set to the touch. Avoid overbaking, which can dry out the bars, but ensure they are cooked enough to hold together when sliced.
- Cool Completely: Once baked, remove the pan from the oven and allow it to cool on a wire rack for 10–15 minutes. This step is crucial; the bars firm up as they cool. Lifting them too early can cause them to crumble.
- Remove from Pan: Using the parchment paper overhang, carefully lift the entire block of granola bars out of the pan. Place it on a cutting board for the next step. This method keeps the bars intact and avoids breaking the edges.
- Slice into Bars: With a sharp knife, cut the block into 12 equal bars (2 rows x 6 columns) or squares, depending on your preference. For cleaner cuts, wipe the knife with a damp cloth between slices. Cutting while slightly warm is okay, but fully cooled bars slice more neatly.
- Serve and Store: Your Maple Pecan Granola Bars are now ready to enjoy immediately, or store them for later. Keep them in an airtight container in the fridge for up to one week. For longer storage, wrap individual bars in plastic wrap or parchment and freeze them in a large freezer-safe bag for up to a month.
Notes
- Always use certified gluten-free oats and oat flour if you’re avoiding gluten, as this ensures a safe, allergy-friendly snack.
- Chopping pecans finely helps the bars bind better and creates a more even texture.
- For a chewier bar, slightly underbake by 2–3 minutes; for a firmer, crunchier bar, bake until golden brown and set.
- Maple syrup is the natural sweetener here; honey or brown rice syrup can be substituted, but flavors will vary slightly.
- These bars are highly versatile—you can add dried fruits, seeds, or even a few chocolate chips while maintaining the same structure.
Chef’s Secrets for Perfect Bars
The secret to perfectly textured granola bars lies in balance and gentle handling.
Make sure the wet ingredients fully coat the dry mix, as this helps the bars stick together without crumbling.
Pressing the mixture firmly and evenly into the pan ensures they bake uniformly.
For added flavor, toast the pecans lightly before chopping—this deepens their nuttiness.
Lastly, let the bars cool completely before cutting; this allows them to firm up and slice cleanly, giving professional-looking edges.
Serving Suggestions for Every Occasion
These granola bars shine as a quick breakfast, post-workout snack, or afternoon pick-me-up.
Pair them with a cup of coffee, tea, or a glass of milk for a satisfying start to your day.
For a more indulgent treat, spread a thin layer of almond or peanut butter on top.
They also travel well—perfect for lunchboxes, hiking trips, or office snacks.
Slice into smaller squares for bite-sized options at gatherings or brunches.
Storage Tips for Longevity
To keep your granola bars fresh, store them in an airtight container in the refrigerator for up to one week.
For longer storage, individually wrap each bar in parchment or plastic wrap, then place them in a freezer-safe bag—this extends shelf life to about one month.
To thaw, simply leave at room temperature for 10–15 minutes, or warm slightly in the microwave for a soft, chewy texture.
Avoid storing at room temperature for extended periods, as the coconut oil can soften and the bars may lose structure.
Frequently Asked Questions
1. Can I make these bars vegan?
Yes! Replace the egg with a flax or chia egg (1 tbsp flax or chia seeds + 3 tbsp water, set for 5 minutes). Keep the maple syrup and coconut oil the same. The texture will remain slightly chewy, and flavor stays rich.
2. Can I substitute nuts or seeds?
Absolutely! Walnuts, almonds, or sunflower seeds work well. Just chop them finely to ensure the bars hold together. Mixing a variety of nuts adds texture and flavor complexity.
3. How do I make them crunchier?
Bake a few minutes longer until the edges turn golden brown. Additionally, slightly increasing the pecan amount can create extra crunch.
Avoid pressing too firmly into the pan if you want a lighter, less dense bar.
4. Can I add chocolate or dried fruit?
Yes! Mini chocolate chips, dried cranberries, raisins, or chopped dates can be folded in after combining the wet and dry ingredients. Be cautious with wet ingredients like dried fruit—too much moisture may affect firmness.
5. What’s the best way to reheat frozen bars?
Wrap the frozen bar and microwave 15–30 seconds, depending on size, or leave it at room temperature for 10–15 minutes.
This softens the bar and brings out the maple and nutty flavors without compromising texture.