These Mini Cheese Quesadillas are a quick, crowd-pleasing snack that blends gooey cheese with a hint of spice for irresistible flavor.
Packed with protein and fiber from wholesome ingredients, they deliver satisfying bites without heavy guilt.
Perfect for meal prep, parties, or a cozy weekday snack, they’re easy to make and ideal for everyday cooking.
Mini Cheese Quesadillas
Equipment
- 1 large mixing bowl
- Pastry brush
- 1 large baking sheet
- Oven
- Measuring cups
- Measuring Spoons
- Scissors or knife for slicing
Ingredients
- 2 packages “street taco” sized flour tortillas
- 4 cups grated cheese cheddar and jalapeño jack recommended
- 2 4 oz cans diced green chilies, drained
- ½ cup diced onion
- 4 tablespoons melted butter
- 2 teaspoons coarse kosher salt
Instructions
- Preheat the Oven for Perfect Crisping: Begin by preheating your oven to 425°F (220°C). Position the oven rack in the center for even heat circulation, ensuring the quesadillas bake evenly. A properly preheated oven helps tortillas crisp quickly while keeping the cheese inside wonderfully melty.
- Prepare the Cheese Filling: In a large mixing bowl, combine 4 cups of grated cheese — a blend of sharp cheddar and jalapeño jack adds depth of flavor — with two 4-ounce cans of diced green chilies (drained thoroughly) and ½ cup diced onion. Mix until ingredients are evenly distributed, producing a cheesy, slightly spicy filling with balanced texture.
- Prepare the Baking Sheet with Butter and Salt: Brush a large baking sheet with 4 tablespoons of melted butter using a pastry brush to ensure an even coating. Sprinkle about 2 teaspoons of coarse kosher salt over the surface for added flavor and a subtle crunch. This step helps create a buttery base and enhances the quesadilla’s taste.
- Arrange Tortillas for Assembly: Place 7–8 “street taco” sized flour tortillas on the prepared baking sheet in a single layer without overlapping. Proper spacing ensures even cooking and allows the cheese to melt without crowding, which keeps the tortillas crisp and uniform.
- Add the Cheese Mixture Generously: Spoon about 1 heaping tablespoon of the cheese mixture onto the center of each tortilla. Spread it evenly, leaving a small border around the edges to make folding easier. This ensures every bite is filled with rich, melty cheese and flavorful chilies.
- Bake Until Cheese Melts: Place the baking sheet in the preheated oven and bake for about 5 minutes, or until the cheese is fully melted and edges begin to bubble. Watch carefully to prevent overbaking. The quesadillas should be golden and aromatic when ready.
- Fold the Tortillas into Quesadillas: Carefully remove the baking sheet from the oven. Using a spatula, fold each tortilla in half, pressing the edges gently to seal the filling inside. This creates neat, golden quesadilla wedges with a perfect balance of crisp edges and melted center.
- Cool Before Serving or Storing: Transfer quesadillas to a cooling rack or plate and let them cool slightly if serving later. This resting period allows the cheese to set, ensuring cleaner slices and easier handling without losing flavor or texture.
- Store for Meal Prep or Later Use: If making ahead, allow quesadillas to cool completely. Place them in an airtight container in the refrigerator for up to three days. They reheat well and remain crispy if stored properly.
- Reheat for Perfect Warmth: Remove refrigerated quesadillas and let them sit at room temperature for about 10 minutes before reheating. Preheat oven to 350°F (175°C). Place quesadillas in a single layer on a baking sheet and heat for about 5 minutes or until warmed through and crisp again.
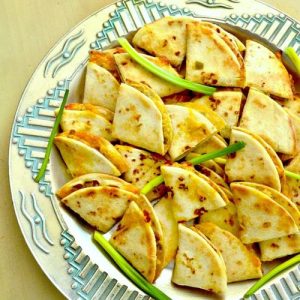
- Slice and Serve with Style: Using kitchen scissors or a sharp knife, slice each quesadilla into wedges after reheating. Arrange them on a serving platter and pair with salsa, guacamole, or sour cream for a colorful, flavorful presentation.
Notes
- For best flavor, use a blend of cheeses such as sharp cheddar and jalapeño jack — this adds depth and a slight kick.
- Ensure the diced green chilies are well drained to prevent soggy quesadillas.
- Use a pastry brush to evenly coat the baking sheet with melted butter for consistent browning.
- Work in batches if needed so tortillas are evenly spaced and cook uniformly.
- Allow quesadillas to cool slightly before slicing to maintain their shape and avoid cheese spillage.
- Store leftovers in an airtight container and reheat in the oven for crispiness rather than a microwave.
Chef’s Secrets: Unlock Perfect Quesadilla Flavor
To elevate your quesadillas, begin by selecting high-quality cheeses with complementary flavors.
Sharp cheddar adds richness, while jalapeño jack brings a touch of heat for complexity.
Avoid overly wet ingredients; moisture can prevent proper crisping.
Brushing your baking sheet with melted butter and sprinkling coarse salt adds a gourmet layer of flavor and texture.
Baking instead of pan-frying allows you to make multiple quesadillas at once without excessive oil, creating a lighter but equally indulgent snack.
Always preheat the oven for consistent results and keep an eye on your quesadillas so they remain golden without burning.
Serving Suggestions: Pair Ideas For Perfect Quesadillas
Mini Cheese Quesadillas make an excellent appetizer or snack for gatherings, and pairing them thoughtfully can elevate the experience.
Serve with fresh guacamole, salsa verde, or creamy sour cream for contrasting flavors.
For a balanced snack, offer a side of mixed greens tossed with lime and olive oil.
They’re perfect alongside a light Mexican salad with black beans and corn.
For a fun party platter, arrange quesadilla wedges with bowls of salsa, pico de gallo, and sliced jalapeños for guests to customize their bites.
Storage Tips: Keep Fresh Crispy Quesadillas
Quesadillas store well for quick snacks or meal prep.
Allow them to cool completely before transferring to an airtight container to maintain freshness.
Stored in the refrigerator, they will keep for up to three days.
For longer storage, place quesadillas in a freezer-safe bag or container with parchment paper between layers for up to one month.
Reheat in the oven or air fryer rather than the microwave to preserve their crisp texture.
Avoid stacking them tightly during reheating to ensure they warm evenly.
Frequently Asked Questions
1. Can I make these quesadillas gluten-free?
Yes! Simply substitute the flour tortillas with gluten-free tortilla varieties available in most grocery stores. Keep in mind that gluten-free tortillas may crisp differently, so watch cooking time closely.
2. Can I prepare the cheese filling ahead of time?
Absolutely. The cheese mixture can be prepared and stored in the refrigerator for up to two days. Keep it covered to maintain freshness and moisture. Assemble quesadillas right before baking for optimal texture.
3. How do I keep quesadillas from becoming soggy?
Make sure to drain any wet ingredients such as diced chilies thoroughly. Avoid overfilling tortillas, and allow baked quesadillas to cool slightly before cutting.
Reheating in the oven or air fryer instead of the microwave preserves crispness.
4. What variations can I try for this recipe?
You can add cooked chicken, seasoned ground beef, sautéed vegetables, or beans to the cheese mixture for variety. For a fresh twist, add chopped cilantro or a squeeze of lime before baking.
5. Can these quesadillas be frozen for later use?
Yes, quesadillas freeze beautifully. Let them cool completely, then wrap individually in parchment paper and store in a freezer-safe container or bag for up to one month.
Reheat in a preheated oven or air fryer until warmed through and crispy.