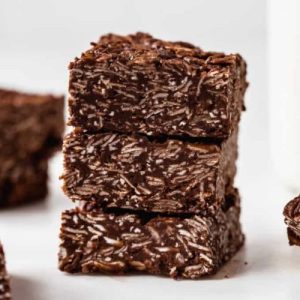
These No-Bake Chocolate Coconut Bars are a delicious, nutrient-packed snack that’s perfect for busy days.
Made with wholesome ingredients like almond butter, oats, and dark chocolate, they’re high in protein, fiber-rich, and contain healthy fats.
Quick to prepare with zero baking, they’re a satisfying, energy-boosting treat ideal for meal prep, on-the-go snacking, or a guilt-free dessert.
No Bake Chocolate Coconut Bars
Equipment
- Small pot (1)
- Large mixing bowl (1)
- 8×8-inch pan (1)
- Parchment paper (1 sheet)
- Spoon or spatula (1)
Ingredients
- 1 cup almond butter
- ½ cup honey or maple syrup for vegan
- ⅓ cup refined coconut oil
- ¼ cup cocoa powder
- 1 tsp vanilla extract
- 4 oz 70% dark chocolate
- 2 cups large flake oats*
- 1 cup unsweetened shredded coconut
- Pinch of salt
Instructions
- Prepare the Wet Mixture: Start by gathering your wet ingredients almond butter, honey (or maple syrup for a vegan version), coconut oil, cocoa powder, and vanilla extract. Place them all in a small saucepan over medium-low heat. Stir gently but continuously to combine the ingredients evenly. Allow the coconut oil and almond butter to melt together into a smooth, glossy mixture. Be careful not to overheat, as almond butter can separate if the temperature is too high.
- Melt the Dark Chocolate: Once the wet ingredients are thoroughly combined, add the 70% dark chocolate to the saucepan. Continue stirring constantly until the chocolate melts completely and blends seamlessly with the almond butter mixture. The result should be a silky, rich, dark chocolate base with a glossy finish. Remove the pan from heat to prevent scorching.
- Combine the Dry Ingredients: In a large mixing bowl, add the oats, unsweetened shredded coconut, and a pinch of salt. Stir these together so that the coconut and oats are evenly distributed. This ensures that every bite of your bars will have the perfect balance of texture and flavor. Using large flake oats is recommended for a chewy consistency, but quick oats can be used for a slightly softer texture.
- Mix Wet and Dry Ingredients: Pour the warm chocolate-almond butter mixture over the oat-coconut mixture in the large bowl. Using a sturdy spatula or spoon, fold the wet and dry ingredients together. Make sure all the oats and coconut are fully coated with the chocolate mixture. This may require a few minutes of gentle mixing to ensure that no clumps remain and that the texture is uniform. The mixture should be thick, sticky, and slightly glossy.
- Line the Pan and Transfer Mixture: Take an 8×8 inch baking pan and line it with parchment paper, leaving an overhang for easy removal later. Transfer the prepared bar mixture into the pan. Use your spatula or your hands (covered with parchment paper to avoid sticking) to press the mixture evenly across the pan. Press firmly but gently to ensure the mixture holds together and has a uniform thickness. Smooth the surface to create an even top for clean, neat bars once cut.
- Chill to Set: Place the pan in the refrigerator for at least 3 hours to allow the bars to firm up completely. This chilling step is crucial; it helps the chocolate set, the oats absorb some moisture, and the bars hold their shape when sliced. For best results, cover the pan loosely with plastic wrap to prevent any fridge odors from affecting the flavor.
- Cut into Bars: After chilling, remove the pan from the fridge. Lift the bars out using the parchment overhang. Place on a cutting board and, using a sharp knife, cut into 16 even-sized bars. Wipe the knife clean between cuts to achieve smooth edges. If desired, you can cut them into squares or rectangles depending on your preference.
- Store and Serve: Store the chocolate coconut bars in an airtight container in the fridge. They will keep fresh for up to 1 week. For longer storage, the bars can also be frozen for up to 2 months—just thaw slightly before serving. These bars are perfect as a grab-and-go snack, a post-workout energy boost, or a guilt-free dessert.
Notes
- Use high-quality almond butter for the best flavor and creamy texture. Natural, unsweetened almond butter works beautifully.
- Honey can be swapped for maple syrup if you prefer a vegan version, but it may slightly alter the sweetness.
- Large flake oats give a chewy, satisfying texture, while quick oats create a softer, more uniform bar. Choose based on your preference.
- Unsweetened shredded coconut balances the richness of chocolate and almond butter. Avoid sweetened coconut for a healthier snack option.
- Parchment paper is essential to prevent sticking and makes removing the bars from the pan effortless.
Chef’s Secrets: Perfect Bars Every Time
Achieving the perfect no-bake chocolate coconut bars relies on careful attention to temperature and mixing.
Keep the heat low when melting the wet ingredients to avoid separating the almond butter.
Stir constantly for a smooth, glossy texture.
Pressing the mixture evenly in the pan is key—using parchment paper or a second piece on top helps achieve a firm, uniform surface.
For an extra touch, sprinkle a few flakes of coconut on top before chilling to add texture and visual appeal.
Serving Suggestions: Delicious Ways To Enjoy
These bars are versatile and can be enjoyed in multiple ways.
Serve them chilled as a snack alongside a cup of coffee or tea, or pack them individually for school or work.
For an indulgent twist, dip half of each bar in melted chocolate before setting.
They also pair wonderfully with fresh fruit like berries, or a dollop of Greek yogurt for a balanced, protein-rich snack.
Storage Tips: Keep Bars Fresh Longer
To maintain freshness and texture, store the bars in an airtight container in the refrigerator for up to one week.
If you want to enjoy them over a longer period, they freeze beautifully for up to two months.
For freezing, place parchment between layers to prevent sticking, then thaw for a few minutes at room temperature before serving.
Avoid storing at room temperature for extended periods, as the bars may become too soft and lose their shape.
Frequently Asked Questions
1. Can I make these bars vegan?
Yes! Simply replace honey with an equal amount of maple syrup or agave. The texture may be slightly softer, but they will still set perfectly when chilled.
2. Can I use different nuts or nut butters?
Absolutely. Cashew or peanut butter works well, though the flavor and richness may vary slightly. Stick to smooth, creamy nut butters for best results.
3. How do I make the bars firmer?
Press the mixture firmly into the pan and ensure they chill for at least 3 hours. Using a slightly higher ratio of oats to wet ingredients can also help create a firmer texture.
4. Can I add extras like chocolate chips or dried fruit?
Yes! Mini chocolate chips, cacao nibs, or chopped dried fruit can be folded into the mixture before chilling. Just be mindful of additional moisture, which can slightly soften the bars.
5. Are these bars suitable for meal prep?
Definitely. They are a convenient, grab-and-go snack rich in protein, fiber, and healthy fats. Portion into small containers or individually wrap for easy storage and transport.