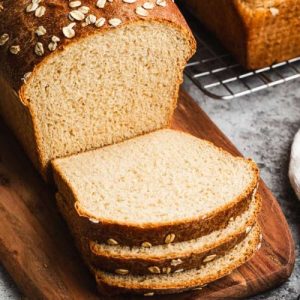
This light and fluffy oatmeal bread combines hearty rolled oats, natural honey, and a blend of whole wheat and all-purpose flour for a soft, chewy texture everyone will love.
Packed with fiber and plant-based protein, it’s a nutritious option with heart-healthy fats and low saturated fat.
Perfect for breakfast, sandwiches, or meal prep, it’s simple, satisfying, and wholesome.
Fiber-Rich Oatmeal Bread
Equipment
- 2 Loaf Pans
- Stand Mixer (or Large Mixing Bowl)
Ingredients
- 2 cups milk heated to a simmer
- 1 cup old-fashioned rolled oats
- 4 tablespoons unsalted butter softened
- ½ cup honey
- 4 ½ teaspoons instant yeast
- ½ cup warm water
- 1 ½ teaspoons kosher salt
- 2 ½ cups whole wheat flour
- 2 ¼ –3 cups all-purpose flour
- 1 egg white + 1 tablespoon water for egg wash
Instructions
- Prepare the Oat Mixture: Begin by adding the rolled oats and softened butter into the bowl of a stand mixer or a large mixing bowl if mixing by hand. Warm the milk in a small saucepan until it reaches a gentle simmer, ensuring it’s not boiling. Pour the hot milk over the oats and butter, stirring gently to combine. Allow this mixture to rest for approximately 1.5 hours at room temperature. This soaking step softens the oats and enhances the bread’s texture while ensuring even moisture throughout the dough.
- Activate the Yeast and Sweeteners: Once the oat mixture has cooled to room temperature, add the honey, warm water, instant yeast, and kosher salt directly into the bowl. Stir everything thoroughly to combine. The warmth of the water helps activate the yeast, while the honey not only adds natural sweetness but also feeds the yeast for a gentle rise. Make sure all ingredients are well-incorporated and the mixture is smooth.
- Combine Whole Wheat Flour: Add the whole wheat flour to the wet mixture and begin mixing on medium-low speed if using a stand mixer. Mix just until the flour is fully incorporated and forms a rough dough. The whole wheat flour provides a nutty flavor and adds fiber, giving the bread a hearty, wholesome quality.
- Gradually Add All-Purpose Flour: Now, add the all-purpose flour one small portion at a time, mixing thoroughly after each addition. The goal is to create a soft dough that is slightly sticky but still manageable. Avoid adding too much flour, as this can make the bread dense. Stop adding flour once the dough starts to pull away from the sides of the bowl and feels smooth and elastic.
- Knead the Dough: Turn the dough out onto a lightly floured surface (if kneading by hand) or continue kneading in the stand mixer for a few more minutes. Knead until the dough becomes smooth, elastic, and slightly tacky but not overly sticky. Use a bench scraper to lift and fold the dough as needed, ensuring even development of gluten, which is essential for a soft, airy loaf.
- First Rise – Let Dough Double: Transfer the kneaded dough into a lightly greased bowl, turning once to coat the top. Cover the bowl with a clean kitchen towel or plastic wrap and place it in a warm, draft-free area. Allow the dough to rise until it has roughly doubled in size, which usually takes about 1 hour. The dough should feel puffy and airy when gently pressed with a finger.
- Shape the Loaves: After the first rise, gently punch down the dough to release any trapped air. Divide it into two equal portions. Shape each portion into a loaf by flattening slightly, folding the edges toward the center, and rolling gently to fit the size of your loaf pans. Place the shaped loaves into two lightly greased loaf pans.
- Apply Egg Wash and Toppings: In a small bowl, whisk together the egg white and water to create an egg wash. Gently brush a thin layer over the tops of each loaf. This will create a golden, shiny crust when baked. For added texture and visual appeal, sprinkle a small handful of dry oats over each loaf.
- Second Rise – Let Loaves Expand: Cover the loaves loosely with a well-greased piece of plastic wrap to prevent sticking. Let the dough rise in a warm area for 45 minutes to 1 hour, or until it rises about 1 inch above the pans. Carefully remove the plastic wrap before baking, taking care not to deflate the loaves.
- Bake the Bread: Preheat your oven to 350°F (175°C). Place the loaf pans on the center rack and bake for 30–40 minutes. The bread is fully baked when it sounds hollow when tapped on the top or when an instant-read thermometer inserted in the center reads 200°F (93°C).
- Cool the Loaves: Once baked, remove the pans from the oven and allow the loaves to cool for 15 minutes on a wire rack. Then, carefully turn the loaves out of the pans and let them cool completely on the wire rack. Cooling completely is crucial to ensure a soft, sliceable texture and to prevent the bread from becoming gummy inside.
- Serve and Enjoy: Slice the bread with a serrated knife once fully cooled. Serve as toast, sandwiches, or a wholesome accompaniment to soups and salads. Leftover slices can be stored at room temperature, refrigerated, or frozen for later use.
Notes
- Use old-fashioned rolled oats, not instant or quick-cooking oats, to retain texture and chewiness.
- Ensure milk is simmered but not boiled; overheating can kill the yeast and affect rise.
- Dough should be soft and slightly sticky; avoid adding too much flour, as this can make the bread dense.
- Allow the dough to rise in a warm, draft-free spot; cooler environments will slow fermentation.
- Brushing with an egg wash enhances browning and adds a subtle shine to the crust, but it’s optional for a vegan-friendly version.
- You can add mix-ins like raisins, dried cranberries, chopped nuts, or seeds after the first rise for extra flavor and texture.
Chef’s Secrets For Perfect Bread
The key to light, fluffy oatmeal bread lies in patience and gentle handling.
Allowing the oats to soak in warm milk softens them fully, which contributes to a moist, tender crumb.
When kneading, aim for elasticity rather than stiffness; this ensures proper gluten development without overworking the dough.
Using a combination of whole wheat and all-purpose flour balances nutrition and softness.
For a slightly richer flavor, try substituting a portion of the milk with buttermilk or adding a teaspoon of vanilla extract to the dough.
Lastly, don’t rush the second rise; this step ensures a beautifully domed, airy loaf.
Serving Suggestions For Everyday Enjoyment
This oatmeal bread is versatile and perfect for any meal.
Toast slices lightly and spread with nut butter, honey, or jam for breakfast.
Use thicker slices for hearty sandwiches with fresh vegetables, deli meats, or avocado.
It also pairs beautifully with soups, stews, or chili for a cozy, satisfying dinner.
For a fun snack, lightly butter the bread, sprinkle cinnamon and sugar, and warm in the oven.
Its slightly sweet, nutty flavor complements both savory and sweet toppings, making it an ideal all-purpose bread.
Storage Tips To Keep Bread Fresh
To preserve freshness, store cooled bread in an airtight container or tightly wrapped in plastic at room temperature for up to 3 days.
For longer storage, freeze slices or whole loaves in freezer-safe bags for up to 3 months.
When ready to use, thaw at room temperature and lightly toast or warm to restore softness.
Avoid refrigerating bread, as it accelerates staling.
For dough, you can refrigerate after kneading for up to one day and then allow it to come to room temperature before shaping and baking.
Frequently Asked Questions
1. Can I use instant oats instead of rolled oats?
Instant oats are too fine and won’t retain the chewy texture. Rolled oats are preferred because they absorb moisture evenly and add a hearty bite.
2. Is it possible to make this bread vegan?
Yes! Replace the butter with plant-based butter and use almond or oat milk. Omit the egg wash or brush with a small amount of plant-based milk for browning.
3. Can I add fruit or nuts?
Absolutely. Add up to 1 cup of raisins, dried cranberries, chopped nuts, or seeds after the first rise but before shaping the loaves. This adds flavor, texture, and extra nutrition.
4. How do I know when the bread is fully baked?
Tap the top of the loaf; it should sound hollow. You can also check with an instant-read thermometer—the center should reach 200°F (93°C).
5. Can I freeze the dough or baked bread?
Yes! For dough, shape into loaves, cover tightly, and freeze for up to 3 months.
For baked bread, let it cool completely, slice if desired, and freeze in a resealable bag for up to 3 months. Thaw at room temperature before serving.