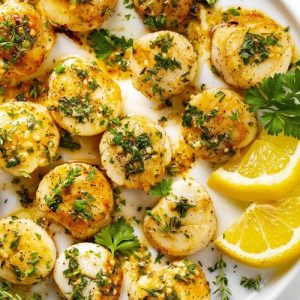
Experience restaurant-quality scallops at home in just 10 minutes!
These pan-seared scallops develop a golden, caramelized crust while staying tender inside, paired with a rich garlic herb butter.
High in protein and low in carbs, this quick and satisfying dish is perfect for weeknight dinners or elegant meal prep, delivering flavor and nutrition effortlessly.
Healthy Pan Seared Scallops
Equipment
- 1 Large cast iron skillet
- 1 small mixing bowl
- 1 spoon or spatula
- Paper Towels
Ingredients
For the Scallops:
- 16 large sea scallops ~1 lb
- 1 tsp sea salt
- ¼ tsp black pepper
- 1 tbsp olive oil
For the Garlic Herb Butter:
- 2 tbsp salted butter softened
- 1 tbsp fresh lemon juice
- 2 cloves garlic minced
- ½ tbsp fresh thyme leaves
- ½ tbsp fresh parsley chopped
Instructions
- Prepare Garlic Herb Butter: In a small mixing bowl, combine softened salted butter, freshly squeezed lemon juice, minced garlic, fresh thyme leaves, and chopped parsley. Use the back of a spoon or a small whisk to mash and mix everything together until well incorporated. Don’t worry if the lemon juice doesn’t fully blend in—the citrus will melt into the butter during cooking, infusing the scallops with bright, aromatic flavor. Set the butter aside at room temperature so it’s ready to melt when needed.
- Pat Scallops Dry: Remove the scallops from their packaging and gently rinse them under cold water. Lay them out on a layer of paper towels and pat each scallop completely dry. This is a crucial step excess moisture prevents a golden crust from forming. Make sure each scallop is dry on all sides before moving to seasoning.
- Season Scallops: Sprinkle both sides of the scallops evenly with sea salt and freshly ground black pepper. Take your time to ensure every scallop is lightly seasoned. This simple seasoning enhances the natural sweetness of the scallops without overpowering them, allowing the garlic herb butter to shine in later steps.
- Heat the Skillet: Place a large cast iron skillet on the stove over medium-high heat. Add the olive oil and allow it to shimmer, which indicates the pan is hot enough for searing. Avoid rushing this step; a properly heated skillet is essential for achieving a golden, caramelized crust on the scallops.
- Arrange Scallops in Skillet: Carefully add the scallops to the skillet in a single layer, making sure they do not touch each other. Crowding the pan will steam the scallops instead of searing them. Once placed, resist the urge to move them; they need uninterrupted contact with the hot surface to form a perfect crust.
- Sear the First Side: Let the scallops cook undisturbed for 2 to 3 minutes. During this time, the bottom side will develop a rich golden-brown color. You can gently peek under one scallop to check the crust, but avoid lifting or pressing them, as this can interfere with caramelization.
- Flip Scallops: Once a golden crust has formed, flip each scallop carefully using tongs or a spatula. Immediately add small pieces of the prepared garlic herb butter around the scallops in the pan. The heat will melt the butter, creating a fragrant sauce that gently cooks the scallops and infuses them with garlic, herbs, and citrus.
- Sear the Second Side and Baste: Allow the scallops to cook for an additional 2 to 3 minutes on the second side. While they cook, use a spoon to occasionally baste the scallops with the melted garlic butter, tilting the pan slightly to pool the butter on one side. This step adds richness and ensures even flavor penetration while keeping the scallops moist and tender.
- Check for Doneness: The scallops are done when they are firm to the touch, opaque throughout, and slightly springy in the center. Avoid overcooking, as scallops can quickly turn rubbery. They should have a delicate, tender texture with a beautifully caramelized exterior.
- Plate and Serve: Carefully remove the scallops from the skillet using a spatula or tongs and place them on a serving plate. Spoon some of the garlic herb butter from the pan over the scallops for added flavor. Serve immediately while hot, paired with your choice of side dishes like steamed vegetables, a fresh salad, or a light pasta.
Notes
- Always pat scallops completely dry before seasoning to ensure a golden crust.
- Use medium-high heat and a preheated cast iron skillet for perfect searing.
- Avoid overcrowding the pan; leave space between scallops for even caramelization.
- Garlic herb butter can be prepared ahead of time for faster cooking.
- Remove scallops from the fridge 10–15 minutes before cooking to help them cook evenly.
- This dish is naturally low in carbs and high in protein, making it healthy and satisfying.
- Best enjoyed fresh, but leftovers can be stored in an airtight container for 2–3 days.
- Serve with light sides like steamed vegetables, greens, or cauliflower rice for a balanced meal.
- A small knob of butter added at the end enhances flavor and richness.
- Perfect for weeknight dinners or elegant entertaining, delivering restaurant-quality results quickly.
Chef’s Secrets: Tips For Perfect Scallops
The secret to tender, juicy scallops lies in temperature control and timing.
A well-heated cast iron skillet creates a beautiful golden crust while keeping the center moist.
Don’t move the scallops during searing; this ensures even browning.
Use fresh herbs and lemon juice in the butter for a bright, aromatic flavor that complements the natural sweetness of the scallops.
Additionally, remove the scallops from the fridge 10–15 minutes before cooking to allow them to reach room temperature, which helps them cook evenly.
For a richer taste, consider finishing the scallops with a tiny knob of butter at the very end.
Serving Suggestions: Delicious Pairing Ideas
These scallops shine when served simply, allowing their natural flavor to take center stage.
Pair them with steamed asparagus, sautéed spinach, or roasted vegetables for a low-carb, nutrient-rich meal.
A light lemony quinoa or cauliflower rice works beautifully for a wholesome, satisfying plate.
For a touch of indulgence, drizzle extra garlic herb butter over the top and serve with crusty bread to soak up the sauce.
This dish also works well for elegant entertaining arrange scallops over a small bed of creamy risotto or a fresh arugula salad for a restaurant-style presentation at home.
Storage Tips: Keep Scallops Fresh Longer
Pan-seared scallops are best enjoyed fresh, but leftovers can be stored carefully.
Place cooled scallops in an airtight container in the refrigerator for up to 2–3 days.
Reheat gently in a hot skillet for 30–60 seconds, just long enough to warm them without overcooking, which can make them rubbery.
While scallops can be frozen after cooking, the texture changes slightly.
If freezing, wrap them tightly in foil or freezer-safe bags and store for up to 3 months.
Always thaw completely in the fridge before reheating for the best results.
Frequently Asked Questions
1. How do I know when scallops are done?
Scallops are fully cooked when they are opaque in the center and slightly firm to the touch.
They should feel tender and springy rather than rubbery. Overcooking can make them tough, so rely on visual cues and timing rather than guesswork.
2. Can I use frozen scallops?
Yes, frozen scallops work perfectly if fully thawed in the fridge and patted dry before cooking. Avoid thawing at room temperature to prevent excess water release, which can interfere with searing.
3. What type of pan is best for searing scallops?
A cast iron skillet is ideal because it retains heat evenly, producing a golden crust. Stainless steel works well too, but nonstick pans may not achieve the same level of browning.
4. Can I make the garlic herb butter ahead of time?
Absolutely. You can prepare the butter up to a day in advance and keep it covered in the fridge. Bring it to room temperature before cooking to allow it to melt smoothly around the scallops.
5. What should I serve with pan-seared scallops?
Scallops pair well with light, fresh sides such as roasted vegetables, greens, or cauliflower rice.
For a more indulgent meal, serve over risotto, mashed potatoes, or pasta. A squeeze of fresh lemon juice elevates the flavor of the butter sauce and brightens the dish.