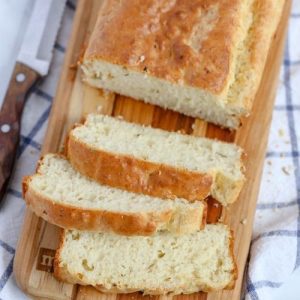
This Parmesan Garlic Herb Quick Bread is a soft, savory loaf bursting with aromatic herbs and nutty Parmesan flavor.
Packed with protein from cheese and healthy fats from olive oil, it’s a satisfying, fiber-rich option for everyday meals.
Quick to prepare and easy to bake, it’s perfect for weeknight dinners, brunches, or meal prep with minimal effort.
Parmesan Garlic Herb Quick Bread
Equipment
- 1 standard 9×5 inch loaf pan
- 2 medium mixing bowls
- Whisk
- spatula
- Measuring Cups and Spoons
Ingredients
- 2 cups all-purpose flour
- 1 tablespoon granulated sugar
- 1 tablespoon baking powder
- 1 teaspoon salt
- ¾ cup freshly grated Parmesan cheese
- 1 cup buttermilk
- 1 large egg
- ¼ cup olive oil or vegetable oil
- 3 cloves garlic minced (or 3 teaspoons pre-minced)
- 1 teaspoon dried rosemary
- 1 teaspoon dried oregano
Instructions
- Preheat Oven and Prepare Pan: Begin by preheating your oven to 350°F (175°C) to ensure even baking. While the oven warms, prepare a standard 9×5-inch loaf pan by greasing it thoroughly with butter, oil, or nonstick cooking spray. For easier removal and cleaner edges, consider lining the pan with parchment paper, leaving a slight overhang on the sides. This will allow you to lift the bread out effortlessly once baked.
- Combine Dry Ingredients: In a medium mixing bowl, whisk together the all-purpose flour, granulated sugar, baking powder, and salt. Ensure that the ingredients are evenly distributed to prevent pockets of leavening agents or salt in your bread. Next, fold in the freshly grated Parmesan cheese, allowing it to coat evenly with the flour mixture. The cheese adds flavor and a subtle nutty richness that makes each slice savory and satisfying.
- Prepare Wet Ingredients: In a separate bowl, combine the buttermilk, large egg, and olive or vegetable oil. Whisk these ingredients together until fully emulsified, forming a smooth, uniform liquid. This mixture provides moisture, helps the bread rise, and contributes to its tender crumb.
- Incorporate Wet and Dry Ingredients: Pour the wet mixture over the dry ingredients. Using a spatula or large spoon, gently fold the wet and dry components together. Stir just until the flour is fully incorporated and a moist, slightly thick batter forms. Take care not to overmix, as this can make the bread dense rather than light and fluffy.
- Add Herbs and Garlic: Sprinkle in the minced garlic, dried rosemary, and dried oregano. Gently fold them into the batter until evenly distributed. The garlic and herbs infuse the bread with aromatic flavors, giving each bite a balanced, savory taste. Avoid vigorous mixing to preserve the bread’s tender texture.
- Transfer Batter to Pan: Scrape the batter into the prepared loaf pan, using a spatula to spread it evenly toward the edges. Smooth the top lightly to ensure a uniform rise. The even distribution helps the bread bake consistently and develop a golden, domed top.
- Bake the Bread: Place the loaf pan in the preheated oven. Bake for 45 to 50 minutes, keeping a close eye on the bread during the final 10 minutes. You’ll know it’s done when the top has turned golden brown, has a slight dome, and a toothpick inserted into the center comes out clean without wet batter clinging to it. The aroma of baked Parmesan and garlic should fill your kitchen.
- Cool Before Slicing: Once baked, remove the pan from the oven and allow the bread to cool in the pan for about 15 minutes. Cooling in the pan helps the bread set slightly, making it easier to slice without crumbling. Afterward, gently lift the loaf out using the parchment overhang and place it on a wire rack to cool completely if desired.
- Slice and Serve: Use a serrated bread knife to slice the loaf into 10 even pieces. The bread is perfect served warm alongside soups, salads, roasted vegetables, or even as a standalone snack. Its tender crumb, cheesy aroma, and herb-infused flavor make it a versatile addition to any meal.
- Storage and Make-Ahead Tips: If not serving immediately, wrap the cooled bread tightly in plastic wrap and store at room temperature for up to a week. For longer storage, wrap in plastic and then aluminum foil, placing it in the freezer for up to three months. To enjoy later, thaw at room temperature and lightly warm in the oven for that fresh-baked taste.
Notes
- Always measure flour using the spoon-and-level method to avoid a dense loaf.
- Use freshly grated Parmesan for a richer, nuttier flavor and even melting.
- Gently fold wet and dry ingredients to prevent overmixing, which can make bread tough.
- Fresh garlic provides a brighter, more aromatic flavor than pre-minced garlic.
- Line the loaf pan with parchment for easy removal and clean slices.
- Ensure the oven is fully preheated before baking for even cooking.
- Avoid opening the oven door during the first 30 minutes to prevent sinking.
- Slice bread after it has cooled slightly to maintain structure and avoid crumbling.
Chef’s Secrets: Expert Baking Insights
The key to this bread’s tender, moist crumb lies in balancing the wet and dry ingredients and mixing just until combined.
Olive oil contributes subtle richness, while buttermilk adds a slight tang and tenderizes the flour for a lighter texture.
Toasting the Parmesan lightly before adding it to the batter enhances its flavor depth.
You can also experiment with herb combinations—thyme or basil work beautifully—without overpowering the garlic and cheese.
Always allow the bread to cool slightly before slicing to maintain structure and prevent crumbling.
Serving Suggestions: Pairings And Presentation Ideas
This quick bread pairs wonderfully with soups, stews, and fresh salads for a wholesome meal.
Slice it thick for sandwiches, or serve warm with softened butter or a drizzle of olive oil for a simple, satisfying snack.
For brunch, try it alongside scrambled eggs or roasted vegetables.
You can also cut it into cubes and lightly toast them to create flavorful croutons, or serve with creamy dips, cheeses, or charcuterie for entertaining.
Storage Tips: Keeping Bread Fresh Longer
Store fully cooled bread at room temperature, wrapped tightly in plastic wrap or in an airtight container, for up to one week.
For extended storage, wrap in plastic and then aluminum foil, and freeze for up to three months.
To serve after freezing, thaw at room temperature and warm briefly in a preheated oven to restore a freshly baked texture.
Avoid refrigerating bread, as it accelerates staling and can dry out the crumb.
Frequently Asked Questions
1. Can I use all-purpose milk instead of buttermilk?
Yes, but to mimic the tang and tenderizing effect of buttermilk, add 1 tablespoon of lemon juice or white vinegar to 1 cup of milk and let it sit for 5 minutes before using.
2. Can I substitute Parmesan with another cheese?
Grated Pecorino Romano or Asiago can be used, offering a sharper, saltier profile. Avoid very soft cheeses as they may release too much moisture.
3. Can I add more herbs or garlic?
Absolutely. Increase herbs slightly to intensify flavor, but balance additions carefully to avoid overpowering the bread. Roasted garlic can add a sweeter, more mellow taste.
4. How do I prevent the bread from sinking in the middle?
Ensure the baking powder is fresh and avoid overmixing the batter. Also, make sure the oven is fully preheated before baking, and do not open the door during the first 30 minutes.
5. Can this bread be made in a different pan size?
Yes, but the baking time may vary. A slightly larger pan will produce a shorter, wider loaf that may require less time, while a smaller pan may need a few extra minutes to bake through.
Always check doneness with a toothpick.