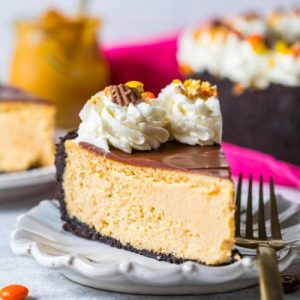
This creamy peanut butter cheesecake is the ultimate treat for dessert lovers, featuring a crunchy Oreo crust, a rich peanut butter filling, and a smooth layer of chocolate ganache.
Not only is it indulgent, but it also delivers a boost of plant-based protein and heart-healthy fats from the peanut butter.
With its make-ahead convenience and crowd-pleasing flavor, this cheesecake is perfect for celebrations, family gatherings, or simply treating yourself.
Peanut Butter Cheesecake
Equipment
- 1 × 9-inch springform pan
- 1 × food processor
- 2 x Medium mixing bowls
- 1 × large mixing bowl
- 1 × hand or stand mixer with paddle attachment
- 1 × measuring cup (for pressing crust)
Ingredients
For the Crust:
- 35 Oreo cookies filling removed
- 5 tablespoons 75 g unsalted butter, melted
For the Cheesecake:
- 24 ounces 678 g cream cheese, softened
- 1 cup 280 g creamy peanut butter
- 1 ¼ cups 250 g granulated sugar
- ½ cup 120 g sour cream
- 2 teaspoons vanilla extract
- 3 large eggs room temperature and lightly beaten
- 2 tablespoons heavy cream
For the Ganache:
- 3 ounces 85 g semisweet or dark chocolate, finely chopped
- ½ cup 118 ml heavy cream
Optional Topping:
- ½ batch homemade whipped cream
Instructions
- Prepare the Oven: Preheat your oven to 325°F (160°C). This moderate temperature helps the cheesecake cook gently and evenly, reducing the risk of cracks. Position the oven rack in the center for the most consistent heat distribution.
- Make the Oreo Crumbs: Twist apart the Oreo cookies and scrape out the cream filling with a butter knife—discard the filling or save it for another use. Place only the cookie halves into a food processor and pulse until you have fine, sand-like crumbs with no large chunks remaining. This ensures your crust holds together firmly.
- Combine Crust Ingredients: In a medium mixing bowl, stir together the cookie crumbs and melted unsalted butter until every crumb is evenly coated. The mixture should feel slightly damp and pressable, almost like wet sand—this helps the crust stay firm once baked.
- Form the Crust in Pan: Pour the moistened crumbs into a 9-inch springform pan. Use the flat bottom of a measuring cup or glass to firmly press the crumbs into an even layer across the bottom and up the sides of the pan. Pressing the crumbs up the sides helps prevent cracks in the cheesecake filling and creates a strong shell for the batter. Once shaped, set the pan aside.
- Beat the Cream Cheese: Place softened cream cheese into a large mixing bowl. Using an electric hand mixer (or a stand mixer with paddle attachment), beat on low speed until smooth, creamy, and free of lumps. Scraping down the sides and bottom of the bowl ensures even mixing.
- Add Peanut Butter and Sugar: Add creamy peanut butter and granulated sugar to the cream cheese. Continue mixing on low speed until the mixture is smooth, fluffy, and well-blended. Avoid mixing on high speed at this stage to prevent incorporating too much air, which can cause cracking during baking.
- Incorporate Sour Cream and Vanilla: Add sour cream and vanilla extract to the batter. Mix until fully incorporated. The sour cream lightens the filling’s texture and adds a subtle tang, while vanilla enhances the overall flavor balance.
- Add the Eggs Gradually: Lightly beat the eggs in a small bowl, then add them to the batter one at a time. After each addition, mix gently on low speed just until the egg disappears into the batter. Overbeating at this stage can trap excess air and lead to cracks.
- Finish with Heavy Cream: Pour in the heavy cream and stir until the batter is completely smooth, creamy, and lump-free. Scrape the sides and bottom of the bowl once more to make sure everything is evenly combined.
- Fill the Crust with Batter: Carefully pour the cheesecake batter into the prepared Oreo crust. Smooth the top with a spatula to create an even surface, which will bake more consistently and look neater once topped with ganache.
- Bake the Cheesecake: Transfer the springform pan to the center oven rack. Bake for about 50 minutes. The edges should appear set and lightly puffed, while the center should jiggle slightly if the pan is gently nudged—similar to gelatin. This “jiggle test” ensures the cheesecake is baked through without being overdone.
- Cool the Cheesecake Slowly: Remove the cheesecake from the oven and place it on a cooling rack. Let it sit at room temperature until it no longer feels warm to the touch. Slow cooling helps prevent surface cracks caused by sudden temperature changes.
- Chill for Best Texture: Once cooled, cover the pan and refrigerate for at least 6 hours or, ideally, overnight. This resting period allows the cheesecake to fully set, firm up, and develop its rich flavor. Patience here makes all the difference!
- Prepare the Chocolate Ganache: In a microwave-safe bowl, combine the chopped chocolate and heavy cream. Heat in the microwave for 25 seconds, stir, then heat for another 20–25 seconds. Stir continuously until the mixture is glossy, smooth, and completely melted. If needed, microwave in short bursts, stirring each time, until fully combined.
- Top the Cheesecake with Ganache: Remove the chilled cheesecake from the refrigerator. Pour the warm ganache over the top, tilting the pan slightly to spread it into an even layer. Place the cheesecake back into the fridge for about 20 minutes to let the ganache firm up before serving.
- Add Whipped Cream (Optional): For extra flair, top with swirls or dollops of homemade whipped cream just before serving. This adds lightness and contrast to the rich peanut butter and chocolate layers.
- Slice and Serve: Release the springform pan carefully and transfer the cheesecake to a serving plate. Use a sharp knife dipped in hot water (wiping the blade between cuts) to slice clean portions. Serve chilled and enjoy every creamy, decadent bite.
Notes
- Use full-fat cream cheese for the richest texture; low-fat versions can cause a softer or less creamy filling.
- Always bring cream cheese and eggs to room temperature before mixing to avoid lumps.
- Do not overmix the batter after adding eggs—this keeps the cheesecake smooth and prevents cracks.
- The Oreo crust should be pressed firmly and evenly up the sides to help hold the filling.
- Allowing the cheesecake to chill overnight enhances the flavor and ensures a firm, sliceable texture.
- The ganache sets beautifully if the cheesecake is cold before pouring it on.
- For clean slices, dip a sharp knife in hot water and wipe between cuts.
Chef’s Secrets for Perfect Results
The key to a flawless cheesecake lies in gentle mixing and controlled baking.
Always start with softened cream cheese to prevent lumps and beat it slowly, scraping down the bowl often.
When incorporating eggs, mix only until just combined—overbeating can create air bubbles that rise and crack the surface.
Another secret is pressing the crust firmly up the pan sides.
This not only keeps the filling contained but also acts as a natural shield against cracking.
Lastly, don’t rush the cooling process; gradual temperature changes allow the filling to settle into a velvety smooth texture.
Serving Suggestions to Impress Guests
This cheesecake is already a showstopper, but thoughtful serving touches make it even more memorable.
Pair slices with a dollop of lightly sweetened whipped cream to balance the richness.
Fresh berries—such as raspberries or strawberries—add a bright, tangy contrast to the nutty, chocolatey flavors.
For an extra indulgence, drizzle each slice with warm caramel sauce or dust lightly with cocoa powder.
Coffee or espresso makes a perfect beverage pairing, as its bitterness cuts through the sweetness beautifully.
Whether served at a dinner party or holiday celebration, this cheesecake shines as the centerpiece of any dessert table.
Storage Tips for Maximum Freshness
Proper storage keeps your cheesecake tasting fresh and prevents texture loss.
Cover the cooled cheesecake tightly with plastic wrap or store it in an airtight container in the refrigerator for up to 5 days.
If you want to make it ahead or save leftovers, it freezes beautifully for up to 3 months.
For freezing, wrap the cheesecake (whole or in slices) in plastic wrap followed by foil to prevent freezer burn.
Thaw overnight in the refrigerator before serving.
You can also enjoy it straight from frozen if you prefer a firmer, ice-cream-like texture.
Frequently Asked Questions
1. Can I use natural peanut butter?
Natural peanut butter tends to separate and can alter the cheesecake’s texture, making it oily or uneven. For the best results, stick with creamy, stabilized peanut butter.
2. How do I prevent cracks in my cheesecake?
Avoid overbeating the batter, especially after adding eggs, and cool the cheesecake slowly at room temperature before refrigerating. Pressing the crust high on the sides also provides extra support.
3. Can I make this cheesecake without Oreos?
Yes! Graham crackers, chocolate wafer cookies, or even digestive biscuits work well. Simply replace the Oreos with the same weight of your chosen cookie crumbs.
4. How can I tell if my cheesecake is done baking?
The edges should look set, while the center should jiggle slightly like gelatin when the pan is gently shaken. It will continue to firm up as it cools and chills.
5. Can I prepare this cheesecake ahead of time?
Absolutely. This cheesecake is a great make-ahead dessert. You can bake it a day or two before serving, and the flavor only gets better after resting in the refrigerator overnight.