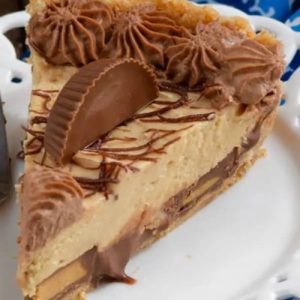
Indulge in the ultimate creamy treat with this Peanut Butter Cup Pie, a decadent yet approachable dessert perfect for any occasion.
Packed with plant-based protein from peanut butter and balanced with good fats, this pie satisfies your sweet tooth while keeping you full longer.
Quick to assemble and freezer-friendly, it’s ideal for easy entertaining or everyday indulgence.
Rich and Creamy Peanut Butter Cup Pie
Equipment
- 1 deep-dish pie pan
- Food Processor
- Microwave-safe measuring cup
- stand mixer or hand mixer
- Metal mixing bowl (for whipping cream)
- Metal whisk
- Piping bag (for whipped cream frosting)
Ingredients
For the Crust:
- 60 Nilla wafers
- ⅓ cup unsalted butter melted
- ¼ cup granulated sugar
For the Ganache Layer:
- 4 oz milk chocolate chips
- ½ cup heavy cream
For the Peanut Butter Cup Layer:
- 9 full-sized peanut butter cups
For the Peanut Butter Filling:
- 2 tbsp granulated sugar
- 1 cup cold heavy cream
- 1 cup creamy peanut butter
- 8 oz cream cheese room temperature
- ½ cup granulated sugar
- ½ tsp vanilla extract
For the Chocolate Drizzle:
- ½ cup milk chocolate chips
For the Chocolate Whipped Cream Frosting:
- 2 tbsp granulated sugar
- 1 cup cold heavy cream
- 2 tbsp unsweetened cocoa powder
- ½ cup powdered sugar
Instructions
- Preheat and Prepare Your Oven: Begin by preheating your oven to 350°F (175°C). This ensures your crust will bake evenly and achieve a light golden color. While the oven warms, gather your pie pan and ensure it’s clean and dry. A deep-dish pie pan works best for holding the multiple layers of this rich dessert.
- Crush the Vanilla Wafers for the Crust: Place 60 Nilla wafers in a food processor and pulse until they form fine, uniform crumbs. If you don’t have a processor, place the wafers in a large zip-top bag and crush them with a rolling pin, ensuring the crumbs are consistent. Even crumbs will help your crust bind properly.
- Mix the Crust Ingredients: Transfer the crushed wafers to a medium mixing bowl. Add 1/3 cup melted butter and 1/4 cup granulated sugar. Stir thoroughly until all crumbs are evenly coated and resemble wet sand. This ensures the crust will hold together after baking and form a firm base for your pie.
- Press the Crust Into the Pie Pan: Pour the crumb mixture into your deep-dish pie pan. Using a flat-bottomed measuring cup or the back of a spoon, press the crumbs evenly across the bottom and up the sides of the pan. Make sure the edges are compact so the crust doesn’t crumble when sliced.
- Bake the Crust: Place the pie pan in the preheated oven and bake for 10 minutes. This step lightly toasts the wafers, enhancing their flavor and helping the crust set. Once done, remove from the oven and allow it to cool completely on a wire rack before adding the ganache.
- Chill Mixing Equipment for Whipping: While the crust cools, place your metal mixing bowl and metal whisk (from a stand mixer) in the freezer for 15 minutes. Chilled equipment is essential for whipping cream efficiently, helping it form stable soft peaks that will hold the pie filling perfectly.
- Prepare the Chocolate Ganache Layer: In a microwave-safe measuring cup, combine 4 oz milk chocolate chips and 1/2 cup heavy cream. Microwave at 50% power for 1 minute, then stir thoroughly. Continue microwaving in 30-second intervals, stirring each time, until the mixture is completely smooth and glossy.
- Assemble the Ganache Layer: Pour the cooled ganache into the baked pie crust, spreading it evenly with a spatula. Make sure the ganache reaches all corners and edges of the crust. Place the pie in the refrigerator for 10 minutes to firm slightly, providing a solid base for the peanut butter layers.
- Whip Peanut Butter Cream: In your pre-chilled metal bowl, combine 1 cup cold heavy cream, 2 tbsp granulated sugar, and 1/2 tsp vanilla extract. Using a stand mixer or hand mixer, beat on medium speed until soft peaks form. Gradually add 1 cup creamy peanut butter and continue mixing until smooth and fully incorporated.
- Incorporate Cream Cheese and Sugar: Add 8 oz room-temperature cream cheese and 1/2 cup granulated sugar to the whipped peanut butter mixture. Beat on medium speed until completely smooth and fluffy. Taste to ensure the sweetness and peanut butter flavor are balanced. This creamy filling will create the signature luscious layer of the pie.
- Layer the Peanut Butter Cups: Place 9 full-sized peanut butter cups directly on top of the cooled ganache. Arrange them evenly so every slice will include one or more peanut butter cups. These candies form a delightful surprise inside each bite of the pie.
- Spread the Peanut Butter Filling: Gently spoon the whipped peanut butter cream over the peanut butter cups. Use a spatula to spread it evenly to the edges of the crust, ensuring a smooth, uniform layer. Be careful not to disturb the peanut butter cups underneath.
- Drizzle Melted Chocolate: In a small bowl or microwave-safe cup, melt 1/2 cup milk chocolate chips until smooth. Drizzle the melted chocolate over the top of the peanut butter filling in decorative patterns. You may use all or part of the chocolate, depending on how rich you want the topping.
- Refrigerate to Set: Place the assembled pie in the refrigerator for at least 4 hours, or ideally overnight. This step allows the ganache and peanut butter filling to firm, making slicing clean and keeping the layers intact. Cover loosely with plastic wrap to prevent absorption of any refrigerator odors.
- Prepare Chocolate Whipped Cream Frosting: Freeze a metal bowl and whisk for 15 minutes. Add 1 cup cold heavy cream and 2 tbsp granulated sugar, then beat until soft peaks form. Mix in 2 tbsp unsweetened cocoa powder and 1/2 cup powdered sugar until fully combined. Transfer to a piping bag and pipe decorative swirls around the edges of the pie.
- Slice and Serve: Use a sharp, clean knife to cut the pie into 8 slices, wiping the knife clean between each cut for perfect presentation. Serve immediately or keep chilled until ready to enjoy. Each slice is rich, creamy, and bursting with chocolate and peanut butter goodness.
Notes
- For best results, use room-temperature cream cheese to ensure a smooth, lump-free filling.
- Chill all mixing bowls and whisks before whipping cream to achieve stable peaks.
- If you prefer a less sweet pie, reduce the sugar in the peanut butter filling by 1–2 tablespoons.
- When drizzling chocolate, let it cool slightly but remain pourable to create smooth decorative patterns.
- Always allow the pie to set for at least 4 hours in the refrigerator; this keeps the layers firm and makes slicing clean.
Chef’s Secrets: Master Pie Techniques Revealed
Creating a perfectly layered Peanut Butter Cup Pie is all about temperature control and timing.
Always chill your bowls and cream before whipping to get light, airy, and stable peaks.
Melt chocolate gently at low power in the microwave or over a double boiler to avoid seizing.
When spreading the peanut butter filling, use a spatula in gentle, even strokes to prevent disturbing the candy layer underneath.
Finally, slicing works best with a warm knife; run the blade under hot water, wipe, and then cut for perfectly neat pieces.
Serving Suggestions: Delicious Ways to Enjoy
This pie shines as a centerpiece dessert for gatherings, birthdays, or cozy family dinners.
Serve chilled, with a dollop of extra chocolate whipped cream or a sprinkle of chopped peanuts on top for added crunch.
It pairs beautifully with coffee, milk, or a cold chocolate milkshake, enhancing the richness of the peanut butter and chocolate layers.
For a special touch, add fresh berries on the side to balance the sweetness with a subtle tartness.
Storage Tips: Keep Pie Fresh Longer
Store your pie in the refrigerator covered loosely with plastic wrap or in an airtight container to maintain freshness for up to 5 days.
For longer storage, you can freeze the fully assembled pie (without the whipped cream frosting) for up to 2 months.
Thaw overnight in the fridge before adding frosting and serving.
Avoid storing at room temperature for extended periods, as the creamy peanut butter layer can soften and lose structure.
Frequently Asked Questions
1. Can I make this pie ahead of time?
Yes! This pie is ideal for make-ahead preparation. Assemble it a day in advance, refrigerate, and it will be perfectly set by serving time.
2. Can I use crunchy peanut butter instead of creamy?
Absolutely. Crunchy peanut butter adds extra texture, but make sure to fully incorporate it when mixing with the cream cheese to avoid lumps.
3. Is it possible to make a nut-free version?
You can substitute sunflower seed butter for peanut butter and use allergen-free chocolate chips. The flavor will differ slightly but remain rich and creamy.
4. How do I avoid the ganache from hardening too much?
Pour the ganache while slightly warm, not hot. Let it chill just enough to firm but still allow the peanut butter filling to adhere smoothly on top.
5. Can I use a store-bought crust instead of wafer crust?
Yes, a pre-made graham cracker or cookie crust works. Adjust the baking time slightly if it’s already baked, and ensure it is firm enough to support the layers.