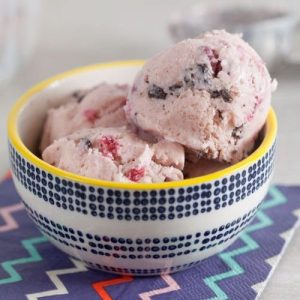
This Pomegranate-Dark Chocolate Ice Cream is a luscious fusion of rich, creamy indulgence and refreshing fruitiness.
Sweet-tart pomegranate arils blend beautifully with velvety dark chocolate, creating a flavor that’s both elegant and satisfying.
Made with antioxidant-rich pomegranates, heart-healthy dark chocolate, and calcium-packed dairy, this treat offers a lighter twist on traditional ice cream—perfect for an easy, make-ahead dessert that feels luxurious yet refreshingly wholesome.
Pomegranate Dark Chocolate Ice Cream
Equipment
- 1 medium saucepan
- 1 Zip-top bag
- 1-Rolling pin
- 1 Measuring cup set
- 1 Mixing Spoon
- 1 ice cream maker
- 1 freezer-safe container
Ingredients
- 1 cup pomegranate arils divided
- 2 cups heavy cream divided
- ¾ cup granulated sugar
- 1 cup skim milk
- 1 teaspoon vanilla extract
- 2 ounces dark chocolate finely chopped
Instructions
- Prepare equipment and ingredients: Before you begin, gather everything so the process is smooth. Make sure your ice-cream maker’s freezing bowl has been frozen if required by the manufacturer (many models need 12–24 hours). Line up a medium saucepan, a heatproof mixing bowl, a fine-mesh sieve (or small strainer), a zip-top bag, a rolling pin or heavy pan, measuring cups and spoons, a rubber spatula, a sharp knife and cutting board for the chocolate, and a freezer-safe container with a tight lid. Measure the pomegranate arils, heavy cream, sugar, skim milk, vanilla, and chocolate exactly as listed and place them within reach. Finely chopping the chocolate ahead of time (small, even pieces about ⅛–¼ inch) makes it sprinkle through the ice cream more evenly.
- Extract pomegranate juice carefully: Place ½ cup of the pomegranate arils into a small zip-top bag. Squeeze out most of the air and seal loosely so you can roll. Lay the bag on a towel to prevent slipping and roll over the arils with a rolling pin or the bottom of a heavy saucepan, pressing firmly but not violently — your aim is to bruise the arils and free their juice, not pulverize the seeds. After a minute of rolling you should see juice collecting. Position the bag over a small bowl or measuring cup and snip a tiny corner; press the bag gently from top to bottom and let the juice run out. For a clearer juice, hold the juice through a fine-mesh sieve so any pulp or seed fragments remain behind. Reserve the crushed arils’ liquid — you’ll add this to the dairy base in the next step.
- Warm cream and dissolve sugar: Pour 1 cup of the heavy cream into a medium saucepan and sprinkle the ¾ cup granulated sugar over it. Put the pan over the lowest heat setting and begin stirring with a heatproof spoon or spatula. The goal is gentle warming — not simmering or boiling. Keep stirring and heating until the sugar has fully dissolved and the mixture is smooth and glossy; you should not feel any graininess when you rub a drop between your fingers. This usually takes 3–5 minutes on low heat. Watch closely and stir the bottom so nothing scorches. Once the sugar is fully dissolved, immediately remove the pan from heat.
- Combine remaining dairy and pomegranate juice: With the sugar cream removed from the burner, add the remaining 1 cup heavy cream, the 1 cup skim milk, and 1 teaspoon vanilla extract to the warm mixture. Stir vigorously until the liquids are homogeneous. Now pour the strained pomegranate juice (from step 2) into the warm cream mixture in a slow, steady stream while whisking — this helps distribute the fruit flavor without shocking the liquids. Taste briefly the mix should be pleasingly sweet and fruity (remember it will taste slightly milder after chilling and freezing). Don’t over-sweeten here; the texture will also change with cold.
- Cool and chill the ice-cream base thoroughly: For a smooth churn and better final texture, the dairy base must be thoroughly chilled. To speed cooling, set the saucepan in a larger bowl filled with ice water (an ice bath) and stir the mixture frequently until it reaches room temperature (about 10 minutes). Then transfer the base into a covered bowl or container, press plastic wrap directly on the surface to prevent a skin, and refrigerate until fully cold — at least 3–4 hours, but ideally overnight. Cold base churns faster and incorporates air more stably; if you try to churn warm mix you’ll end up with a watery or icy texture.
- Set up and prepare your ice-cream maker: Follow your ice-cream maker manual for assembly. If your machine uses a frozen bowl, make sure it has been in the freezer the recommended time and that it is completely frozen solid. Place the machine on a level surface with a towel underneath to catch any condensation. Position your freezer-safe container and spatula nearby so you can transfer the churned ice cream promptly. Keep the remaining ½ cup pomegranate arils and the chopped dark chocolate handy in a small bowl for quick addition.
- Churn the cold base until soft-set: Pour the thoroughly chilled base into the ice-cream maker and start the machine. Churning time varies by machine, but expect roughly 20–30 minutes. Watch for visual cues the mixture will thicken, cling to the dasher, and increase slightly in volume; it should resemble a dense soft-serve when ready — thick enough to hold a loose peak but still pourable. Avoid letting the machine run excessively long past the soft-set stage; over-churning can make the texture too dense or even greasy.
- Add pomegranate arils and chocolate at the right moment: When the ice cream is nearly at soft-serve consistency — usually in the final 2–3 minutes of churning — add the reserved ½ cup whole pomegranate arils and the finely chopped 2 ounces dark chocolate. If your machine allows, add them through the feed hole so they distribute evenly; if not, stop the churn briefly and sprinkle them in, then restart for a short final pulse. Alternatively, you can remove the soft-set ice cream and fold the arils and chocolate in by hand with a spatula gently fold 8–12 times to disperse the mix-ins without crushing the arils. This preserves their juicy burst and prevents the chocolate from clumping.
- Pack, seal, and prevent ice crystals: Immediately transfer the finished ice cream into your prepared freezer-safe container. Use a spatula to press the mixture down, eliminating large air pockets, and smooth the top flat. Press a piece of parchment or plastic wrap directly onto the surface of the ice cream — this contact layer prevents ice crystals from forming while freezing. Close the lid tightly or cover with an additional layer of foil. Label with the date if you like.
- Firm up in the freezer and ideal serving technique: Place the container in the coldest part of your freezer and allow the ice cream to firm for at least 3–4 hours for scoopable texture; for the firmest result leave it overnight. When you’re ready to serve, remove the container and let it sit at room temperature for 4–6 minutes to soften slightly — this makes scooping cleaner and brings out the flavors. For perfectly rounded scoops, dip your ice-cream scoop in hot water and shake off excess before scooping.
- Cleanup, storage, and brief troubleshooting: After use, disassemble and wash the ice-cream maker bowl and dasher according to the manufacturer’s instructions; most removable parts wash well in warm, soapy water. Store leftover ice cream in the freezer for up to two weeks for best quality — keep it airtight to avoid freezer-burn. If the ice cream becomes overly hard, let it thaw in the refrigerator for 20–30 minutes or at room temperature for 5–10 minutes before serving. If the finished ice cream is too icy, the likely causes are insufficient chilling before churning or freezer temperature too warm; next time chill the base longer and ensure the freezer is set cold.
Notes
- Use ripe, fresh pomegranate arils for the best flavor; if unavailable, frozen arils work well after thawing.
- Finely chop dark chocolate so it incorporates evenly and melts slightly in the churn for a smooth texture.
- Chill the base mixture thoroughly before churning — this improves texture and speeds up freezing.
- Avoid over-churning to maintain a creamy, airy texture instead of dense ice crystals.
- For richer flavor, you can substitute part of the skim milk with full-fat milk or half-and-half.
Chef’s Secrets: Perfect Ice Cream Techniques
Achieving the perfect texture and flavor starts with preparation.
Fully chilling your base ensures the churned ice cream freezes evenly and creates a velvety texture.
When adding mix-ins like pomegranate arils and chocolate, timing is crucial — adding them at the last stage of churning preserves their texture and prevents overmixing.
For even flavor distribution, crush arils gently rather than pulverizing, so the juice enhances the dairy base without making it overly watery.
Using high-quality dark chocolate with a cocoa content of at least 70% boosts depth of flavor while adding antioxidants and beneficial minerals.
Serving Suggestions: Delicious Ways To Enjoy
Serve scoops of this Pomegranate-Dark Chocolate Ice Cream in chilled bowls for a refreshing treat.
It pairs wonderfully with fresh fruit like berries or sliced citrus for added brightness.
For a special touch, sprinkle crushed pistachios or coconut flakes on top for crunch.
This ice cream is also delicious served alongside a warm brownie, drizzled with honey, or paired with a crisp biscuit for contrast in texture.
For an elegant dessert, serve in martini glasses with a garnish of fresh pomegranate arils and a mint leaf.
Storage Tips: Keep Ice Cream Fresh
Store your ice cream in an airtight, freezer-safe container to prevent freezer burn and preserve flavor.
Press a sheet of parchment or plastic wrap directly on the surface before sealing to minimize ice crystal formation.
For the best texture, consume within two weeks of preparation.
If the ice cream becomes too firm, let it sit at room temperature for about 5–10 minutes before serving.
Avoid frequent thawing and refreezing, as temperature fluctuations degrade texture and flavor.
Frequently Asked Questions
1. Can I use frozen pomegranate arils?
Yes! Frozen pomegranate arils work perfectly — thaw them in the refrigerator before use. They may release slightly more juice when crushed, so adjust chilling time accordingly.
2. Can I make this recipe without an ice cream maker?
Absolutely. You can pour the chilled mixture into a freezer-safe container and stir every 30 minutes during the first few hours to break up ice crystals until the mixture firms. This creates a texture similar to churned ice cream.
3. How do I adjust sweetness if I prefer less sugar?
Reduce the sugar slightly — by about 2–3 tablespoons — without affecting texture significantly. Taste the base before chilling to adjust for your preference.
4. Can I substitute dairy for plant-based milk?
Yes. Full-fat coconut milk, almond milk, or oat milk work well, though texture and flavor will vary. Coconut milk adds richness, while oat milk gives a lighter, creamier taste.
5. How long will homemade ice cream last in the freezer?
For optimal flavor and texture, consume within two weeks. Store in the coldest part of your freezer and keep airtight to prevent freezer burn.