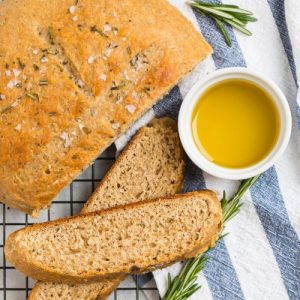
This rosemary olive oil bread is a wholesome twist on classic homemade loaves—soft inside, golden outside, and packed with flavor.
Made with a blend of whole wheat and all-purpose flour, it delivers plant-based protein, gut-friendly fiber, and healthy fats from extra virgin olive oil, all while staying low in saturated fat.
Easy to prepare, it’s a nourishing, everyday bread that’s perfect for dipping, pairing with meals, or prepping ahead.
Rosemary Olive Oil Bread
Equipment
- 1 large mixing bowl
- 1 Medium mixing bowl
- 1 stand mixer with dough hook (optional)
- 1 spatula or bench scraper
- 1 clean kitchen towel
- 1 Parchment Paper (sheet)
- 1 pizza stone or Dutch oven
- 1 instant-read thermometer (optional)
- 1 baking rack
Ingredients
- ¾ cup warm water 100–110°F
- 1 tablespoon honey
- 2 ¼ teaspoons active dry yeast 1 packet, ¼ ounce
- 4 tablespoons extra virgin olive oil divided
- 1 ¼ cups whole wheat flour
- 1 ¼ cups all-purpose flour plus extra for kneading
- 1 tablespoon vital wheat gluten optional
- 1 ½ tablespoons fresh rosemary finely chopped, divided
- 1 teaspoon kosher salt
- ¼ teaspoon garlic powder
- ¼ teaspoon dried oregano
- ¼ teaspoon dried basil
- ¼ teaspoon freshly ground black pepper
- Flaky sea salt for topping, e.g., Maldon or fleur de sel
Instructions
- Activate the Yeast: In a large mixing bowl—or the bowl of a stand mixer if you’re using one—combine the warm water (make sure it’s between 100°F and 110°F), honey, and the packet of yeast. Stir gently and let the mixture sit for about 10 minutes. During this time, the yeast should begin to foam and bubble on the surface, which means it’s alive and ready to work. If the mixture doesn’t look foamy, the yeast may be inactive or the water temperature was off. In that case, start over with fresh yeast, since the dough won’t rise properly otherwise.
- Enrich with Olive Oil: Once the yeast is bubbly and fragrant, stir in 3 tablespoons of extra virgin olive oil. This step not only gives the dough moisture and tenderness but also adds richness and depth of flavor that pairs beautifully with rosemary.
- Mix the Dry Ingredients: In a separate medium bowl, whisk together the whole wheat flour, all-purpose flour, and vital wheat gluten (if you are using it—it helps lighten the loaf but is optional). Next, add 1 tablespoon of the chopped rosemary, the kosher salt, garlic powder, oregano, basil, and freshly ground black pepper. Whisk until the herbs and seasonings are evenly distributed throughout the flour.
- Form the Dough: Add the dry ingredients into the bowl with the yeast mixture. Stir by hand using a wooden spoon or let the stand mixer run on low speed with the dough hook attachment until the mixture comes together into a rough, shaggy dough. If the dough feels too dry and crumbly, sprinkle in 1 tablespoon of water at a time, mixing thoroughly after each addition, until it forms a ball that holds together.
- Knead the Dough: Turn the dough out onto a lightly floured work surface. Knead it firmly with your hands for about 10 minutes, pressing it forward, folding it over, and rotating it as you go. If you’re using a stand mixer, knead with the dough hook on medium-low speed for about 8 minutes. The dough should feel soft, elastic, and slightly tacky to the touch, but not sticky enough to cling to your fingers. If it’s too sticky, add extra all-purpose flour 1 tablespoon at a time, kneading fully after each addition before deciding if more is needed.
- First Rise: Lightly grease a clean bowl with a little olive oil or nonstick spray. Place the kneaded dough inside, turning it once to coat all sides so it won’t dry out. Cover the bowl loosely with a clean kitchen towel or plastic wrap and set it in a warm, draft-free spot to rise. Allow it to rest until it doubles in size, which usually takes 1 to 2 hours depending on the room temperature. A slightly warm oven (turned off) or a microwave with the light on can make a cozy rising environment.
- Shape the Dough: Once the dough has puffed up to nearly double its original size, gently transfer it onto a sheet of lightly floured parchment paper. There’s no need to punch it down. Flour your hands lightly, then lift the top edge of the dough and fold it toward the center. Repeat with the bottom edge, then fold the left and right edges in as well, so you have a rough square.Using a bench scraper or your hands, carefully flip the dough over. Cup your palms around the sides and gently tuck the edges underneath to create a round, smooth ball. Place it seam-side down on the parchment paper.
- Second Rise: Cover the shaped dough ball with a clean towel and let it rise again in a warm place until it’s almost doubled in size. This second rise usually takes 1 to 2 hours. Be patient here—the longer the dough rests, the lighter and airier the bread will be once baked.
- Prepare the Oven: About 30 minutes before baking, place either a pizza stone or a Dutch oven inside your oven, then preheat the oven to 400°F (200°C). Preheating the baking surface is essential for developing a crisp, golden crust.
- Score the Bread: Once the dough has finished rising, use a sharp knife or a bread lame to cut a shallow “X” shape about ¼ inch deep on the top of the dough. This allows steam to escape while baking, preventing cracks and helping the loaf expand evenly.
- Bake the Bread: Carefully transfer the parchment paper with the dough onto the hot pizza stone or lower it gently into the preheated Dutch oven. Bake for 10 minutes, then remove the loaf from the oven. Brush the top with the remaining 1 tablespoon of olive oil, sprinkle over the rest of the chopped rosemary, and finish with a generous pinch of flaky sea salt. Return the bread to the oven and bake for another 10 to 15 minutes, or until the crust is golden brown and the internal temperature reaches 195°F on an instant-read thermometer. If you don’t have a thermometer, tap the bottom of the loaf—it should sound hollow when done. If the top begins to brown too quickly, tent it loosely with foil.
- Cool and Serve: Transfer the finished bread to a wire cooling rack and let it rest until it’s nearly at room temperature. Cooling allows the crumb to set properly and keeps the bread from becoming gummy when sliced. Once cooled, slice thick or thin depending on your preference, and serve with olive oil for dipping, alongside soups, or simply enjoy it warm on its own.
Notes
- Combines whole wheat and all-purpose flour for a loaf that is hearty yet soft.
- Extra virgin olive oil keeps the crumb tender while adding rich, heart-healthy fats.
- Fresh rosemary infuses the bread with aromatic, savory flavor.
- Optional vital wheat gluten boosts rise and creates a lighter, airier texture.
- Perfect for beginners and experienced bakers alike due to its straightforward method.
- Pairs well with soups, salads, sandwiches, or simply dipped in olive oil.
- Can be enjoyed fresh, toasted, or repurposed as croutons for added versatility.
- Easy to prep ahead of time, making it convenient for meal planning or entertaining.
Chef’s Secrets for Perfect Loaf
The secret to great homemade bread lies in patience and precision.
Make sure your water temperature is just right—lukewarm, not hot—so the yeast can activate properly without dying.
Kneading thoroughly is equally important, as it builds gluten that gives the bread its signature chew.
For extra flavor, let the dough rise slowly in a slightly cooler environment; this develops deeper, more complex notes.
If you have a Dutch oven, use it—it traps steam and creates a bakery-style crust.
Don’t skip scoring the dough either, since it allows the loaf to expand gracefully in the oven.
Serving Suggestions and Pairing Ideas
This bread is wonderfully versatile and can be enjoyed in many ways.
Serve it warm with a drizzle of extra virgin olive oil and a sprinkle of sea salt for a simple appetizer.
It pairs beautifully with hearty soups and stews, especially tomato-based or bean varieties, soaking up the broth without becoming soggy.
For a Mediterranean touch, slice it thin and use it as a base for bruschetta with fresh tomatoes and basil.
It also makes a lovely sandwich bread for roasted vegetables, grilled chicken, or mozzarella with pesto.
Even day-old slices can be toasted and served with butter or turned into croutons for salads.
Storage Tips for Maximum Freshness
Homemade bread tastes best on the day it’s baked, but you can easily store it for later.
Wrap the cooled loaf tightly in plastic wrap or place it in a resealable bag, then keep it at room temperature for up to 4 days.
Avoid refrigerating it, as the cold environment dries bread out quickly.
To revive leftover slices, toast them or warm them in a 300°F oven for 5 to 10 minutes.
For long-term storage, freeze the bread either whole or sliced.
If freezing slices, separate them with parchment paper so you can reheat only what you need.
Frequently Asked Questions
1. Can I make this bread without vital wheat gluten?
Yes, you can. The vital wheat gluten helps the whole wheat flour rise more effectively, resulting in a lighter texture, but the bread will still turn out delicious if you skip it.
2. Can I use dried rosemary instead of fresh?
Fresh rosemary gives the best flavor and aroma, but dried rosemary works if that’s what you have. Use about one-third the amount since dried herbs are more concentrated.
3. What if I don’t have a Dutch oven?
A pizza stone or even a regular baking sheet works fine. Just make sure the oven is well preheated and use parchment paper to prevent sticking. A small pan of water on the oven floor can help mimic steam.
4. How do I know when the bread is fully baked?
The most reliable way is to use an instant-read thermometer—look for an internal temperature of 195°F. If you don’t have one, tap the bottom of the loaf; it should sound hollow when done.
5. Can I prepare the dough ahead of time?
Yes! You can refrigerate the dough after the first rise, tightly covered, for up to 24 hours. When ready to bake, let it come to room temperature, complete the shaping, and allow the second rise before baking.