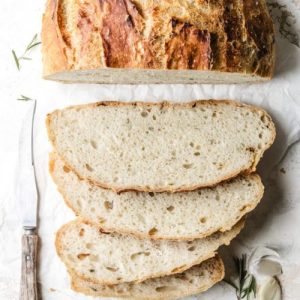
This no-knead Rosemary & Roasted Garlic Bread combines the rich aroma of roasted garlic with the earthy notes of fresh rosemary for a flavorful, wholesome loaf.
Packed with fiber from whole-grain flour and healthy fats from olive oil, it’s satisfying yet light.
Minimal hands-on time and simple ingredients make it perfect for everyday meals or easy meal prep.
Rosemary & Roasted Garlic Bread
Equipment
- 5.5–6 qt Dutch oven with lid
- Large Mixing Bowl
- Wooden spoon or dough whisk
- Parchment Paper
- Sharp Knife
- Small pot or aluminum foil for roasting garlic
- Oven Mitts
- Wire cooling rack
Ingredients
Roasted Garlic:
- 1 small garlic bulb whole
- 1 sprig fresh rosemary
- 1 pinch kosher salt
- 1 drizzle olive oil
Bread Dough:
- 520 g bread flour plus extra for dusting
- 2 tsp kosher salt
- 2 tbsp fresh rosemary chopped
- 7 g active dry yeast 1 packet
- 2 cups warm water 90–105°F / 30–40°C
Instructions
- Prepare the Oven and Garlic: Preheat your oven to 400°F (205°C) to begin roasting the garlic. Remove a few of the outer papery layers from a small garlic bulb, keeping it intact. Slice about ½ inch off the top of the bulb to expose the cloves. Place the garlic cut-side up on a small pot with a lid or wrap in aluminum foil. Drizzle with olive oil, add a pinch of kosher salt, and place a sprig of fresh rosemary on top. Cover loosely and roast for approximately 45 minutes, until the cloves are soft, golden, and fragrant. Allow the garlic to cool completely before handling.
- Mash the Roasted Garlic: Once cooled, remove the cloves from their skins and place them in a small bowl. Mash the garlic into a smooth paste using a fork or spoon. You should have approximately 8–10 cloves. Set aside for mixing into the dough later.
- Mix Dry Ingredients: In a large mixing bowl, combine 520 grams of bread flour, 2 teaspoons of kosher salt, and 2 tablespoons of chopped fresh rosemary. Whisk thoroughly to distribute the salt and rosemary evenly. Sprinkle 7 grams (1 packet) of active dry yeast over the mixture. This forms the base for your bread dough.
- Combine Wet Ingredients with Garlic: Measure 2 cups of warm water (90–105°F / 30–40°C) into a separate bowl. Stir the mashed roasted garlic into the warm water until fully combined. Slowly pour this mixture over the dry ingredients in the large bowl.
- Form the Sticky Dough: Using a wooden spoon or dough whisk, gently mix the ingredients together until no streaks of flour remain. The dough will be wet and sticky—this is normal for a no-knead bread. Avoid adding extra flour, as the high hydration contributes to a tender, airy crumb.
- Initial Room-Temperature Rest: Cover the bowl tightly with plastic wrap. Let the dough rest at room temperature for 2 hours. During this period, the yeast activates, and the dough begins to rise, forming bubbles that indicate proper fermentation.
- Refrigerated Flavor Development: After the initial rise, place the bowl in the refrigerator. Allow the dough to rest for a minimum of 1 hour and up to 5 days. The longer resting period enhances the flavor and texture, while also offering flexible timing for meal preparation.
- Preheat for Baking: Approximately 45 minutes before baking, preheat your oven to 425°F (220°C). Place your 5.5–6 qt Dutch oven with its lid inside the oven to heat thoroughly. Preheating the Dutch oven ensures even heat distribution and promotes a crisp, golden crust.
- Shape the Dough: Remove the dough from the refrigerator. Lightly dust your countertop with flour and transfer the dough. With floured hands, gently shape it into a smooth ball, tucking the edges underneath until the top is round and taut. Pinch any seams on the bottom to seal.
- Prepare for Proofing Before Baking: Place the shaped dough seam-side down on a sheet of lightly floured parchment paper. Lift the dough with the parchment and place it into a bowl roughly the size of your Dutch oven. Cover with a clean kitchen towel and let it rest for 45 minutes while the oven and Dutch oven finish preheating. The dough should puff slightly during this time.
- Transfer to Dutch Oven: Carefully remove the preheated Dutch oven from the oven using oven mitts. Lift the dough with the parchment and lower it gently into the hot Dutch oven. Using a sharp knife, make 2–3 shallow slashes across the top of the dough to allow steam to escape and control expansion.
- Bake with Lid On: Cover the Dutch oven with its lid and bake for 40 minutes. This initial covered baking phase traps steam, helping to create a crisp crust while keeping the interior soft and moist.
- Bake with Lid Off: After 40 minutes, carefully remove the lid and continue baking for an additional 15–20 minutes. The crust will develop a deep golden-brown color, and the aroma of roasted garlic and rosemary will fill your kitchen.
- Cool Completely Before Slicing: Remove the bread from the Dutch oven using the parchment paper. Transfer to a wire cooling rack and allow it to cool completely for at least 1 hour. Cooling ensures the interior sets properly; slicing too early may result in a gummy texture. Once cooled, slice with a sharp bread knife and enjoy.
Notes
- Use a kitchen scale for accuracy when measuring flour; this ensures consistent texture.
- Make sure the water is warm, not hot, to activate the yeast without killing it.
- Roasting garlic slowly brings out its natural sweetness and mellows the sharp flavor.
- Lightly flour your hands and surface when shaping the dough to prevent sticking but avoid over-flouring, which can make the crust dry.
- The dough is intentionally wet and sticky; resist the urge to add extra flour. This helps create an airy, tender crumb.
- For a more pronounced rosemary flavor, add an extra teaspoon to the dough or sprinkle lightly on top before baking.
Chef’s Secrets: Insider Tips For Baking
For the most flavorful loaf, allow the dough to rest in the refrigerator for several hours or even overnight.
This slow fermentation develops deeper flavor and improves the crumb structure.
Using a Dutch oven traps steam, creating a crisp, golden crust while keeping the interior soft and moist.
Preheating the Dutch oven ensures even heat distribution and a beautiful oven spring.
When slashing the dough before baking, make shallow cuts to control expansion while enhancing the rustic appearance.
Additionally, freshly chopped rosemary and roasted garlic elevate the aroma and make this bread irresistibly aromatic.
Serving Suggestions: Delicious Ways To Enjoy
This rosemary and roasted garlic bread pairs beautifully with soups, stews, and fresh salads.
Slice and toast for a savory breakfast topped with avocado, a drizzle of olive oil, or a sprinkle of sea salt.
It also works wonderfully as a side for roasted vegetables or grilled proteins.
For entertaining, serve warm slices with flavored butters, herb-infused olive oil, or a soft cheese spread.
The robust flavor of the bread complements both casual meals and more elegant dinner spreads.
Storage Tips: Keep Bread Fresh Longer
Store your cooled bread in a freezer-safe bag for up to 3 months.
Whole loaves can be refreshed in a preheated 375°F (190°C) oven for 10–12 minutes to restore crustiness.
Pre-sliced pieces toast well directly from the freezer, making this bread an excellent option for meal prep or last-minute snacks.
Avoid storing bread at room temperature in plastic for more than a day, as it may become soggy.
If keeping on the counter, wrap the loaf loosely in a clean kitchen towel to maintain crust texture while preserving freshness.
Frequently Asked Questions
1. Can I use whole wheat flour instead?
Yes, you can substitute up to half of the bread flour with whole wheat flour. Expect a slightly denser texture and nuttier flavor. Adjust hydration if the dough feels too stiff, as whole wheat absorbs more water.
2. How do I know the bread is fully baked?
The loaf is done when it has a deep golden-brown crust and sounds hollow when tapped on the bottom. Internal temperature should be about 200°F (93°C) if using a digital thermometer.
3. Can I skip roasting the garlic?
While you can add raw garlic, roasting mellows its sharpness and brings out natural sweetness, giving the bread a richer, more complex flavor. Roasted garlic is highly recommended for the best result.
4. How long can I proof the dough in the fridge?
The dough can rest in the refrigerator for a minimum of 1 hour and up to 5 days. Longer resting improves flavor and texture but make sure it is tightly covered to prevent drying out.
5. Can I bake this bread without a Dutch oven?
Yes, you can bake on a preheated baking stone or heavy-duty sheet pan. Cover loosely with a metal bowl or aluminum foil for the first 30–40 minutes to trap steam, then remove to brown the crust.