This Rustic Sourdough Bread blends simplicity and flavor with only five wholesome ingredients.
Rich in fiber and naturally fermented, it supports digestion and delivers a satisfying, hearty crumb.
Low in saturated fat and made without artificial additives, it offers a nutritious, plant-forward option for everyday cooking.
Perfect for breakfasts, sandwiches, or meal prep, it fills your home with irresistible aroma.
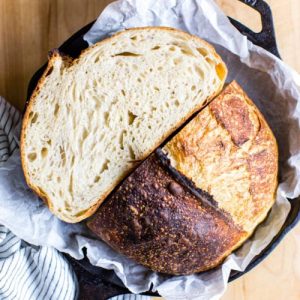
Rustic Sourdough Bread
Equipment
- 1 large mixing bowl
- 1 digital kitchen scale
- 1 bench scraper
- 1 damp tea towel
- 1 banneton or 9–10 inch bowl
- Parchment Paper
- 1 cast iron skillet or Dutch oven with lid
- Oven thermometer
- Measuring Cups and Spoons
Ingredients
- 100 g ½ cup active sourdough starter (100% hydration)
- 350 g 1½ cups + 1 tbsp water (80°F / 26°C)
- 40 g 2 tbsp maple syrup or honey
- 100 g ½ cup + 2 tbsp whole wheat flour
- 375 g 2½ cups + 1 tbsp unbleached bread flour
- 13 g 1½ tsp fine sea salt
Instructions
- Prepare Starter and Ingredients: Before starting, ensure your sourdough starter is active, bubbly, and fed within the last 4–6 hours. Gather all ingredients and measure precisely using a digital kitchen scale. Having your ingredients ready in advance helps ensure smooth mixing and fermentation. Also, preheat your kitchen to about 68–70°F if possible for optimal rising.
- Mix Wet Ingredients: In a large mixing bowl, add the sourdough starter. Pour in the lukewarm water (about 80°F / 26°C) and maple syrup (or honey). Using a whisk or fork, stir gently until the starter dissolves and the mixture is uniform. This step creates the base for the dough, ensuring the starter is evenly distributed.
- Incorporate Dry Ingredients: Add the whole wheat flour, bread flour, and sea salt to the wet mixture. Start mixing with a fork to break up clumps and incorporate the flours. Once it forms a rough mixture, switch to your hands. Knead lightly in the bowl for 3–4 minutes, folding and pressing the dough until no dry flour remains. The dough will initially appear shaggy and sticky—this is normal for high-hydration sourdough.
- Rest and Autolyse: Cover the bowl with a damp tea towel and let the dough rest for 45 minutes. This rest period, called autolyse, allows the flour to hydrate fully and the gluten structure to begin forming. Meanwhile, use this time to refresh your starter if needed for future baking.
- First Fold for Strength: After resting, perform the first fold. Wet your fingers to prevent sticking, then lift a section of the dough and fold it toward the center. Rotate the bowl slightly and repeat until you’ve folded all around the dough. This step strengthens gluten strands, improving texture and crumb structure.
- Additional Folds (Optional but Recommended): If time allows, repeat folding 1–2 more times, with approximately 45 minutes between each fold. Each fold develops the dough’s elasticity and structure. Cover with a damp cloth between folds to keep the surface moist and prevent skin formation.
- Bulk Fermentation (First Rise): After the last fold, cover the bowl with two damp towels or a bowl cover. Let the dough ferment at room temperature for 8–10 hours.In cooler kitchens, this can extend to 12–14 hours. You’ll know the dough is ready when it has visibly expanded, feels airy, jiggles slightly when nudged, and shows bubbles on the surface.
- Pre-shaping the Dough: Lightly flour your work surface and wet your fingertips. Gently transfer the dough onto the surface without deflating it. Pull one side of the dough toward the center and fold gently, repeating around the dough to form a loose shape. Let it rest uncovered for 15–20 minutes to relax the gluten before final shaping.
- Prepare Banneton or Bowl: Line a banneton with a flour sack or lightly dust it with rice flour to prevent sticking. If using a round bowl, follow the same process. Proper preparation here ensures the dough can rise without sticking and maintains its shape.
- Shaping the Dough: Flour the work surface lightly. Flip the dough seam-side up. Gently flatten it into a rectangle about 6–7 inches wide and 8–9 inches long. Fold one-third of the dough toward the center, crease firmly, then fold the bottom third up toward the crease, pinching the seam closed. Tuck the ends in, ensuring a taut surface. Carefully transfer the dough seam-side down into the prepared banneton.
- Proofing the Dough (Second Rise): Cover the banneton with a damp cloth. Let the dough rest for 30–45 minutes. The dough should become slightly puffy without doubling in size. This stage develops flavor and texture while preparing for oven spring.
- Preheat the Oven and Prepare Baking Vessel: Preheat your oven to 475°F (245°C). Place a sheet pan on the bottom rack to prevent the base from burning. Line parchment paper large enough for your loaf. Choose a baking vessel like a cast iron skillet with a lid or a Dutch oven for optimal crust development.
- Scoring the Loaf: Gently invert the banneton onto the parchment paper. Using a sharp lame or razor blade, score the dough about ½ inch deep in an arch or preferred pattern. This step allows controlled expansion during baking, creating a beautiful crust and signature artisan look.
- Baking the Bread: Place the dough inside the preheated vessel and cover. Bake at 475°F (245°C) for 30 minutes. Remove the lid, reduce temperature to 450°F (232°C), and bake for another 10–15 minutes. Watch for deep golden crust; tent with foil if browning too quickly.
- Cooling and Storing: Remove the loaf and transfer it to a wire rack to cool completely before slicing. Store at room temperature, cut side down, for up to 3–4 days. Freeze slices for up to two weeks, toasting directly from frozen for a crisp, fresh taste.
Notes
- Ensure your sourdough starter is active, bubbly, and fed recently for the best rise and flavor.
- Use a digital kitchen scale for accuracy; sourdough is sensitive to hydration levels.
- Hydration affects crumb texture — adjust water slightly if needed for consistency.
- Folding strengthens gluten and creates an open crumb; don’t skip folds if possible.
- Allow enough bulk fermentation time for flavor development; this stage is essential for texture.
Chef’s Secrets for Perfect Sourdough
The key to exceptional sourdough lies in patience and technique.
Using a fully active starter is crucial; it provides both flavor and lift.
Hydration level plays a vital role — higher hydration yields a more open crumb, while slightly less water makes shaping easier.
Folding the dough during bulk fermentation builds strength and improves structure.
For best results, ferment at a consistent temperature, ideally between 68–70°F, and resist the urge to rush the process.
Scoring the loaf right before baking is not only decorative but also functional, helping control expansion for a beautiful crust.
Serving Suggestions for Rustic Bread
This hearty sourdough is wonderfully versatile.
Enjoy it fresh with creamy butter and honey for breakfast or alongside soups and stews for a comforting meal.
It pairs beautifully with cheese boards, charcuterie, and fresh garden salads.
For sandwiches, its chewy texture and tangy flavor elevate any filling.
Toasted slices are perfect for avocado toast or as a base for open-faced sandwiches topped with seasonal ingredients.
Its aroma and flavor make it a standout centerpiece for brunch or a rustic meal.
Storage Tips for Fresh Bread
Sourdough bread is best enjoyed the day it’s baked, when crust is crisp and crumb is soft.
Store it at room temperature in a paper bag or bread box to maintain crustiness, ideally cut side down.
For longer storage, slice and freeze in airtight bags for up to two weeks.
To enjoy, remove slices directly from the freezer and toast for a warm, fresh taste.
Avoid storing bread in the refrigerator, as it accelerates staling.
Frequently Asked Questions
1. Can I make this bread without a sourdough starter?
Yes, but it will require a different method, such as yeast-based bread recipes. Sourdough’s unique flavor and texture come from natural fermentation, so the results will differ.
2. How do I know when my dough has fermented enough?
The dough should appear puffed, airy, and slightly jiggle when the bowl is moved. Bubbles on the surface and a doubling in size are key indicators.
Avoid relying solely on time — fermentation depends on temperature and starter activity.
3. What if my dough feels too sticky to shape?
A high-hydration dough will feel sticky. Lightly flour your hands and work surface, but avoid over-flouring as it alters texture. Slightly damp fingertips also help prevent sticking while shaping.
4. Can I use a different flour instead of whole wheat or bread flour?
You can experiment, but substitutions will change the texture, hydration, and flavor.
Whole wheat adds depth and nutrition, while bread flour provides structure. All-purpose flour can work but may yield a softer crumb.
5. How should I score my bread for baking?
Scoring is both practical and decorative. Use a razor blade or lame to make quick, shallow cuts about ½ inch deep.
Scoring helps control the loaf’s expansion and creates an artisan appearance. Choose a pattern you enjoy, whether a simple slash or a decorative design.