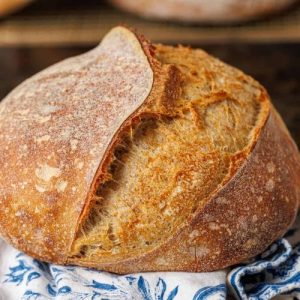
This artisan sourdough bread recipe delivers a perfect balance of crusty exterior and tender, flavorful crumb.
Rich in whole-grain fiber and naturally fermented for optimal digestion, it offers plant-based protein and essential nutrients with minimal saturated fat.
Easy to adapt to your schedule with a flexible fermentation process, it’s an ideal choice for wholesome everyday baking that’s both satisfying and nourishing.
Homemade Sourdough Bread
Equipment
- 1 large mixing bowl
- Kitchen scale
- Wooden spoon
- Clean kitchen towel
- Banneton (bread basket)
- Parchment Paper
- Dutch oven or combo cooker
- Bread lame or sharp knife
- Oven Mitts
Ingredients
- 400 g bread flour or all-purpose flour
- 55 g rye flour or whole wheat/bread flour
- 10 g fine sea salt
- 345 g filtered lukewarm water up to 85˚F
- 100 g active sourdough starter
- Rice flour optional, for dusting banneton
Instructions
- Prepare Your Sourdough Starter: Begin by feeding your sourdough starter to ensure it is active, bubbly, and ready for baking. Depending on the health of your starter, feed it once or twice before beginning. For one loaf, weigh 50 g of starter and add 50 g of bread flour along with 50 g of lukewarm water (around 85˚F). Stir gently until combined. Cover loosely with a lid or kitchen cloth and let rest at room temperature for 4–6 hours until doubled in size and filled with bubbles. This step is essential to ensure a strong rise and rich flavor in your bread.
- Mix the Dry Ingredients: In a large mixing bowl, combine 400 g of bread flour and 55 g of rye flour. Add 10 g of fine sea salt and whisk the dry ingredients together to ensure even distribution. This process helps incorporate the salt evenly into the flour and prevents direct contact with the starter, which could hinder fermentation. A well-mixed base ensures consistent texture and flavor in the finished loaf.
- Combine Starter and Water: Add 345 g of filtered lukewarm water to the dry flour mixture, followed by the active sourdough starter. Using a wooden spoon, stir gently until a rough, shaggy dough forms. Switch to your hands and pinch the dough together, ensuring all flour is hydrated. The dough should feel tacky and soft — this is normal and necessary for a moist crumb. Scrape down the sides of the bowl with a spatula to collect all ingredients. Cover the bowl loosely before moving to the next step.
- Bulk Fermentation and Stretch & Fold: Cover your bowl with a clean kitchen towel and allow the dough to rest in a warm spot for about 4 hours. During this period, perform a “stretch and fold” every hour. Wet your hands slightly to prevent sticking, lift one side of the dough upward without tearing, then fold it over onto itself. Rotate the bowl a quarter turn and repeat this process three more times. This strengthens the gluten network and develops texture. Keep the dough covered between folds to avoid drying. After the fourth fold, the dough should feel tight and elastic.
- Shape the Loaf: Turn the dough out onto a lightly floured surface. If you are making two loaves, divide the dough evenly. With lightly floured hands, gently stretch the dough to form the shape of your banneton or bread basket — round or oval. For a round loaf, fold the sides inward toward the center; for an oval loaf, alternate folding the sides inward and rolling the dough from top to bottom. Handle the dough gently to preserve air pockets and maintain texture.
- Bench Rest: Place the shaped dough seam-side down on the floured surface and cover with a clean kitchen towel. Let it rest for approximately 20 minutes. This bench rest allows the gluten to relax, making final shaping easier while ensuring the loaf maintains its structure during proofing.
- Tighten the Dough Shape: If the dough loosens during bench resting and loses its structure, reshape it gently. With lightly floured hands, cup the dough’s edges and tuck them underneath. Pull the dough in a circular motion toward you, tightening its surface. This creates tension in the loaf, helping it hold shape during proofing and baking.
- Cold Fermentation: Transfer the shaped dough seam-side up into a well-floured banneton or bread basket. Dust with rice flour or all-purpose flour to prevent sticking. Cover loosely with a kitchen towel and refrigerate for 8–48 hours. This slow, cold fermentation deepens flavor, improves crumb structure, and adds flexibility to your baking schedule.
- Preheat the Oven and Baking Vessel: About 30 minutes before baking, place your Dutch oven or combo cooker into the oven. Preheat the oven to 500˚F (260˚C). If using a pizza stone, position it on the bottom rack to protect the loaf’s base and encourage even baking. Preheating the baking vessel is crucial for producing a crisp, crackling crust.
- Score the Bread: Carefully turn the proofed dough out of the banneton onto parchment paper or a bread sling. Using a bread lame or sharp knife, score the loaf at a 45-degree angle, about 1/3–1/2 inch deep, forming a crescent or desired pattern. Scoring allows the bread to expand in a controlled manner and creates an artisan finish.
- Bake the Bread: Using oven mitts, place the dough (with parchment) into the preheated Dutch oven or combo cooker. Cover immediately to trap steam, then reduce oven temperature to 450˚F (232˚C). Bake for 20 minutes covered to allow the crust to develop, then remove the lid and bake an additional 20–25 minutes until the loaf is deep golden brown and sounds hollow when tapped.
- Cool Before Serving: Remove the loaf from the oven and transfer it to a wire cooling rack. Allow the bread to cool completely for at least 1 hour before slicing. Cooling ensures the crumb sets properly and enhances flavor. Once cooled, slice and enjoy your freshly baked artisan sourdough bread with your favorite accompaniments.
Notes
- Starter Feeding: Ensure your sourdough starter is active and bubbly before baking for the best rise and flavor. Feeding it once or twice before making the dough will produce optimal results.
- Flour Choice: Bread flour works best for structure and chew, but all-purpose flour can be used. Rye or whole wheat flour adds extra flavor and nutrition.
- Water Adjustment: Adjust water quantity based on climate — use slightly less water in humid environments and slightly more in dry ones to achieve a tacky but manageable dough.
- Proofing Time: Cold fermentation between 8–48 hours develops flavor complexity and improves texture. Longer fermentation yields tangier bread.
- Scoring Technique: Use a sharp bread lame or razor for cleaner cuts, which help control expansion and create a beautiful crust pattern.
Chef’s Secrets For Perfect Sourdough
The secret to exceptional sourdough lies in patience and technique.
First, focus on starter health — a lively starter produces superior rise and flavor.
Don’t rush bulk fermentation; allowing the dough to rest and develop over several hours improves gluten structure and crumb texture.
During shaping, gentle handling preserves air pockets, resulting in a lighter loaf.
Cold fermentation is another game changer — it deepens flavor and allows flexibility in baking schedules.
Finally, preheat your baking vessel thoroughly to ensure a crisp, crackling crust.
Serving Suggestions For Sourdough Bread
Fresh sourdough bread is versatile and complements many dishes.
Serve thick slices toasted with avocado and a sprinkle of sea salt for a nutritious breakfast.
Pair it with creamy soups or hearty stews for a satisfying lunch or dinner.
For a gourmet twist, enjoy it with soft cheeses, olive oil, and fresh herbs.
This bread also works wonderfully for sandwiches, bruschetta, or simply with butter and honey for a comforting snack.
Its rich flavor makes it equally enjoyable plain or paired with bold accompaniments.
Storage Tips To Keep Bread Fresh
Sourdough bread tastes best fresh but can be stored for later enjoyment.
Wrap completely cooled bread loosely in a clean kitchen towel or paper bag to preserve the crust while preventing excess moisture buildup.
Keep it at room temperature for up to 3 days.
For longer storage, slice and freeze the bread in airtight bags — slices can be toasted straight from the freezer.
Avoid storing bread in plastic without freezing, as this causes the crust to soften and the loaf to stale more quickly.
Frequently Asked Questions
1. Can I use all-purpose flour instead of bread flour?
Yes, all-purpose flour works, though bread flour is preferable for a chewier texture and stronger gluten development.
You can also experiment by substituting part of the bread flour with whole wheat or rye flour for added flavor and nutrition.
2. How do I know when my sourdough starter is ready?
A ready starter should be bubbly, active, and have doubled in size within 4–6 hours after feeding. It should have a pleasant, slightly tangy aroma. If it smells overly acidic or fails to rise, feed it again and wait before baking.
3. What if my dough feels too sticky?
A tacky dough is normal, but if it’s excessively sticky, add a light dusting of flour when shaping.
Avoid adding too much, as this can dry out the loaf. Overhydrated dough can also be managed through gentle folding during bulk fermentation.
4. Why is cold fermentation important?
Cold fermentation slows yeast activity, allowing enzymes and bacteria more time to develop flavors and improve texture.
This process makes the bread tangier, enhances crumb structure, and gives more flexibility in timing your bake.
5. How should I reheat sourdough bread?
Reheat slices in a toaster or oven to restore the crust’s crispness. For whole loaves, warm in a preheated oven at 350˚F (175˚C) for 10–15 minutes. Avoid microwaving bread, as it can make it chewy or soggy.