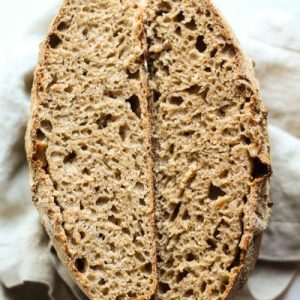
This wholesome Sourdough Honey Spelt Bread combines nutty spelt flour with natural honey for a lightly sweet, deeply flavorful loaf.
Packed with plant-based protein, fiber, and essential nutrients, it supports digestion and sustained energy.
With minimal saturated fat and no refined sugars, this versatile bread is perfect for everyday meals, breakfast, or meal prep, offering both taste and nutrition in each slice.
Sourdough Honey Spelt Bread
Equipment
- Large mixing bowl (1)
- Small mixing bowl (1)
- Wooden spoon or hand for mixing (1)
- Plastic wrap (for covering dough)
- Linen towels or couche (2)
- Cast iron skillet or oven-safe pan (1–2)
- Parchment paper (1 sheet)
- Sheet pan (1, optional for steam)
- Oven (preheated to 450°F / 232°C)
Ingredients
- 4 ½ cups + 1 Tbsp spelt flour 696 g
- 1 ¾ cups bread flour 232 g
- ½ cup + 1 Tbsp ripe sourdough starter 148 g
- 3 cups + 1 Tbsp water room temperature (668 g)
- 2 tsp sea salt 18 g
- 4 tsp honey or maple syrup 37 g
Instructions
- Preparing Your Sourdough Starter: Begin by ensuring your sourdough starter is active and ripe. About 8–10 hours before mixing your dough, feed your starter with equal parts flour and water. Allow it to bubble and rise at room temperature until it’s doubled in size and has a pleasant, tangy aroma. A ripe starter ensures your bread will rise beautifully and develop a complex, nutty flavor.
- Mixing Dry Ingredients: In a large mixing bowl, combine the spelt flour, bread flour, and salt. Whisk or gently stir them together to evenly distribute the salt and create a uniform base. This step ensures the salt does not come into direct contact with the starter, which could inhibit yeast activity.
- Combining Wet Ingredients: In a separate bowl, mix the room-temperature water with the honey or maple syrup. Stir until the sweetener is fully dissolved. The gentle sweetness not only balances the earthy spelt flavor but also feeds the natural yeast in the starter for better fermentation.
- Forming the Dough: Pour the water and honey mixture into the dry ingredients. Stir gently until a rough dough starts to form. Then add the ripe sourdough starter. Using your hands or a wooden spoon, mix until all ingredients come together into a sticky, cohesive dough. The dough will feel wetter and softer than typical wheat bread dough, which is normal for spelt.
- Optional Gluten Development: If you want a slightly more structured texture, knead the dough gently by hand for 2–3 minutes. Spelt gluten is more delicate than wheat, so avoid over-kneading, which can break down the structure and make the bread denser.
- First Folding and Bulk Fermentation: Scrape the dough from the sides of the bowl and fold it over itself. Perform a total of three folds at 30-minute intervals. Each fold helps build strength in the dough and encourages air pockets for a lighter crumb. After the last fold, cover the bowl tightly with plastic wrap and let it bulk ferment at room temperature for approximately 8 hours, until it has visibly expanded and is airy.
- Preparing for Shaping: Lightly flour your work surface to prevent sticking. Gently scrape the dough onto the counter. For two loaves, divide the dough evenly or as desired based on your pan size. Handle the dough carefully to retain the air bubbles formed during fermentation.
- Shaping the Loaves: Shape the dough into rounds or elongated loaf forms. Use gentle pressure to create tension on the dough surface, which helps with oven spring. Line your bannetons or bowls with lightly floured linen or tea towels to prevent sticking. Place the dough bottom-side-up and cover with plastic wrap or a clean, sanitary shower cap to avoid air exposure.
- Cold Fermentation (Second Proofing): Place the shaped dough in the refrigerator for approximately 12 hours. This slow, cold fermentation enhances flavor, deepens the color, and improves texture. If your fridge is colder than 37–38°F, the fermentation may slow; allow additional time at room temperature if necessary until the dough has nearly doubled in size.
- Preheating the Oven: About 45 minutes before baking, preheat your oven to 450°F (232°C). Place a sheet pan or oven-safe skillet on the bottom rack to heat; this will later be used for creating steam, which helps achieve a crisp, golden crust.
- Preparing for Baking: Remove the dough from the fridge and carefully peel off the plastic wrap. Cut a piece of parchment paper the size of the dough’s base and place it underneath. Use a pizza peel or cutting board to invert the dough gently into a cast iron skillet or oven-safe pan.
- Scoring the Loaves: Using a sharp knife or bread lame, score the top of the dough to control the direction of expansion. You can make one central slash with diagonal cuts along the sides or a plus-sign pattern with small diagonal lines in between. Scoring also enhances the artisan appearance of the loaf.
- Creating Steam for Crust: Immediately throw one cup of ice or a small amount of water onto the preheated pan on the bottom rack to generate steam. Close the oven door quickly to trap the moisture. Steam is crucial for a crisp crust and a light, airy interior.
- Baking the Bread: Bake the loaf for 35–45 minutes, until the crust is deep golden brown. If baking multiple loaves, either bake them separately or stagger them in the oven, keeping the other covered in the fridge until ready. To check doneness, carefully remove the loaf and tap the bottom; it should sound hollow.
- Cooling and Storing: Allow the bread to cool for 30 minutes to one hour before slicing. This rest period lets the crumb set and prevents the bread from becoming gummy. Once cooled completely, wrap the bread in plastic wrap to maintain freshness or slice and freeze portions for future use.
Notes
- Always use a ripe, active sourdough starter for the best rise and flavor. Feeding it 8–10 hours in advance ensures it’s bubbly and strong.
- Spelt flour absorbs water differently than regular wheat flour; the dough may feel wetter and stickier than expected. This is normal, so handle it gently.
- Folding the dough during bulk fermentation strengthens the gluten and promotes a light, airy crumb. Don’t skip this step.
- Use a digital kitchen scale for precise measurements—it makes a noticeable difference in texture and consistency.
- Cold fermentation in the fridge deepens flavor, improves the crust, and enhances digestibility. Adjust proofing times depending on your fridge temperature.
Chef’s Secrets: Enhancing Flavor And Texture
To achieve a deeply nutty flavor and perfect texture, always perform the folding technique during bulk fermentation.
This step develops the delicate spelt gluten without overworking it.
For a slightly sweeter aroma, allow the dough to ferment slightly longer at room temperature before refrigeration.
When scoring the loaf, use a sharp blade to make clean cuts, which guides expansion and creates an artisanal appearance.
Finally, steaming the oven during the first few minutes of baking ensures a crisp, golden crust while keeping the interior soft and tender.
Serving Suggestions: Enjoying Bread Everyday
This honey spelt sourdough pairs beautifully with both savory and sweet toppings.
Spread almond butter or avocado for a nutritious breakfast, or pair with cheeses, smoked salmon, or roasted vegetables for a satisfying lunch.
It also works perfectly as a sandwich base or lightly toasted for morning toast.
Its hearty texture makes it excellent for meal prep—slice and store in the fridge or freezer to enjoy throughout the week.
Storage Tips: Keeping Bread Fresh Longer
To maintain freshness, store the bread at room temperature in a loosely wrapped cloth or plastic wrap for up to three days.
For longer storage, slice and freeze in airtight bags; thaw slices at room temperature or toast directly from frozen.
Avoid refrigeration, which can dry out the bread and make it dense.
Always allow the bread to cool completely before wrapping, as trapping heat can create condensation and a soggy crust.
Frequently Asked Questions
1. Can I use all spelt flour instead of bread flour?
Yes, you can, but the texture may be slightly denser. Bread flour adds extra gluten for a lighter crumb, so combining both gives the best balance.
2. How do I know if my sourdough starter is ready?
A ripe starter will double in size, appear bubbly, and have a tangy, pleasant smell. Perform a float test by dropping a spoonful in water; it should float if ready.
3. Can I make this bread vegan?
Absolutely! Simply substitute honey with maple syrup or agave nectar. The flavor will remain rich, and the dough will ferment beautifully.
4. How long should I cool the bread before slicing?
Cool for at least 30–60 minutes to allow the crumb to set. Cutting too soon can result in a gummy texture.
5. Can I bake both loaves at the same time?
Yes, if your oven has space, but make sure they are not crowded. If using one cast iron skillet, bake each loaf separately and keep the other covered in the fridge until ready.