These zesty strawberry lemon bars are a delightful balance of sweet and tart, perfect for brightening any day.
Packed with fresh fruit, they provide natural vitamins and antioxidants while the buttery crust offers satisfying flavor with moderate healthy fats.
Easy to prepare and perfect for snacking, dessert, or meal prep, these bars combine freshness, fiber, and a touch of indulgence in every bite.
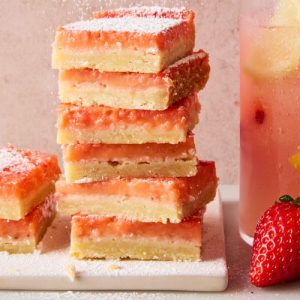
Refreshing Strawberry Lemonade Bars
Equipment
- 13" x 9" baking dish
- Parchment Paper
- Large Mixing Bowl
- Rubber spatula
- Food Processor
- Medium bowl or measuring cup
- Whisk
- Knife
Ingredients
Crust:
- ½ cup + 1 Tbsp 115 g granulated sugar
- 1 tsp finely grated lemon zest
- ¼ tsp kosher salt
- 2 ½ cups 300 g all-purpose flour
- 1 cup + 2 Tbsp 240 g unsalted butter, melted
- Cooking spray for greasing
Filling:
- 1 ½ cups 8 oz fresh strawberries, hulled
- 1 ½ cups 300 g granulated sugar
- 3 Tbsp cornstarch
- 1 Tbsp finely grated lemon zest
- 1 ½ cups fresh lemon juice from 8–12 lemons
- ½ tsp kosher salt
- 4 large eggs
- 3 large egg yolks
For Serving:
- Confectioners’ sugar for dusting
Instructions
- Prepare the Oven and Pan: Begin by arranging your oven rack in the center position and preheating the oven to 350°F (175°C). While the oven warms, lightly grease a 13" x 9" baking dish with cooking spray to ensure your bars don’t stick. Line the dish with parchment paper, leaving an overhang on two opposite long sides. This overhang will make lifting the baked bars out of the pan much easier later.
- Combine Sugar, Lemon, and Salt: In a large mixing bowl, combine 1/2 cup plus 1 tablespoon of granulated sugar, 1 teaspoon of finely grated lemon zest, and 1/4 teaspoon of kosher salt. Using clean fingers or a fork, gently rub these ingredients together for about 1 minute until fragrant. This step releases the natural oils from the lemon zest, enhancing the citrus flavor throughout the crust.
- Mix in Flour and Butter for Crust: Add 2 1/2 cups (300 g) of all-purpose flour to the sugar mixture. Pour in 1 cup plus 2 tablespoons (240 g) of melted unsalted butter. Using a rubber spatula, stir until the mixture starts coming together into a wet, crumbly dough. The dough should hold together when pressed but remain soft enough to spread evenly.
- Press Crust Into Pan: Transfer the dough into your prepared baking dish. Use clean fingertips or the back of a measuring cup to press the dough evenly across the bottom of the pan. Make sure the layer is uniform so the bars bake evenly. This even pressing ensures a golden, crisp crust without gaps or thin spots.
- Bake the Crust: Place the pan in the preheated oven and bake the crust for 20 to 25 minutes, or until it turns golden in the center. While the crust bakes, you can prepare the filling. Once done, remove the pan from the oven and allow the crust to cool for 20 minutes. After cooling, reduce the oven temperature to 325°F (165°C) in preparation for baking the filling.
- Process Strawberries for Filling: In a food processor, combine 1 1/2 cups (8 oz) fresh hulled strawberries, 1 1/2 cups (300 g) granulated sugar, 3 tablespoons cornstarch, 1 tablespoon finely grated lemon zest, 1 1/2 cups fresh lemon juice, and 1/2 teaspoon kosher salt. Process until the strawberries are completely broken down and the mixture is mostly smooth. A few small strawberry bits are fine—they add a natural texture to the filling.
- Whisk Eggs and Yolks: In a medium bowl or a large measuring cup, whisk together 4 large eggs and 3 large egg yolks until smooth and homogeneous. The eggs should be fully blended with no streaks of white or yolk remaining. This will ensure a consistent, silky texture in the filling.
- Combine Eggs with Strawberry Mixture: Add the whisked eggs and yolks to the strawberry mixture in the food processor. Process briefly until fully combined. The resulting mixture will be liquid but evenly blended. Pour this strawberry-egg mixture over the pre-baked crust in the baking dish. Be gentle to avoid disturbing the crust layer.
- Bake the Bars: Carefully transfer the baking dish to the oven. Bake at 325°F (165°C) for 30 to 40 minutes. The bars are done when the edges are set and the center is slightly jiggly—like a soft custard. Avoid overbaking, as this can dry out the filling.
- Cool Completely: Remove the pan from the oven and allow the bars to cool at room temperature. Cooling is crucial for the filling to fully set. This may take 1 to 2 hours, depending on your kitchen temperature. Once cooled, use a knife to loosen the bars from the short ends of the pan.
- Lift and Dust Bars: Using the parchment paper overhang, carefully lift the baked bars out of the pan and transfer them to a cutting board. Sift a light layer of confectioners’ sugar over the top of the bars for a beautiful, professional finish.
- Slice and Serve: Using a sharp knife, cut the bars into even squares—usually 12 to 16 depending on your preferred size. For clean edges, wipe the knife with a damp cloth between cuts. Serve immediately or store for later. These bars are perfect for dessert, snacks, or sharing at gatherings.
Notes
- Use ripe, sweet strawberries for the best flavor. Overly tart or underripe strawberries can affect the natural sweetness of the filling.
- Freshly squeezed lemon juice yields the brightest, most vibrant flavor. Bottled lemon juice may work in a pinch but will slightly reduce freshness.
- The crust can be made a day in advance and stored covered at room temperature to save prep time.
- For even bars, let the crust and filling cool completely before cutting. Wiping the knife between cuts ensures clean edges.
- Confectioners’ sugar dusting is optional but adds a lovely finishing touch and slight sweetness to balance the tart lemon.
Chef’s Secrets: Enhance Flavor and Texture
Achieving the perfect strawberry lemon bar comes down to technique and ingredient quality.
Gently rubbing the sugar with lemon zest before adding flour releases essential oils that heighten citrus aroma.
Using melted butter creates a buttery, tender crust that holds the filling well.
Avoid overprocessing the strawberries; leaving a few small chunks adds natural texture.
When baking, monitor the center carefully—the bars should be slightly jiggly for a creamy, custard-like finish after cooling.
Serving Suggestions: Creative Ways to Enjoy
These strawberry lemon bars are versatile and can be served in many delightful ways.
Dust with extra confectioners’ sugar for a classic presentation or drizzle with a light yogurt glaze for added tang.
Pair bars with fresh berries or a dollop of whipped cream for dessert.
For brunch or afternoon tea, serve alongside herbal tea, coffee, or a citrus spritzer.
They’re also perfect for picnic boxes, lunchboxes, or festive gatherings.
Storage Tips: Keep Bars Fresh Longer
To maintain freshness, store the bars in an airtight container at room temperature for up to 2 days.
For longer storage, refrigerate for up to 5 days—ensure they are covered to prevent drying.
These bars freeze beautifully: wrap tightly in plastic wrap and place in a freezer-safe container for up to 3 months.
Thaw in the refrigerator or at room temperature before serving, and lightly dust with confectioners’ sugar before cutting.
Frequently Asked Questions
1. Can I use frozen strawberries instead of fresh?
Yes, frozen strawberries can work, but thaw and drain them thoroughly before processing to avoid excess liquid, which can make the filling runny.
2. Can I make the crust ahead of time?
Absolutely! The crust can be baked a day in advance and stored in an airtight container at room temperature. This makes assembly faster and easier.
3. How do I know when the bars are fully baked?
The edges should be set, and the center should jiggle slightly, like a soft custard. Overbaking will result in a firmer, less creamy filling.
4. Can I substitute lemon juice or zest?
Fresh lemon juice and zest provide the best bright, tangy flavor. While bottled lemon juice can work, the flavor will be less vibrant.
Orange juice or lime zest can be experimented with for a twist, but the flavor profile will change.
5. How should I cut the bars for best results?
Cool the bars completely before cutting. Use a sharp knife and wipe between cuts for clean, neat squares. Cutting while warm may result in crumbling or uneven edges.